Printer Management
Key Concepts
Printer management is how you configure your physical printers so they can participate in Printago's automatic job matching and production system. Each printer needs three things to receive jobs: assigned materials (so the queue knows what filament is loaded), slicer profiles (so the cloud slicer can generate G-code for that machine), and printer-specific settings like bed type and AMS configuration. Once configured, a printer enters the queue's matching pool and can receive jobs automatically based on material compatibility and tag filters. Day-to-day operations center on marking printers as "clear and ready" after removing a completed print, swapping materials when needed, and monitoring status. The goal is to make each printer a self-sufficient worker in your production system—load filament, clear the bed, and let Printago handle job routing and slicing.
Required Configuration
For jobs to match with printers from the queue, each printer must be properly configured:
1. Material Assignment
- At least one material must be loaded and assigned to the Printer.
- Materials are assigned through the Material Assignment window
2. Slicer Profiles
- Machine Profile: Slicer setting from Bambu Studio or Orca (default or sync'd User Profile)
- Process Profile: Used as a fallback whenever a part does not specify a process profile.
3. Printer-Specific Settings
For Bambu Lab printers:
- Bed Type: Smooth PEI, Textured, etc.
- Use AMS: Controls whether the printer uses the AMS system. The Printers list only shows the active material source (AMS slots or external spool)
- Bed Leveling & Flow Calibration: Standard Bambu "start print" options
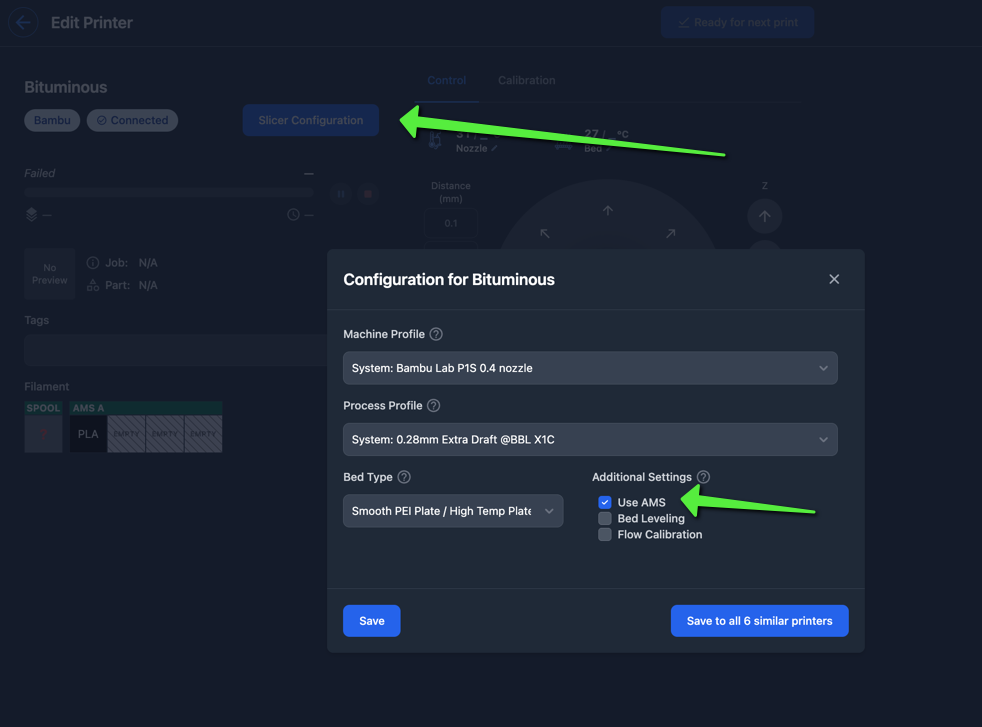
Slicer Configuration Dialog
The slicer configuration dialog (titled Configuration for [printer name]) is where you set the printer's Machine Profile, Process Profile, Bed Type, and Additional Settings such as Use AMS, Bed Leveling, Flow Calibration, and Enable Timelapse. Profile dropdowns are prefixed with System: or User: so you can tell built-in profiles from your own synced ones.
- Printer page: Click the "Slicer Configuration" button
- Dashboard: Click gear icon ⚙️ on any printer
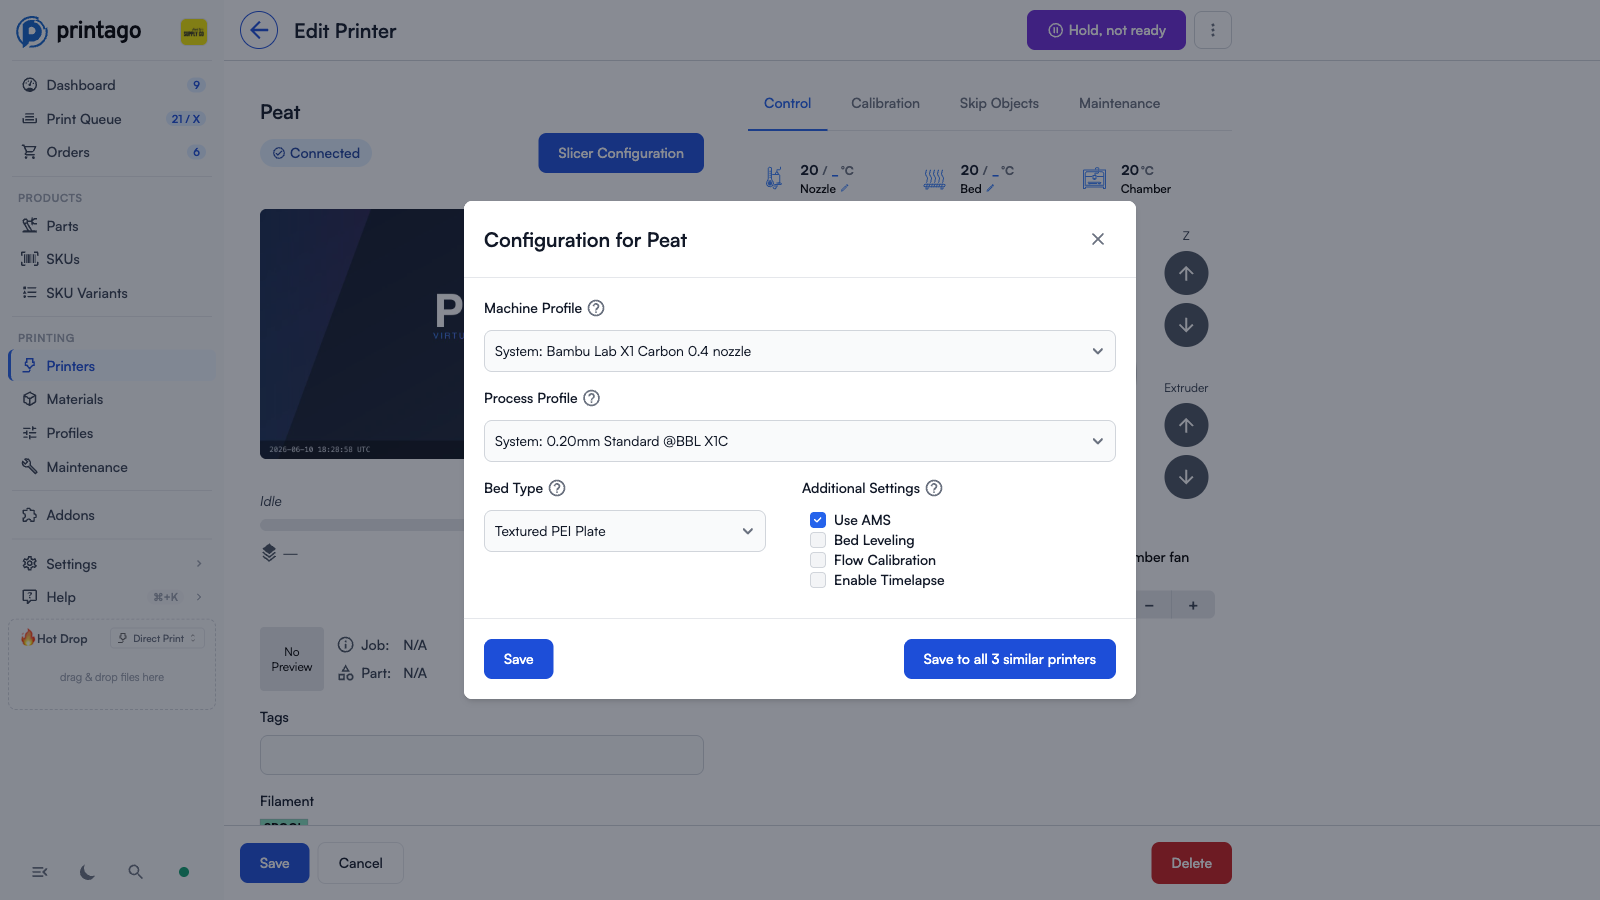
For multiple printers with identical model and nozzle configuration, click Save to all N similar printers in the configuration dialog.
Quick Select: In the Printers List, select one printer and press G to automatically select all printers with matching model and nozzle size.
Printers List
Navigate to Printing → Printers to view all printers with their current status and loaded materials. Click on any printer to go to its Printer page
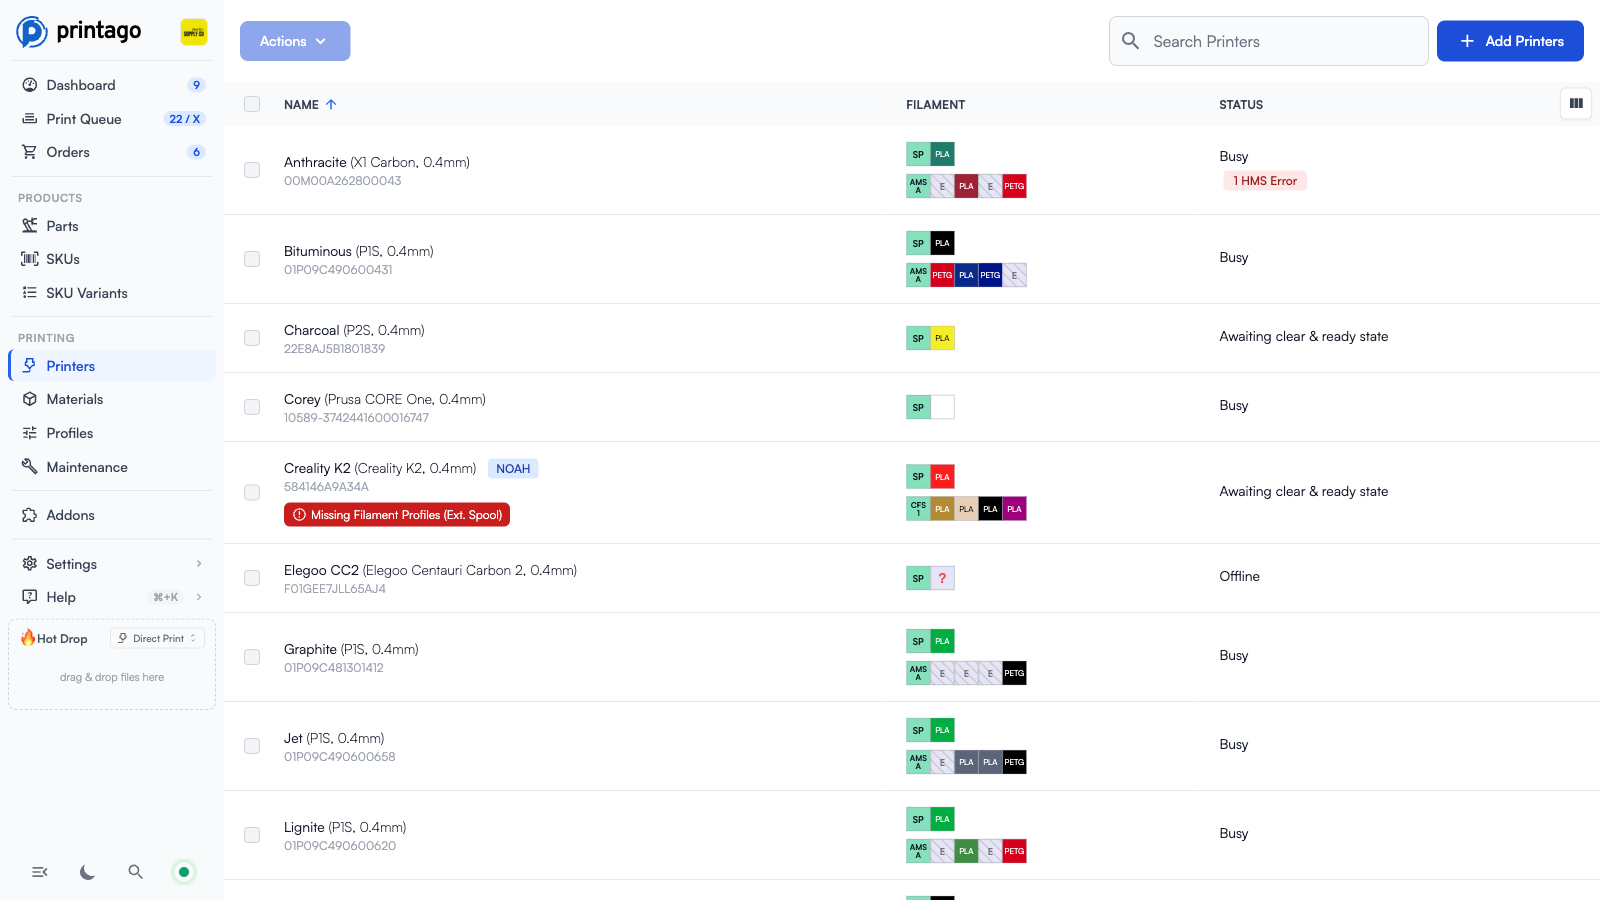
Display Information
- Name: Shows the printer's name, model, nozzle diameter, and serial number.
- Filament: Shows the external spool (SP) plus AMS/CFS slot chips when a multi-material unit is in use
- Status: Current state, such as
Busy,Ready,Offline,Awaiting clear & ready state, orNeeds configuration - Material Assignment: Click any filament slot to open the Printer Materials dialog
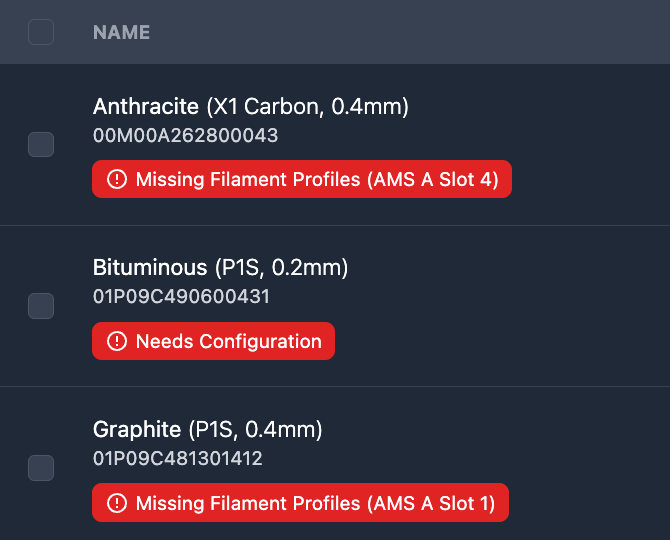
- Configuration Warnings: Alerts about issues that prevent the printer from accepting jobs (e.g.,
Missing Filament Profiles)
Use the Add Printers button to connect new printers, the search box to filter the list, and the column picker at the top right to configure which columns are shown.
Multi-Printer Actions
Select multiple printers using checkboxes to access bulk operations via the Actions menu.
Keyboard Shortcuts:
A- Toggle select all printers (press again to deselect all)G- Select all printers matching the first selected (same model/nozzle)R- Mark selected printers as ready (skips printers that are currently printing)
Available Actions:
- Availability: Mark ready (
R) or not-ready (U) - FabMatic: Enable/disable continuous printing
- Control Panel: Multi-printer control (
P) - Configure: Bulk slicer configuration (
C) - Materials: Bulk material assignment (
M) - Tags: Bulk tag editing (
T) - Temperature: Quick bed/nozzle temperature presets
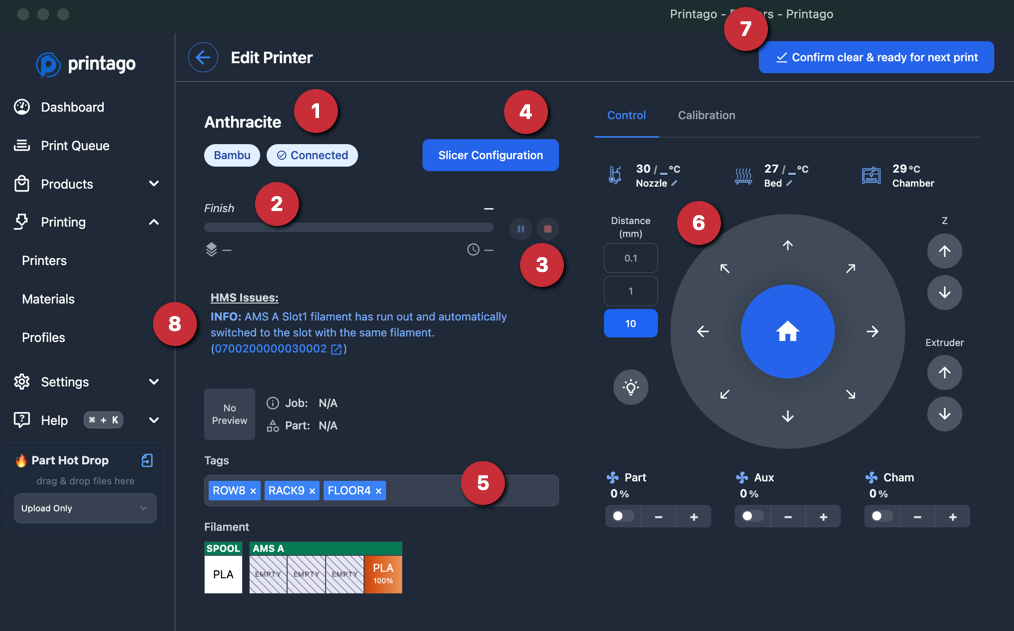
Printer Page
Each printer page displays:
- Printer Information: Name, type, connection status
- Current Job: Active print information
- Print Controls: Pause/Stop buttons
- Slicer Configuration: Access printer/process profiles, bed type, and print-start options
- Printer Tags: Dynamic grouping labels
- Control Panel: Manual printer control & calibration tools
- Ready Button: "Confirm clear & ready for next print" - let's Printago know this printer may accept a job.
- HMS Alerts: Displays any Health and Maintenance System (HMS) warnings or errors from Bambu Lab printers, with direct links to the relevant Bambu Lab Wiki articles for resolution.
Ready State Management
The Confirm clear & ready for next print button is critical for queue processing. Click after:
- Print completion
- Printer recovery from unknown state
- Printer comes online
- Manual bed clearing
Once a printer is confirmed ready, the same button shows Hold, not ready so you can take the printer back out of the matching pool without disconnecting it.
Alternatives:
- Multi-action from Printers page
- FabMatic mode for continuous operation
Material Assignment
Click any AMS slot or external spool to open the Printer Materials dialog (titled Printer Materials for [printer name]).
The same slot-based assignment applies beyond Bambu AMS. Multi-toolhead machines (Snapmaker U1, Prusa XL) show each toolhead as its own slot, and printers with auto-detected filament systems (Creality CFS, Elegoo's multi-color canvas) grow their slot count as units are attached.
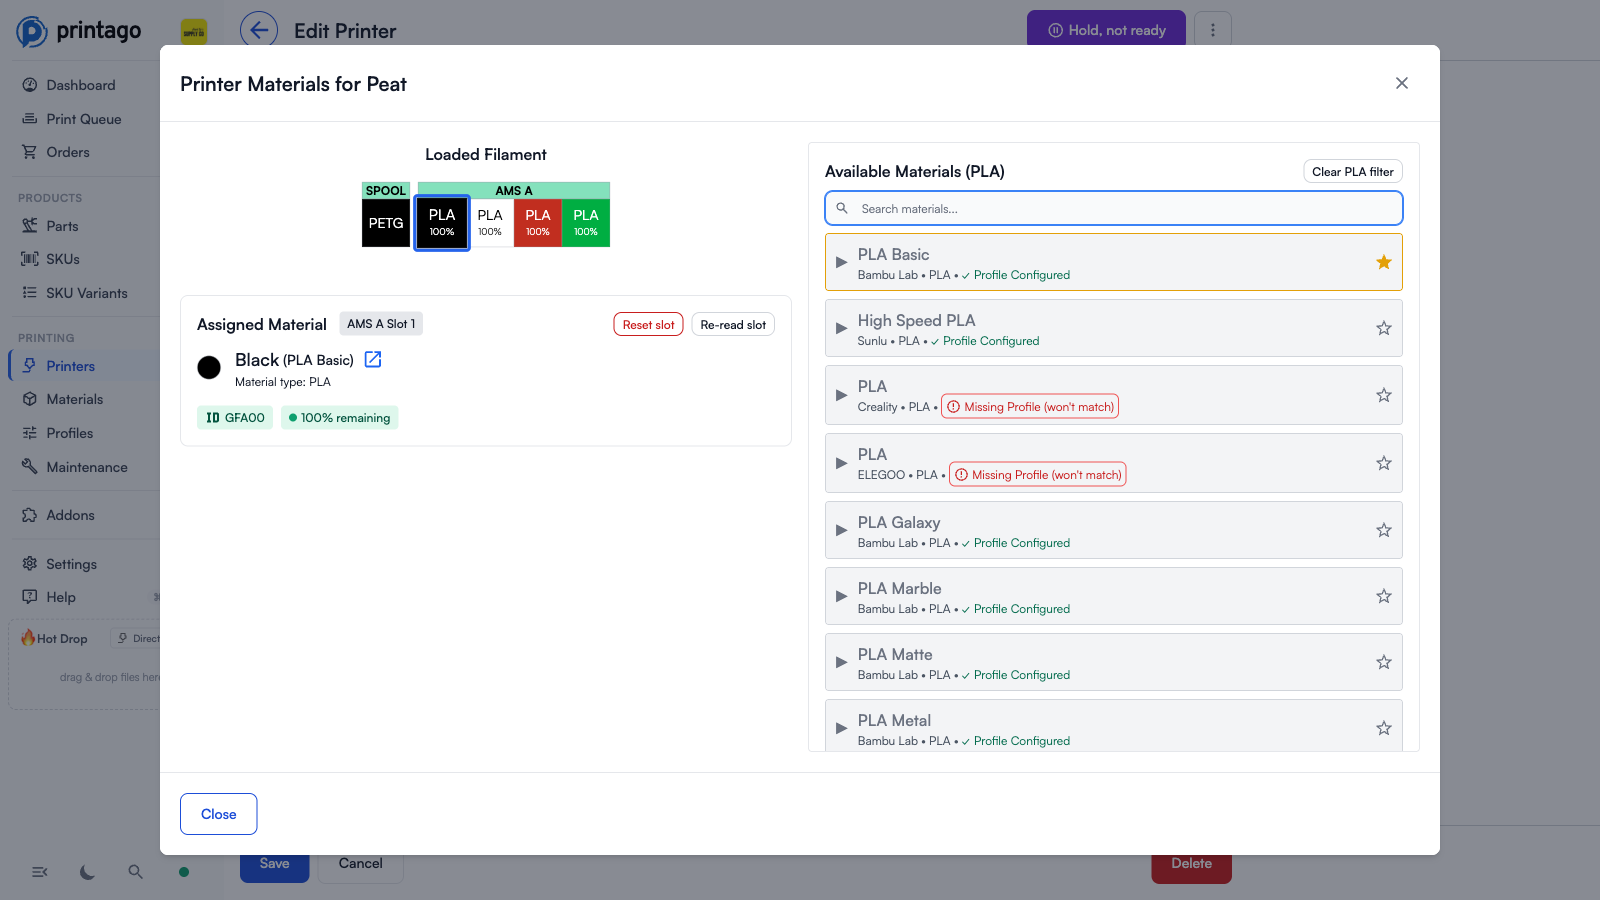
The dialog has three areas:
- Loaded Filament: A slot picker showing the external spool plus each AMS slot. Click a slot to view or change its assignment.
- Assigned Material: The material currently assigned to the selected slot, with Reset slot and Re-read slot buttons for clearing the assignment or re-reading the loaded filament.
- Available Materials: A searchable list of your material library, grouped by base material with expandable color variants. Materials with profiles set up for this printer show a
✓ Profile Configuredbadge; starred materials sort to the top.
How Material Assignment Works
The standard material assignment process:
- Click any slot: Select an AMS slot or external spool
- Choose material: Select from the Available Materials list and assign it to the slot
- Assignment options:
- Specific material (e.g., "Bambu Basic PLA - Black") - uses configured profiles (recommended)
- Generic type (e.g., "Any PLA") - prompts for inline slicing profile selection
While you can set a generic filament profile directly on the printer (bypassing Printago's material system), this isn't recommended. Here's why:
- Limited matching: Only parts set to
Any {Material-Type}will match (e.g. "Any PLA") - More specific Part settings won't match: If a part requires "Bambu TPU for AMS" specifically, it won't match a generic "Any TPU-AMS" assigned printer.
- Reduced flexibility: You lose the benefits of Printago's material management system
Bambu Lab RFID Enhancement
When using Bambu Lab RFID-tagged filament, the process is enhanced with automatic detection:
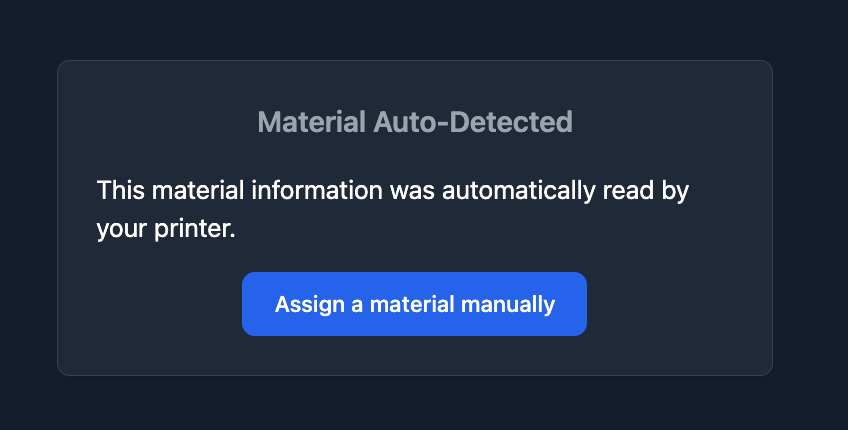
Automatic Material Detection
- Auto-reads: Printago automatically detects the material and color from the RFID tag
- Instant assignment: Material is assigned without manual selection
- Missing material workflow: Quick-add buttons appear for materials not in your library
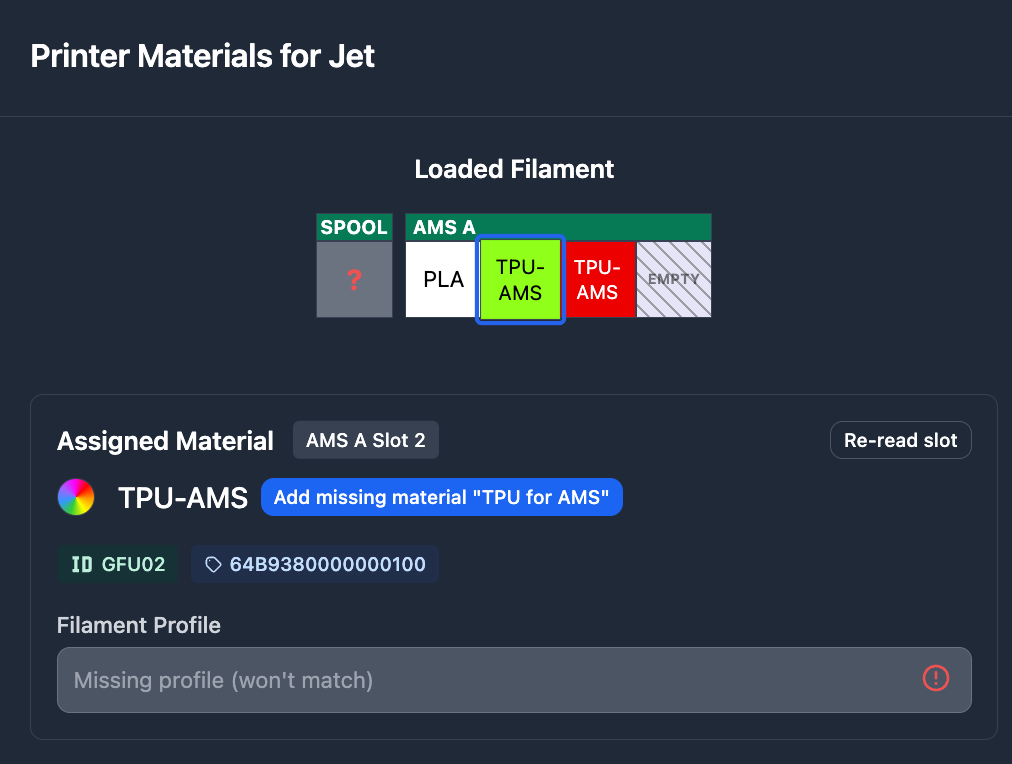
Missing Material Quick-Add
When RFID-tagged filament isn't in your library:
Step 1: Add Base Material
Click Add missing material for [Bambu] { MATERIAL-TYPE } to add the base material (e.g., "TPU for AMS").
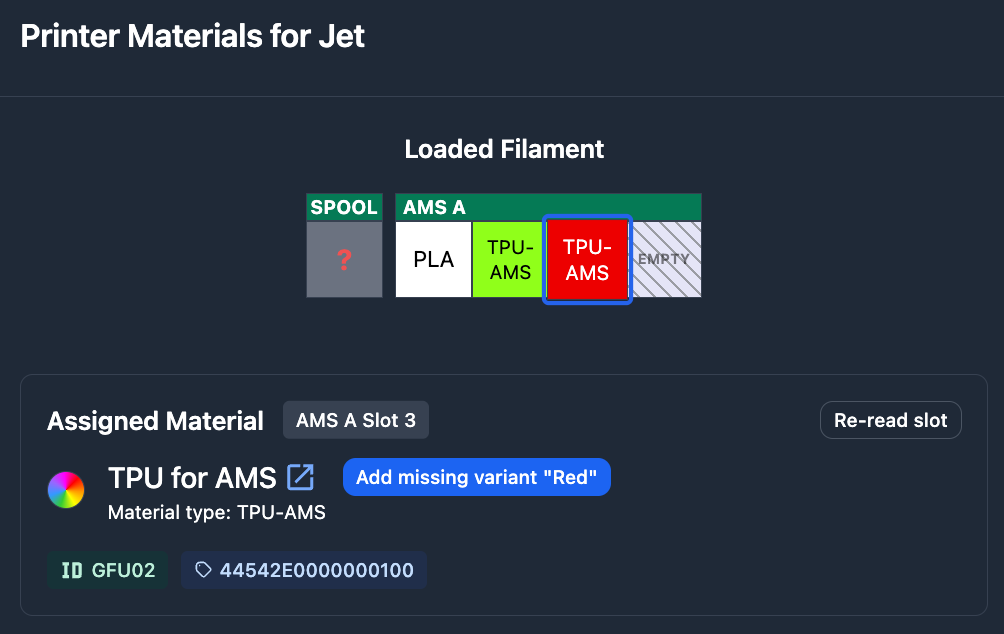
Step 2: Add Color Variant
Click Add missing variant "{ COLOR }". This opens a compact in-place form so you can confirm or rename the variant before it's created, so no more silent web-color guesses (like "Crimson") get baked into your library. The new variant is automatically assigned to the slot you were looking at.
Step 3: Configure Profiles Save the Printer, and go to the Materials page to set up slicing profiles for the Material.
RFID Override
To assign a different material than the RFID tag, click "Assign a material manually" to enable normal selection from your Material library.
- External spool material can be assigned without physical material loaded
- AMS slots require physical material to be loaded before assignment
- All Bambu Lab materials and variants are built into Printago for easy addition
Material Slicer Configuration Warning
When selecting materials for a printer, it's possible to assign a material which doesn't have a slicing profile assigned to it for the model of printer in question.
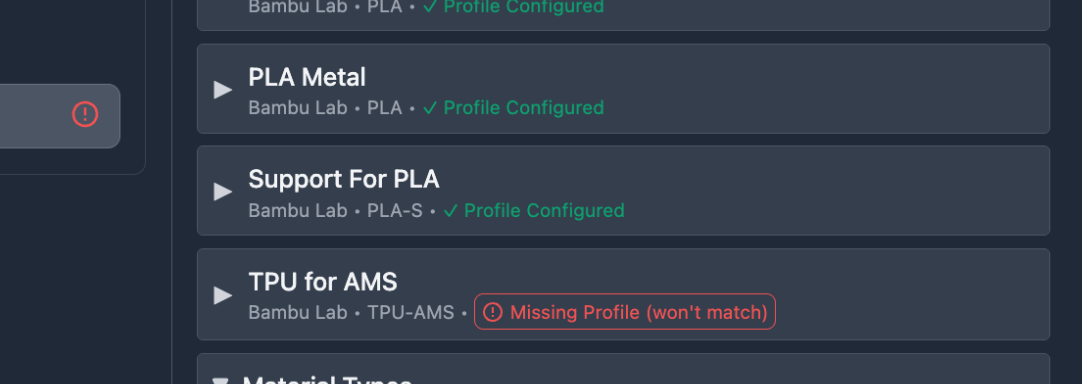
Materials tagged with Missing Profile (won't match) is letting you know that jobs will not be able to be assigned to this material in the printer until it's resolved. This commonly happens when switching nozzle sizes (e.g., from 0.4mm to 0.2mm) or adding new printer models without matching material profiles.
Resolution: Go to Materials page → Open material → Configure slicing profiles for each printer model + nozzle diameter combination
For detailed material management and profile configuration, see the Materials documentation.
AMS Configuration
The Use AMS checkbox in slicer configuration controls:
When Enabled:
- AMS slots visible in UI
- AMS information shown on printer lists
- Multi-slot material management
When Disabled:
- Only external spool holder available
- AMS hidden from interface
- Single material assignment
Related Documentation
- Printer Tags: Dynamic printer grouping and job routing
- Printer Control Panel: Manual printer operation and calibration
- Materials: Material library management and profiles
- Cloud Slicer: Understanding slicer profiles and settings
- FabMatic: Continuous printing automation
Need help with printer setup? Join our Discord community for support and latest updates!