Shopify Integration
Integrations require a Commercial subscription. Learn more
Key Concepts
The Shopify integration connects your Shopify storefront directly to Printago's production system so that incoming customer orders automatically generate print jobs. When a customer purchases a product, the integration syncs the order to Printago, matches the Shopify SKU to your Printago SKU definitions, and optionally queues the resulting jobs for production immediately.
The Printago Shopify app runs directly inside your Shopify Admin panel, giving you a Synced Orders dashboard to monitor order and job status, a Settings page to configure automation behavior, and a Production Status block on each order detail page to track print progress — all without leaving Shopify.
What You Get
- Real-time order sync from Shopify to Printago
- Manual backfill sync for historical orders with date range and fulfillment status filters
- Synced Orders dashboard with job progress tracking inside Shopify Admin
- Per-order Production Status block showing print completion
- Automatic queueing (optional) for new valid order items
- Progress tags written back to Shopify (optional)
- Auto-close behavior for synced orders (optional)
Before You Start
- You have access to a Printago account with Commercial features enabled
- You have admin access to your Shopify store
- Your Shopify SKUs are mapped to SKUs in Printago (exact SKU match or suffix match)
Connect Shopify to Printago
1. Install the Printago app in Shopify
In your Shopify Admin, install the Printago app from the Shopify App Store.
2. Connect from the Shopify app
Open the Printago app in your Shopify Admin. You'll see a welcome screen with a Connect to Printago button. Click it to begin the connection flow.
A popup window will open where you confirm the account binding in Printago:
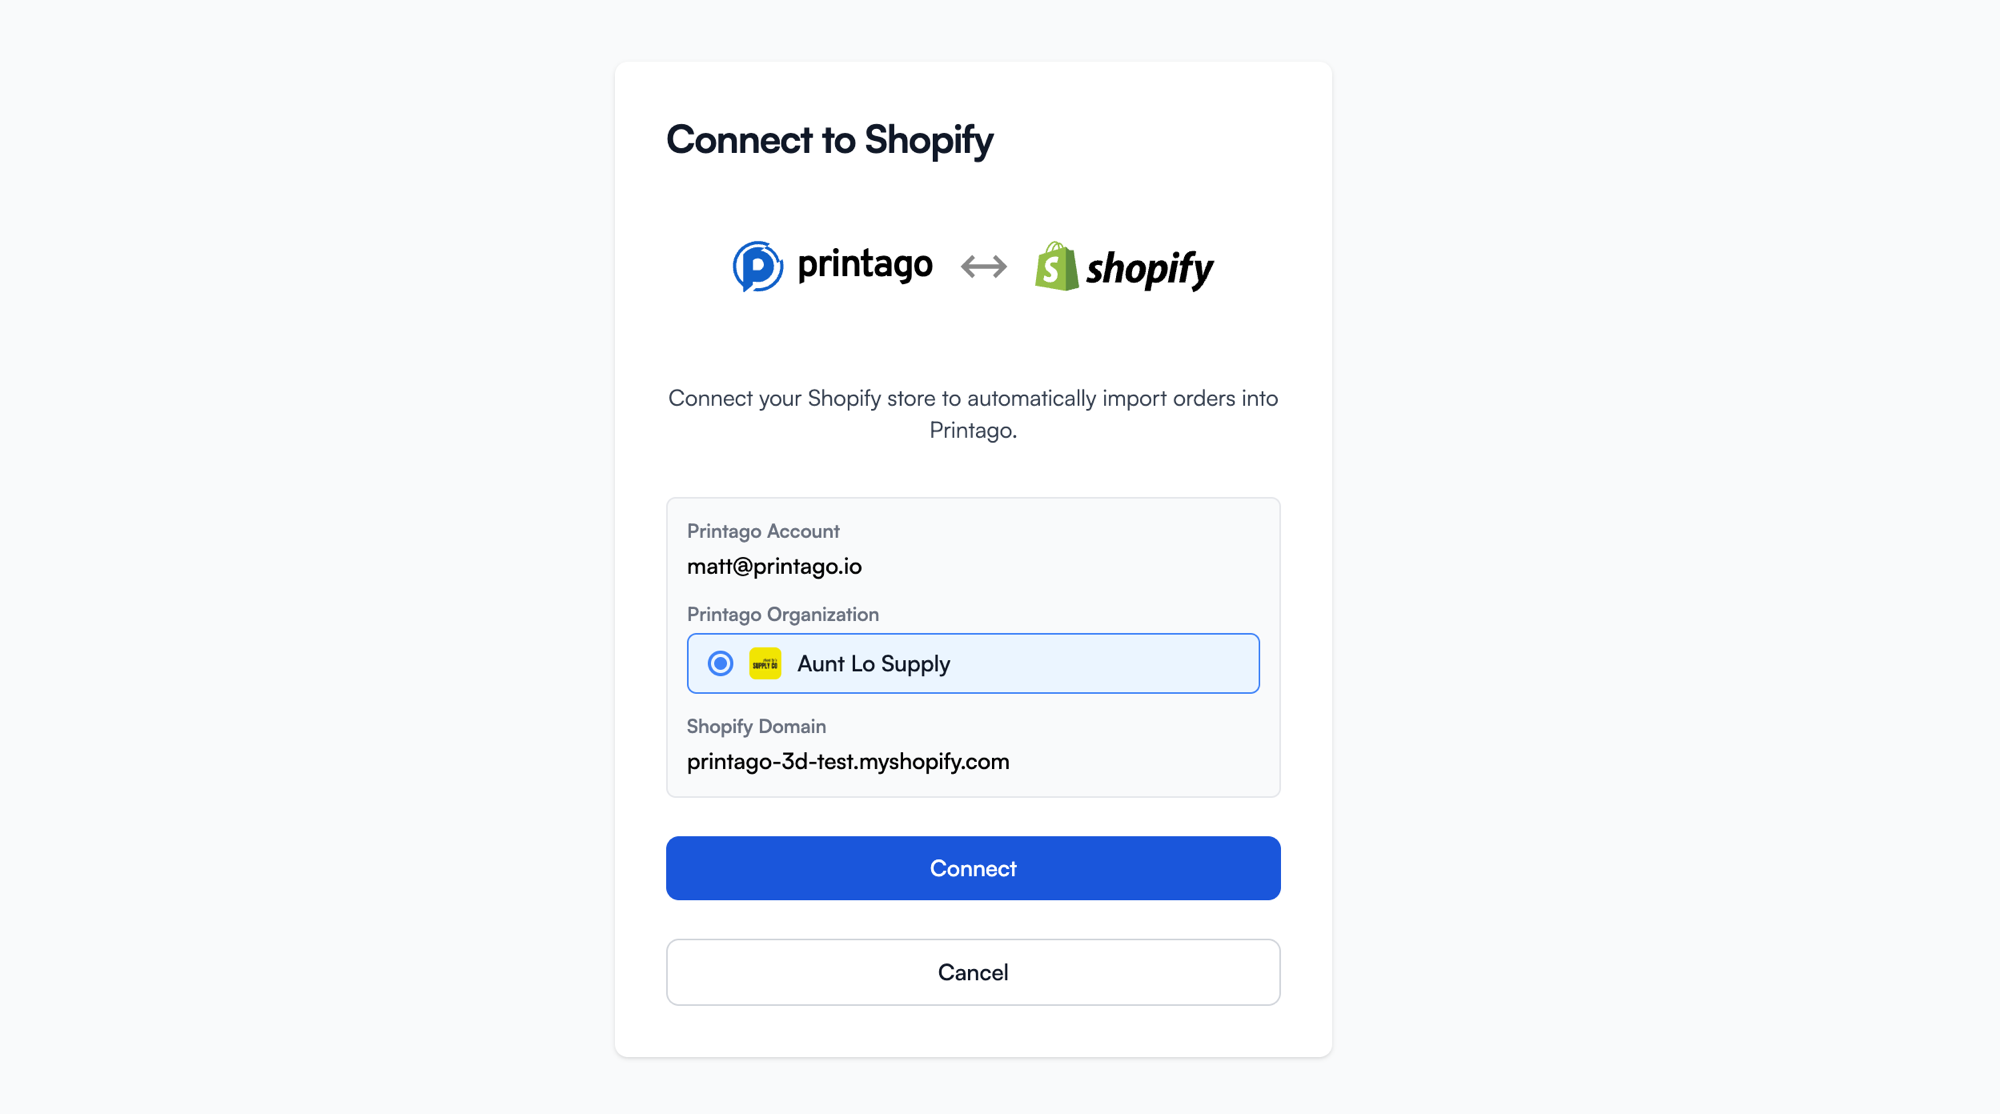
Select your Printago organization and click Connect. Once confirmed, the app stores your credentials and redirects you to the Synced Orders dashboard.
3. Verify connected status
After connecting, the app automatically redirects to the Orders page. You can verify your connection details in Settings, which shows your Printago store name, store ID, and connection date.
Synced Orders Dashboard
The Orders page is the main interface of the Printago Shopify app. It shows all orders synced between Shopify and Printago along with their print job status.

Dashboard Features
- Order count and job summary at the top, including total orders and print jobs
- Date range filter — view orders synced in the last 7, 14, 30, 60, or 90 days
- Hide completed checkbox to focus on in-progress work
- Sortable columns — Order number, Status, Created date, Synced date
Order Status
Each order row shows a progress bar and job count (e.g., "1/1 jobs") indicating how many print jobs are complete. Orders with no matching SKUs show "No jobs".
Actions
- Print — queue an individual order's items to the print queue
- View — open the order in Printago for full details
- Print All Orders — bulk-queue all visible orders to print
- Manually Sync Orders — open a sync modal to import historical orders
Manual Sync
Click Manually Sync Orders to import existing orders. You can configure:
- How many days back — 7, 14, 30, 60, or 90 days
- Fulfillment status filter — Unfulfilled, Partially fulfilled, Fully fulfilled
This is useful for your first sync or to catch up on orders placed before the integration was connected.
Real-time Sync
After connection, new Shopify orders sync automatically via webhooks with no manual action needed.
Order Production Status
When you open an individual order in Shopify, the Printago app block displays a Printago Production Status card showing print completion progress for that order.
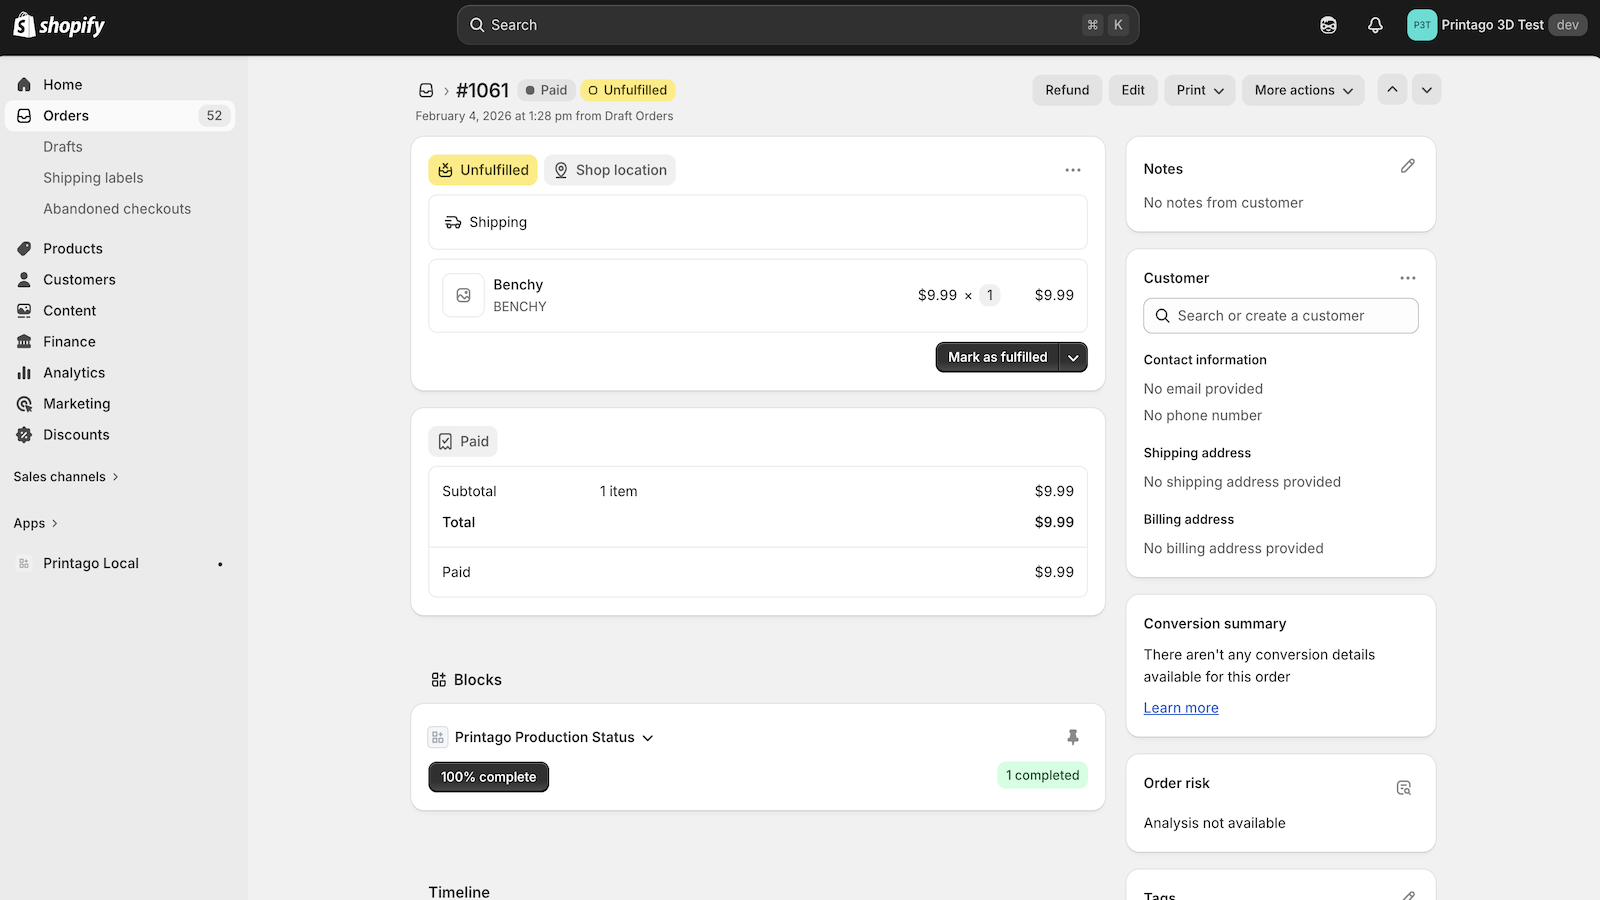
The status block shows:
- Completion percentage (e.g., "100% complete")
- Job count (e.g., "1 completed")
Clicking the progress badge opens Printago's Queue filtered to that specific order.
Settings
Open Settings from the Printago app navigation to configure integration behavior.
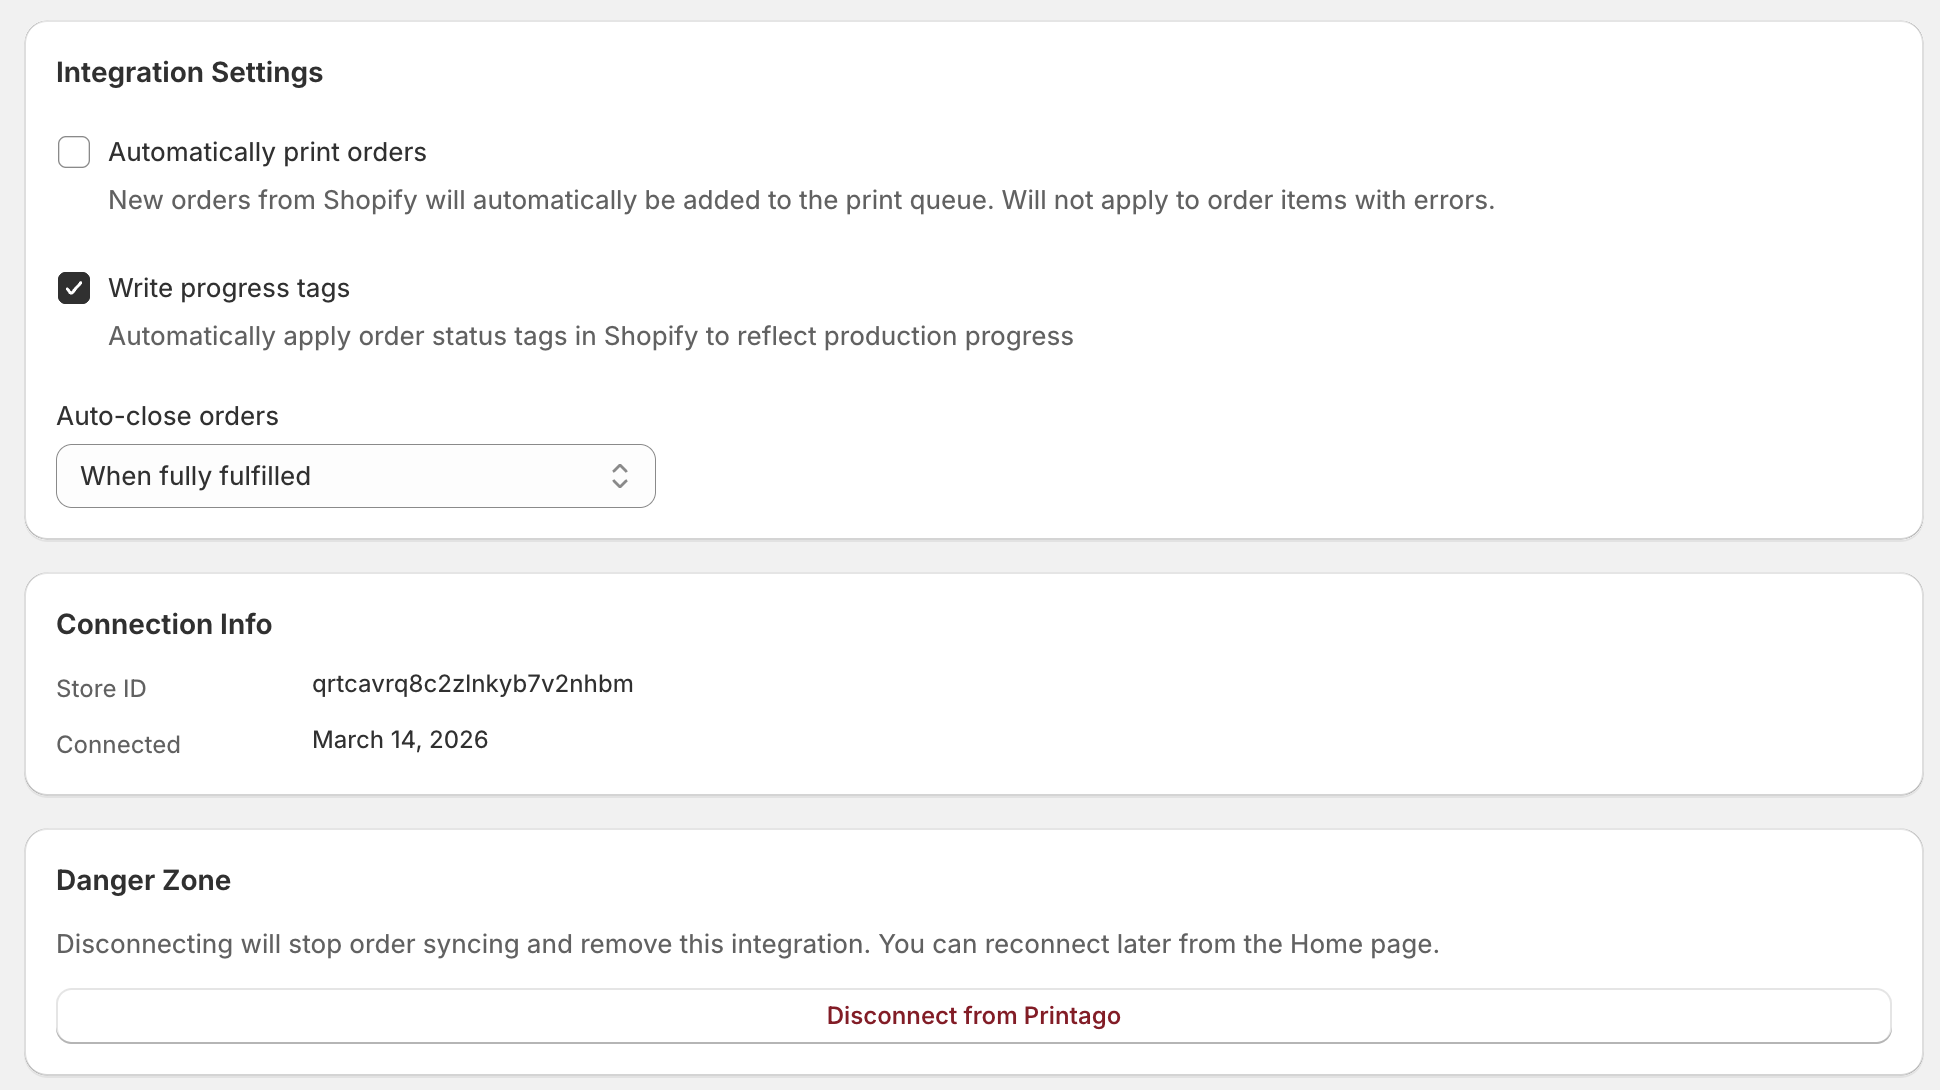
Automatically Print Orders
When enabled, new orders from Shopify are automatically added to the print queue. Order items with SKU errors are skipped.
Write Progress Tags
When enabled, Printago automatically applies order status tags in Shopify to reflect production progress (e.g., printago:in-progress, printago:printed). These tags are visible in your Shopify orders list.

Auto-close Orders
Controls when Printago orders are automatically closed based on Shopify fulfillment status:
- Never — do not auto-close
- When fully fulfilled — close when all items in the Shopify order are fulfilled
- When partially fulfilled — close when any items are fulfilled
Line Item Properties
Shopify line item properties are custom key-value pairs that customers can set at checkout (e.g., engraving text, custom colors, personalization options). By default, Printago ignores these properties during order import.
To promote specific line item properties to SKU options for variant matching, add the exact property names to the whitelist. For example, if your customers select a "Text Color" property at checkout and you have a matching SKU variant option in Printago, adding Text Color to the whitelist will include it during SKU resolution.
- Type the property name in the input field and press Enter or click Add
- Remove a property by clicking the × on its tag
- Property names must match exactly (case-sensitive) with what Shopify sends
- If a variant option and a line item property share the same name, the variant option takes precedence
You can inspect a line item's properties on the order detail page by clicking the icon next to any order item that has properties attached.
Ignored Variant Names
Some Shopify variant options may not affect your 3D printed product. The Ignored variant names setting lets you exclude specific variant option names from SKU matching so they don't interfere with order resolution.
Ignored variants are still stored on each order item for reference — they just aren't used when Printago resolves which SKU variant to print.
- Type the variant option name in the input field and click Add
- Remove a name by clicking the × on its tag
- Names must match exactly (case-sensitive) with the Shopify variant option name
Example: If your product incorporates wood parts and your Shopify listing has Color and Wood Type options, but the Wood Type doesn't affect your 3D printed parts, add Wood Type to the ignored list. Printago will match orders using only the Color option.
Connection Info
The Settings page also shows your connection details:
- Printago store name
- Store ID
- Connected date
Disconnect
Click Disconnect from Printago in the danger zone at the bottom of Settings to remove the integration. This stops future syncs but does not remove historical orders already imported into Printago.
SKU Variant Support
The Shopify integration supports two methods for resolving product variants, and both can work simultaneously:
Option-based matching
When a Shopify order comes in, Printago fetches the variant's selected options (e.g., Color=Red, Size=Large) directly from Shopify and matches them to your SKU Variant definitions in Printago.
This is the simplest setup — just make sure your Shopify option names and values exactly match your Printago variant names and values. See SKU Variant name matching for details.
SKU suffix matching
If your Shopify variants use compound SKU codes (e.g., WIDGET-001-RED-LG), Printago can also resolve variants by parsing the SKU suffix:
- Each variant option/value combination in Printago must have a SKU suffix defined
- Each Shopify variant must have a SKU value defined in Shopify
- Printago automatically resolves compound SKUs by matching the base SKU and suffix options
Example:
- Printago SKU:
WIDGET-001 - Color option: Red (suffix:
-RED), Blue (suffix:-BLUE) - Size option: Small (suffix:
-SM), Large (suffix:-LG) - Shopify variant SKU:
WIDGET-001-RED-LGresolves to WIDGET-001 with Color=Red, Size=Large
Line item property matching
If your products use Shopify line item properties for customization options that go beyond standard variants (e.g., "Text Color", "Logo", "Back Color"), you can promote these to SKU options by adding them to the property whitelist in Settings.
How resolution works
When a Shopify order arrives, Printago resolves each line item's SKU in this order:
- Exact SKU match — Printago looks for a SKU with a code that exactly matches the Shopify variant's SKU (e.g.,
WIDGET-001). If found, the variant's selected options (Color, Size, etc.) are passed through for validation. - Suffix match — If no exact match is found, Printago tries to parse the SKU as a base code plus suffixes (e.g.,
WIDGET-001-RED-LG→ base SKUWIDGET-001with Color=Red, Size=Large). The parsed options replace any options from Shopify. - Line item properties — If any property names are whitelisted, their values are merged into the resolved options. Variant options take precedence if there is a name conflict.
If you use a single SKU code across all variants (e.g., every variant uses WIDGET-001), option-based matching handles everything automatically. If each variant has its own compound SKU code (e.g., WIDGET-001-RED-LG), suffix matching kicks in.
Troubleshooting
Store shows as not connected
- Re-run the connect flow from the Shopify app
- Confirm you are logged into the intended Printago account
- Check Settings to verify connection status
Orders are not syncing
- Check connection status in Settings
- Run a manual sync with a wider date range
- Verify orders match the selected fulfillment states
Items show errors or "No jobs"
- SKU mismatch between Shopify and Printago
- Create or correct SKU mappings in Printago, then re-sync
- Check that variant SKU suffixes are defined on both sides
Print action fails
- Open the error details shown in the app banner
- Click "Fix in Printago" to resolve SKU or configuration issues
- Re-try printing after fixing errors