Print Queue
Key Concepts
The print queue is Printago's central job management system, powered by an intelligent matching engine called Gutenb3d. Every print job—whether from a single part, a bulk operation, or an e-commerce order—enters the queue, where Gutenb3d automatically matches it to the best available printer based on material requirements, printer tags, and machine availability. The queue replaces the manual process of deciding which file goes to which printer: you define what you need printed and the system handles distribution across your fleet. Jobs progress through stages (queued, in-progress, completed, cancelled, or errored), and you can reorder priorities, retry failed jobs, and monitor progress in real time. For print farms of any size, the queue is what turns a collection of individual printers into a coordinated production system.
Understanding the Queue Interface
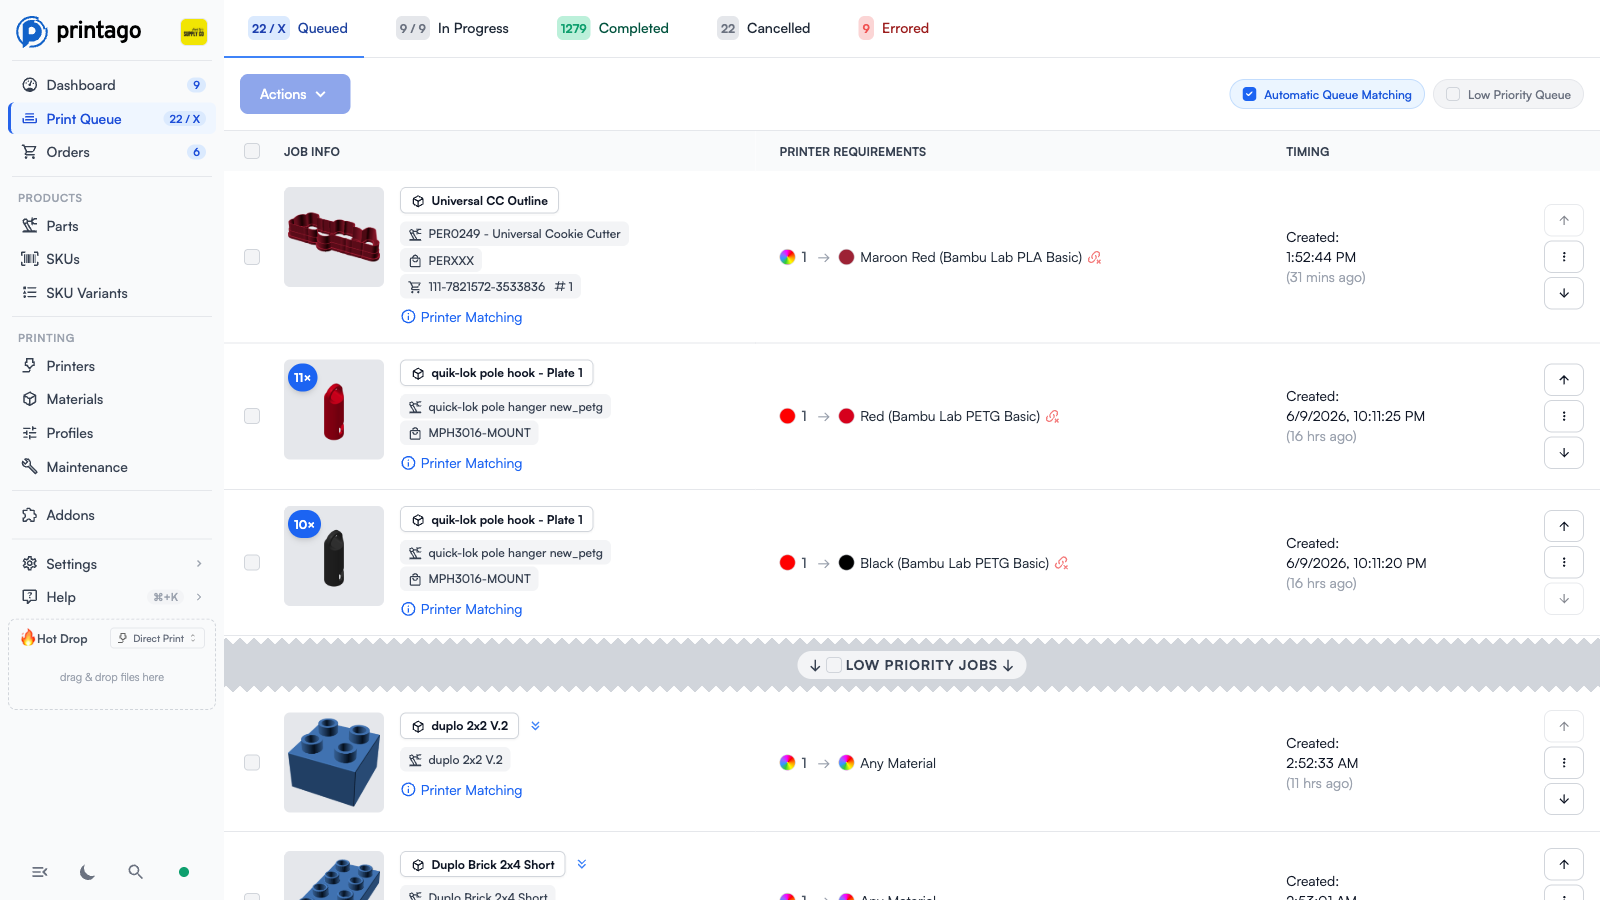
The Print Queue is organized into five tabs that represent different stages of your print jobs:
| Tab | Description | Available Actions |
|---|---|---|
| Queued | Waiting for printer assignment | Cancel, Move to Top, Move to Bottom, Drag/Drop reorder |
| In‑Progress | Actively printing on assigned printers | Pause, Resume, Cancel |
| Completed | Successfully completed prints | Retry, Archive |
| Cancelled | User-cancelled jobs | Retry, Archive |
| Errored | Jobs that failed during slicing or printing | Retry, Archive |
Queued jobs can also be combined onto a single build plate so one printer prints them together: see Plate Merging.
The Queued tab badge shows two counts (e.g., 22 / 5): normal-priority jobs and low-priority jobs. When low-priority processing is paused, the second count shows as X.
The toolbar above the queue also holds the Actions menu plus two toggles: Automatic Queue Matching and Low Priority Queue (both described under Managing Your Queue below).
Job Interaction
Clicking the thumbnail of any job will show an interactive 3D model preview for STL and 3MF files. This includes OpenSCAD or other Add-On output, allowing you to verify the generated output easily. For a multi-plate 3MF project, a job's preview opens on the plate that job prints, and the stats bar names it. (Previewing the part itself — from the part's page — shows plate buttons in the top corner for switching between plates instead.) Each object renders in its assigned filament color. The objects panel lets you show or hide individual objects, and the stats bar shows the model's triangle count, dimensions, and object count. You can also download the model file from this window, which is particularly useful for OpenSCAD output.
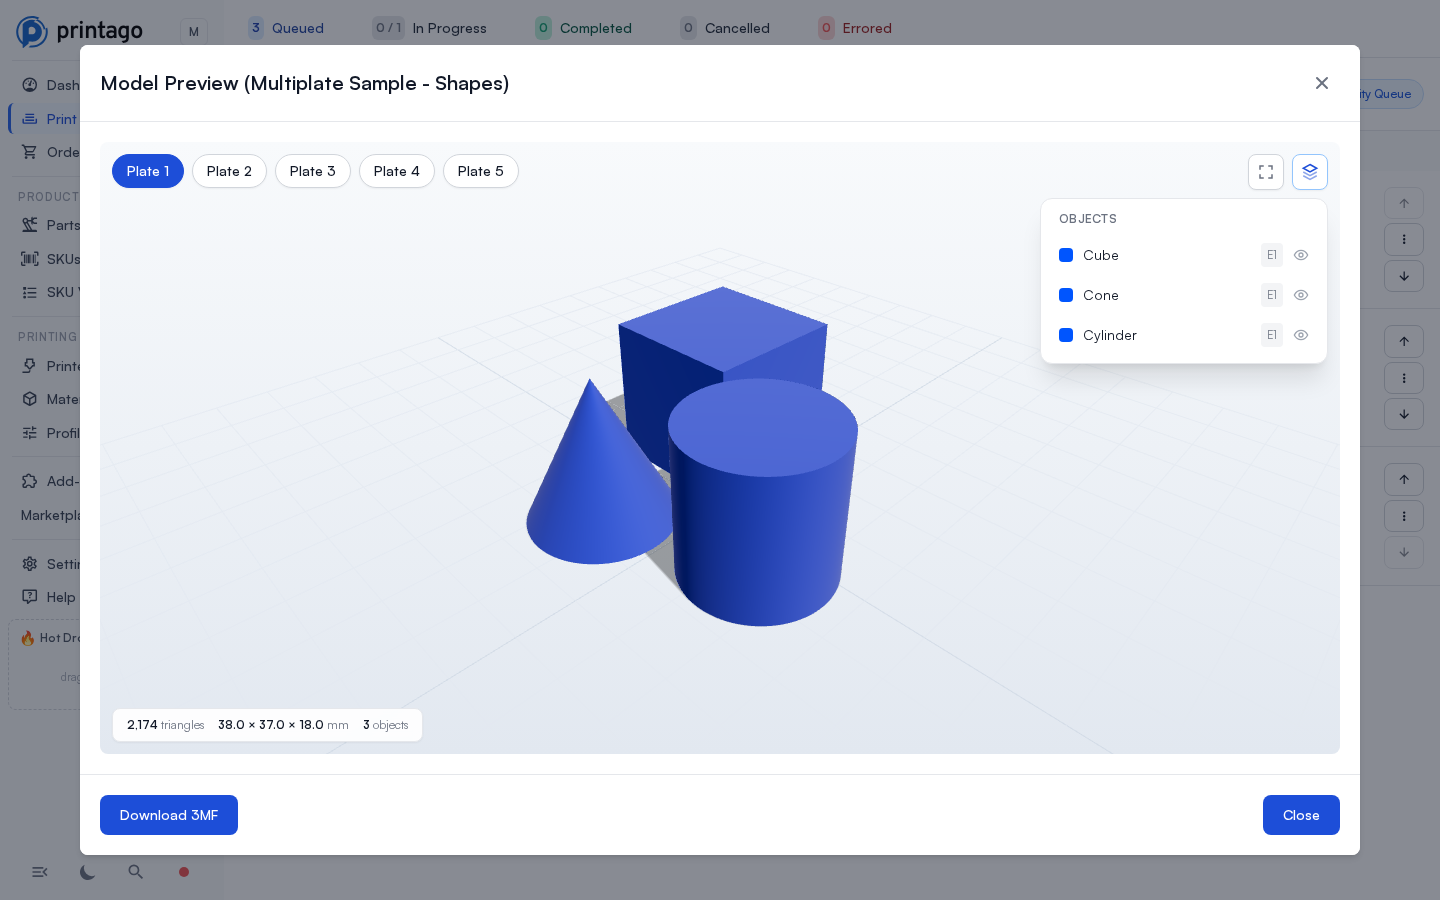
After a job is sliced, this preview window will enable the Download GCODE button that was generated and sent to the printer.
Beyond thumbnail previews, you can also link directly to the SKU or Part associated with each job, and drag queued jobs to reorder their priority. All other job actions require selecting jobs with checkboxes and using the Bulk Action menus.
Each job also shows who queued it: a chip with the person's email, or the name of the API key when an integration created the job. Click a person's chip to open their user page. Jobs Printago queues on its own, such as automatic requeues, carry no chip.
Why Jobs Wait in Queue
Every job starts in the Queued tab, even those sent "To A Specific Printer." Jobs remain queued when:
- No compatible printers are currently available
- All production slots are busy with other jobs
- Required materials or printer tags don't match any ready printers
In-Progress Jobs
Once Gutenb3d assigns a job to a printer, it moves to In-Progress and follows this path:
- Assignment - Job matched with compatible printer
- Material Mapping - Part materials mapped to printer's loaded filaments
- Slicing - Job automatically sliced for assigned printer
- Send & Print - Sliced file sent to printer, printing begins
After printing begins, in-progress jobs show the assigned printer's name, live nozzle and bed temperatures, percent complete, layer progress, time remaining, and estimated completion time. Each job also has a Material Mapping link showing how part materials were mapped to the printer's loaded filaments. The Manage job slots button at the top right takes you to production slot management.
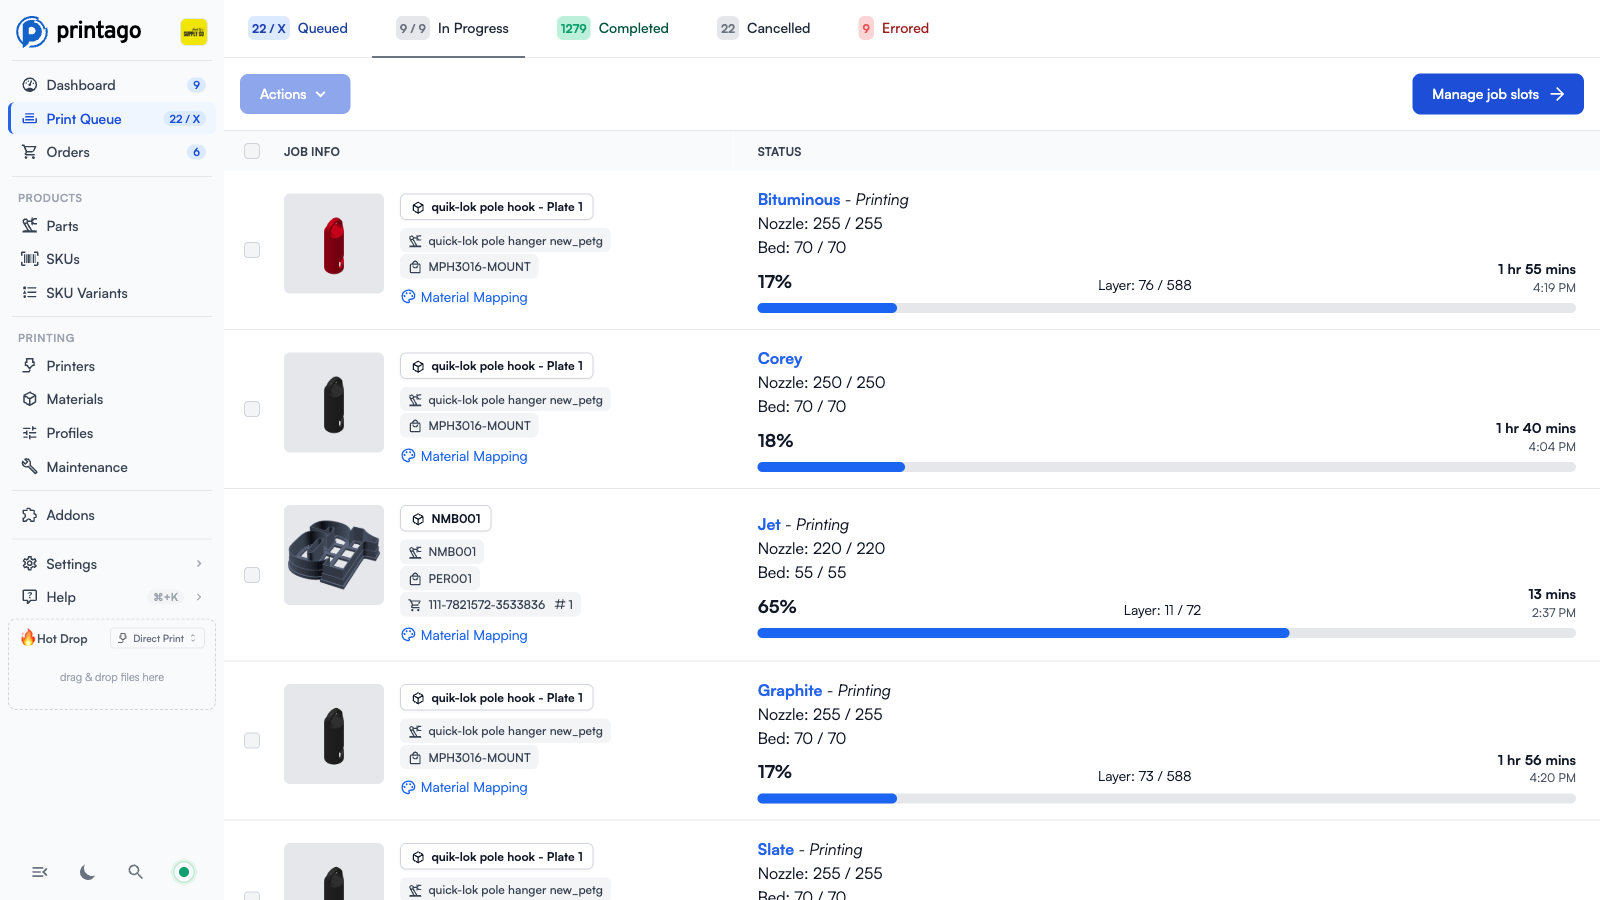
Print jobs started outside Printago (via slicer, Handy app, etc.) don't use production slots and won't appear here. You can monitor all printer activity on the Dashboard instead.
Job Outcomes
- Completed - Print finished successfully and reached end of gcode normally
- Cancelled - User stopped the job via Printago, slicer, Handy, or printer
- Errored - Job failed during slicing or printer halted due to issues (HMS errors, etc.)
Bambu Lab printer HMS events are reflected in the queue:
- HMS Warnings that pause printing (like filament runout) keep jobs in the In-Progress tab
- HMS Errors that halt printing move jobs to the Errored tab
When able, Printago provides a link to Bambu Lab's documentation on the HMS Code
Job Details and Print Telemetry
Click any job to open its detail page. Alongside the model preview, status timeline, and material assignments, finished jobs show a Print Telemetry panel: an at-a-glance history of how the print actually went.
Choosing an Attempt
A job can be printed more than once (for example, after a retry). Each attempt keeps its own telemetry, timelapse, completion photo, and logs. The telemetry panel opens on the latest attempt; use the Attempt selector to replay any earlier one. Everything below the selector, including the graph, events, and downloads, updates to the attempt you pick.
Temperature Graph
The graph plots temperatures over the course of the print:
- Nozzle, bed, and chamber temperatures, each with a solid line for the actual reading and a dashed line for the target. Use the legend to show or hide any series.
- Layer changes appear as faint vertical ticks, so you can see the print's pace.
- Events (see below) appear as colored flags on the timeline: red for errors, amber for warnings.
- Hover anywhere on the graph to read the exact temperatures, layer, and progress at that moment.
Two recordings can feed the graph. Fuse-connected printers upload a high-detail flight recording, and Printago's gateway keeps a lighter sampled series for every print. When both exist, a Fuse / Gateway toggle lets you switch between them; otherwise the best available one is shown automatically.
Event Log
The Events list next to the graph is a timeline of everything the printer reported during the attempt: state changes (including pauses and resumes), filament changes, skipped objects, and any HMS or print errors with their codes. Hover an event to highlight where it happened on the graph.
Summary and Downloads
Summary tiles show the attempt's outcome, duration, completed layers, peak nozzle and bed temperatures, and error count. From the same panel you can download that attempt's timelapse, completion photo, and the raw telemetry recording (Fuse and/or gateway) for your own analysis.
Temperature and event telemetry is on by default. You can opt out under Settings > Printing tab > Telemetry. Timelapses and completion photos follow their own camera settings.
How Smart Matching Works
Gutenb3d's intelligent matching system considers multiple factors when assigning jobs to printers:
Matching Criteria
| Criteria | Description |
|---|---|
| Printer Availability | Is the printer Available to Printago to assign any job? (see below) |
| Material Type | Specified on the part or SKU printed. May be things like "Any PLA" or "Bambu Basic PLA" |
| Material Variant | Material color, also stored on the part or SKU. |
| Printer Tags | Custom labels for organizing printer groups |
- Online and connected to Printago
- Not currently processing another job
- Marked as "clear & ready for next print"
Printer Assignment Strategy
Gutenb3d processes printers on a "last-used" basis to distribute wear evenly across your fleet. All your printers can receive jobs regardless of your commercial production slot limit—those slots only control how many jobs Printago actively manages simultaneously.
Managing Your Queue
Job Organization
- Each individual printed part appears as a separate queue item (even within multi-part SKUs)
- Identical queued copies are collapsed into a single group row with a count badge — see Grouped Rows below
- Use drag-and-drop or the up/down arrows to reorder within the same priority level
- Jobs process from top to bottom, with flexible reordering anytime
- Streamline management with Bulk Actions
Grouped Rows
When you queue multiple copies of the same part (or a 3MF with multiple plates), the Queued tab folds identical copies into one row to keep the queue readable. A blue ×N badge on the thumbnail tells you how many copies are in the group. Each plate of a multi-plate 3MF becomes its own group, since plates are independent print jobs.
Adjust quantity. Open the row's menu (⋮) and choose Adjust quantity… to change how many copies of the part are in the queue. Increasing adds fresh copies to the same group; decreasing removes the last ones. You can set any value from 1 to 500. Jobs linked to a customer order show this option disabled — quantity for those is controlled by the order itself.
Split a group. Choose Split group… to peel off some copies into their own group. This is useful when you want to reorder a subset of the copies independently, or want different copies to route to different printers via tags. Pick how many to split off, and the new group lands right after the original — from there you can drag it wherever you want.
Reorder. Drag the grip icon at the left of a group row to move the whole group as a unit, or use the up/down arrows on the right.
A busy queue can have hundreds of rows. Grouping identical copies keeps the view compact, makes quantity tweaks one click instead of a bulk selection, and makes it obvious which subset of jobs share exactly the same print setup.
Queue Priority
Printago supports two job priority levels:
- Normal Priority: Standard jobs that process first
- Low Priority: Jobs that only process when no normal priority jobs are available
In the Queued tab, low-priority jobs appear below a Low Priority Jobs divider, so it's always clear which group a job belongs to.
Important Notes:
- Jobs cannot be dragged between priority groups (normal ↔ low)
- Use the multi-action dropdown to change priority for selected jobs
- Low priority jobs function identically to normal jobs, but only begin processing when the normal priority queue is empty
- Job priority can be adjusted at any time from the queue interface
Pausing the low-priority queue. The Low Priority Queue toggle in the queue toolbar controls whether low-priority jobs are processed at all. Turn it off to pause low-priority job processing entirely (the Queued tab badge shows X for the low-priority count while paused); normal-priority jobs continue to match as usual.
Pausing Automatic Matching
By default, Gutenb3d continuously matches queued jobs to printers as printers free up. The Automatic Queue Matching toggle in the queue toolbar controls this: when off, background queue matching is paused, and you can use Match queue now to run it manually. Pause it when you want to stage changes without surprise prints kicking off.
- With auto matching off, background events stop assigning jobs and the queue stays still.
- Make your changes (swap materials, reconfigure printers, reorder the queue) without anything starting.
- When you're ready, click Match queue now to run one matching pass against the current state of your fleet.
This is useful when you're about to reload filament across several printers or reorganize the queue and don't want printers grabbing jobs mid-change.
Match queue now is also available programmatically. POST /v1/print-jobs/queue/run runs queue matching synchronously and returns the resulting (printer, job) pairs, regardless of the per-store auto-matching toggle. It requires the queue.manage permission. See the developer docs.
Cancelling Jobs
Cancelling an in-progress job from the queue reliably stops the printer.
The cancel confirmation includes a "Send stop command to the printer(s)" option, on by default. Leave it on to stop the hardware along with clearing the job. Turn it off if you only want to remove the job from Printago's queue while letting the print continue on the printer itself (for example, when you plan to manage that print directly on the machine).
Archiving Finished Jobs
Once a job finishes (completed, cancelled, or errored), you can archive it to hide it from the queue and part-build views. Archiving is the housekeeping action for keeping the queue focused on what's currently active without losing historical records.
What archiving does:
- Hides the job from the queue interface — the row disappears from the Completed, Cancelled, and Errored tabs immediately.
- Preserves the record on the server — nothing is deleted. All data stays in the database for reporting, auditing, and historical lookups.
How to archive:
- Select one or more finished jobs and choose Archive from the bulk action menu.
- Use Archive by Date (1 day / 7 days / 30 days / 60 days) to archive in bulk based on when jobs completed — useful for periodic cleanup.
- Errored items can be archived from the Errored tab the same way.
Finding archived jobs:
When you filter the queue by a specific order or order item (e.g., from the Orders page), a Show archived toggle appears next to the filter banner. Turning it on fetches archived jobs for that order from the server and merges them into the view. This lets you audit the full print history of an order even after its jobs have been archived. The toggle is scoped to the current filter — turning it off or clearing the filter hides archived jobs again.
Archived jobs remain available to server-side reports, dashboards, and exports. Archiving affects what's loaded into your browser, not what Printago retains.
Troubleshooting Assignment Issues
Every job includes a Printer Matching dialog that shows:
- Which printers Gutenb3d attempted to match
- Specific reasons why each printer wasn't selected
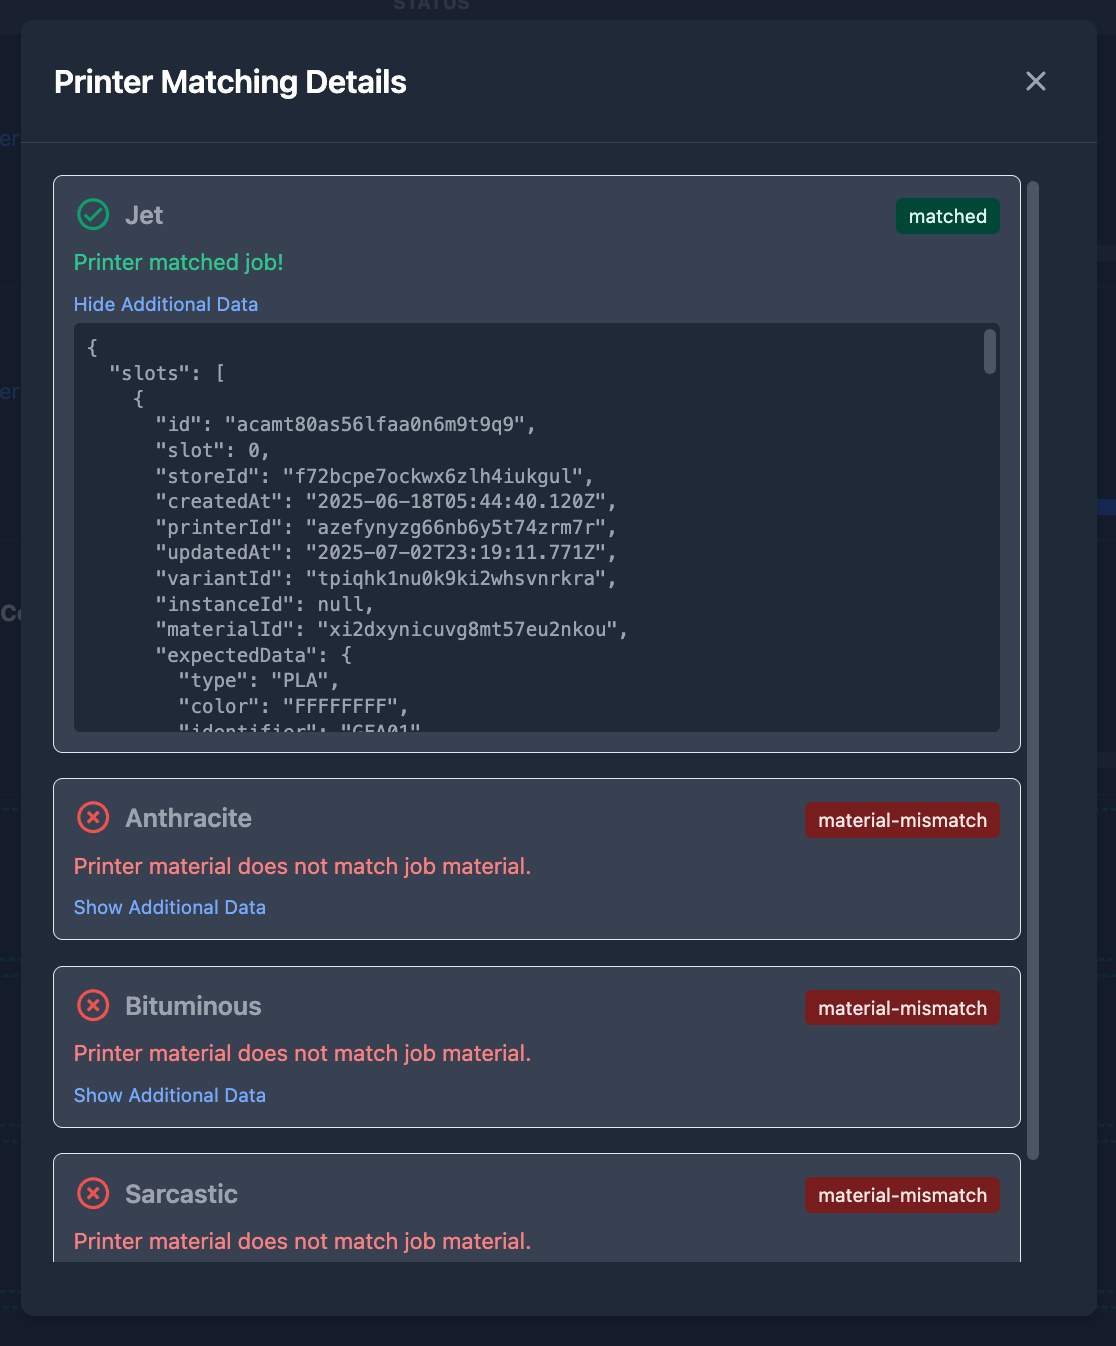
The matching troubleshooter performs a live dry run for the selected job, showing accurate results for every printer regardless of its current state. You see every real failure at once and can fix them in any order, even on printers that are mid-print.
POST /v1/print-jobs/queue/group-matching returns the match verdict for every printer against each pending queue group, one entry per group rather than one per job. Each printer comes back as matched, compatible and (when it did not match) firstFailedCheck. It requires the queue.view permission. See the developer docs.
The verdicts are deliberately terse so the response stays small on a large farm. For the reasoning behind a verdict, call GET /v1/print-jobs/{id}/matching-troubleshoot on the group's representative job: that returns the same full checklist the Printer Matching dialog shows.
Large queues are evaluated from the top down to a fixed budget, so a request that would otherwise return a result for every group on every printer stops early. When that happens the response sets truncated to true and the tail of the queue is left out. Pass printJobIds to ask about specific jobs instead of scanning the whole queue.
Production Slot Management
Want to see how production slots work? Try the interactive demo — drag the slider to see how slots control throughput across your farm.
Your production slots determine how many jobs Printago can actively manage at once. When slots are full:
- New jobs wait in the queue until slots become available
- Completed, cancelled, or errored jobs free up their slots immediately
- External prints (from slicers, apps, etc.) don't consume slots
This system ensures optimal resource allocation while maintaining full visibility of your entire print farm's activity.
Related Topics
- Bulk Actions - Efficient job management tools
- Cloud Slicer - Automatic slicing for assigned printers
Need help with your print queue? Join our Discord community for the latest tips and support!