SKU Variants
SKU Variants are one of Printago's most powerful features, enabling complex product variations and customization without SKU proliferation in your e-commerce stores. With Variants, a single product listing can handle dozens of color combinations, sizes, and personalizations automatically.
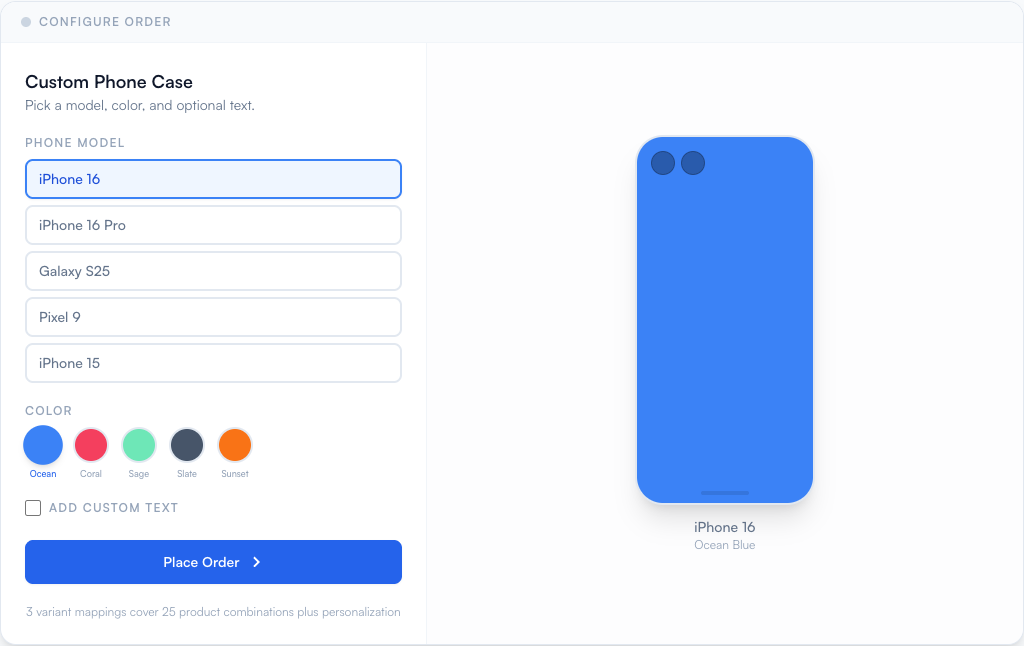
Want to see variant resolution in action? Try the interactive demo — configure an order and watch Printago resolve variants, slice, and route to the right printer in real time.
Overview
You manage variants from the SKU Variants page in the sidebar, where you can create and maintain product options (like size or color) and personalization fields (like engravings) that can be applied to SKUs. Each variant row shows its values and the properties it controls.
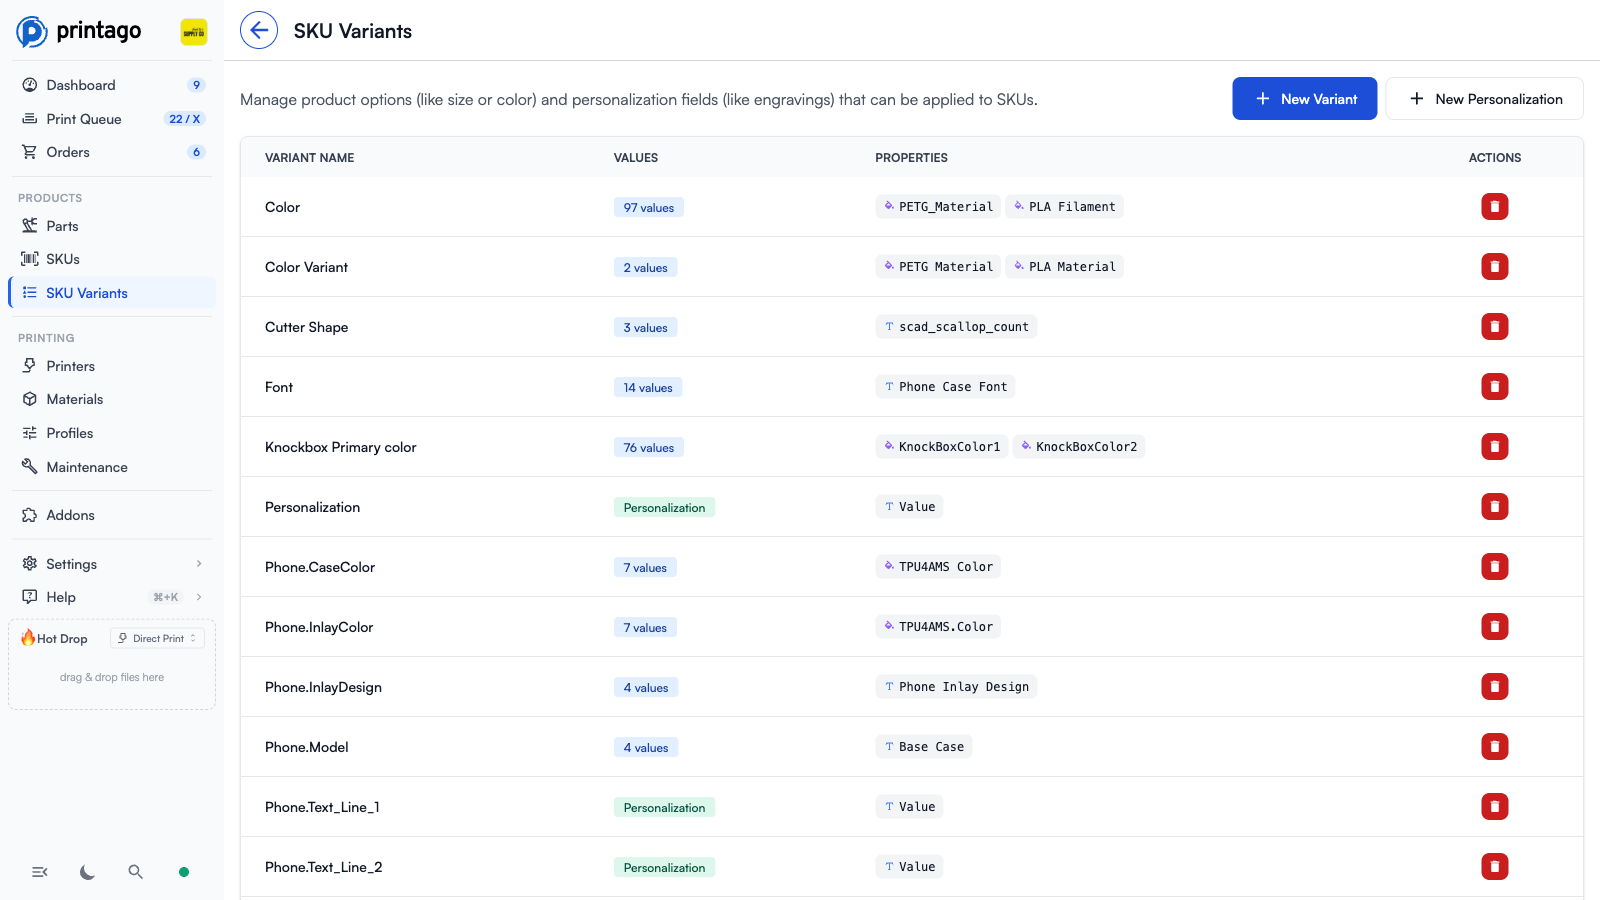
Chips above the list separate variants from personalizations and show which ones aren't on any SKU yet. The Used by column counts the SKUs that use each one. Filters narrows by property type (material, text, plate quantities) or by whether a variant has values, and search also matches value names and aliases, so typing "Ivory" finds the Color variant that lists it as an alias.
SKU Variants solve a critical problem for 3D printing businesses: managing product variations. Instead of creating separate SKUs for every color/size/material combination in your store, Variants let you:
- Create reusable variation definitions that work across multiple SKUs
- Map e-commerce options directly to materials, colors, and parameters
- Automate complex multi-color designs based on customer selections
- Handle custom sizing through OpenSCAD parameters
- Process personalized orders with customer text input
A phone case with 5 colors and 3 sizes would normally require 15 separate SKUs in your store. With Printago Variants, you need just one SKU listing that automatically handles all 15 combinations.
Core Concepts
Variants
A Variant represents a customer-facing option in your e-commerce store. Examples include:
- "Color"
- "Size"
- "Theme"
- "Finish Type"
- "Inlay Design"
Variant names in Printago must match the option names in your e-commerce platform (Shopify, Etsy, etc.) for automatic order processing to work correctly. Matching ignores capitalization and extra spaces, and you can add aliases to a variant so other listing names (like "Color 1" or "Mug Color") match it too. See Variant Aliases.
Variant Values
Variant Values are the specific options customers can choose for each Variant. For a "Color" variant, values might include:
- "Black"
- "Red"
- "Jet Black"
- "Carbon"
Like variant names, values match the names in your e-commerce listings ignoring capitalization and extra spaces, and a value can carry aliases for listings that name it differently.
An order's values come either from the channel's selections, matched by name, or from SKU suffixes in the SKU code, never both. Matching Orders to Variants walks through the whole decision with a flowchart.
Properties
Properties are where the magic happens - they're the internal mappings that tell Printago what each Variant Value actually means for production.
Properties can be:
- Global: Defined at the variant level and shared across all SKUs using that variant
- SKU-Specific: Defined for a single SKU only (see Step 6)
- Compound: Based on combinations of 2-3 variant values, and always SKU-specific (see Step 7)
There are three property types:
Material Properties
Map variant values to specific materials and colors in your Printago library. Examples:
- "PLA Colors"
- "TPU Colors"
- "Phone Case Colors"
- "Primary Color"
- "Secondary Color"
Text Properties
Pass values to OpenSCAD parameters for dynamic sizing and modifications. Examples:
- "size_in_cm"
- "width_inches"
- "handle_length"
- "font_scale"
Plate Quantities Properties
Control how many of each plate to print based on the variant selection. Useful for multi-pack products or selectively printing specific plates from a multi-plate 3MF. Examples:
- "plate_quantities" - For pack size variants (1-pack, 5-pack, 10-pack)
- Allows printing a 10-pack as optimized plate arrangements (e.g., 2 plates of 4 + 2 plates of 2 instead of 10 plates of 1)
A single Variant can have multiple Properties. For example, your "Color" variant might have both "PLA Colors" and "PETG Colors" properties, allowing the same variant to work across different material-based SKUs.
Personalization Variants
Personalization Variants are a special type used for customer freeform text input (like custom engravings). Unlike regular Variants:
- They have no Variant Values (customers enter free text instead)
- They automatically have a "Value" property that captures the customer's text input
- They can be mapped to OpenSCAD parameters to use the custom text in your designs
- Currently used for Etsy's Personalization field and custom text inputs
How It Works: The Complete Flow
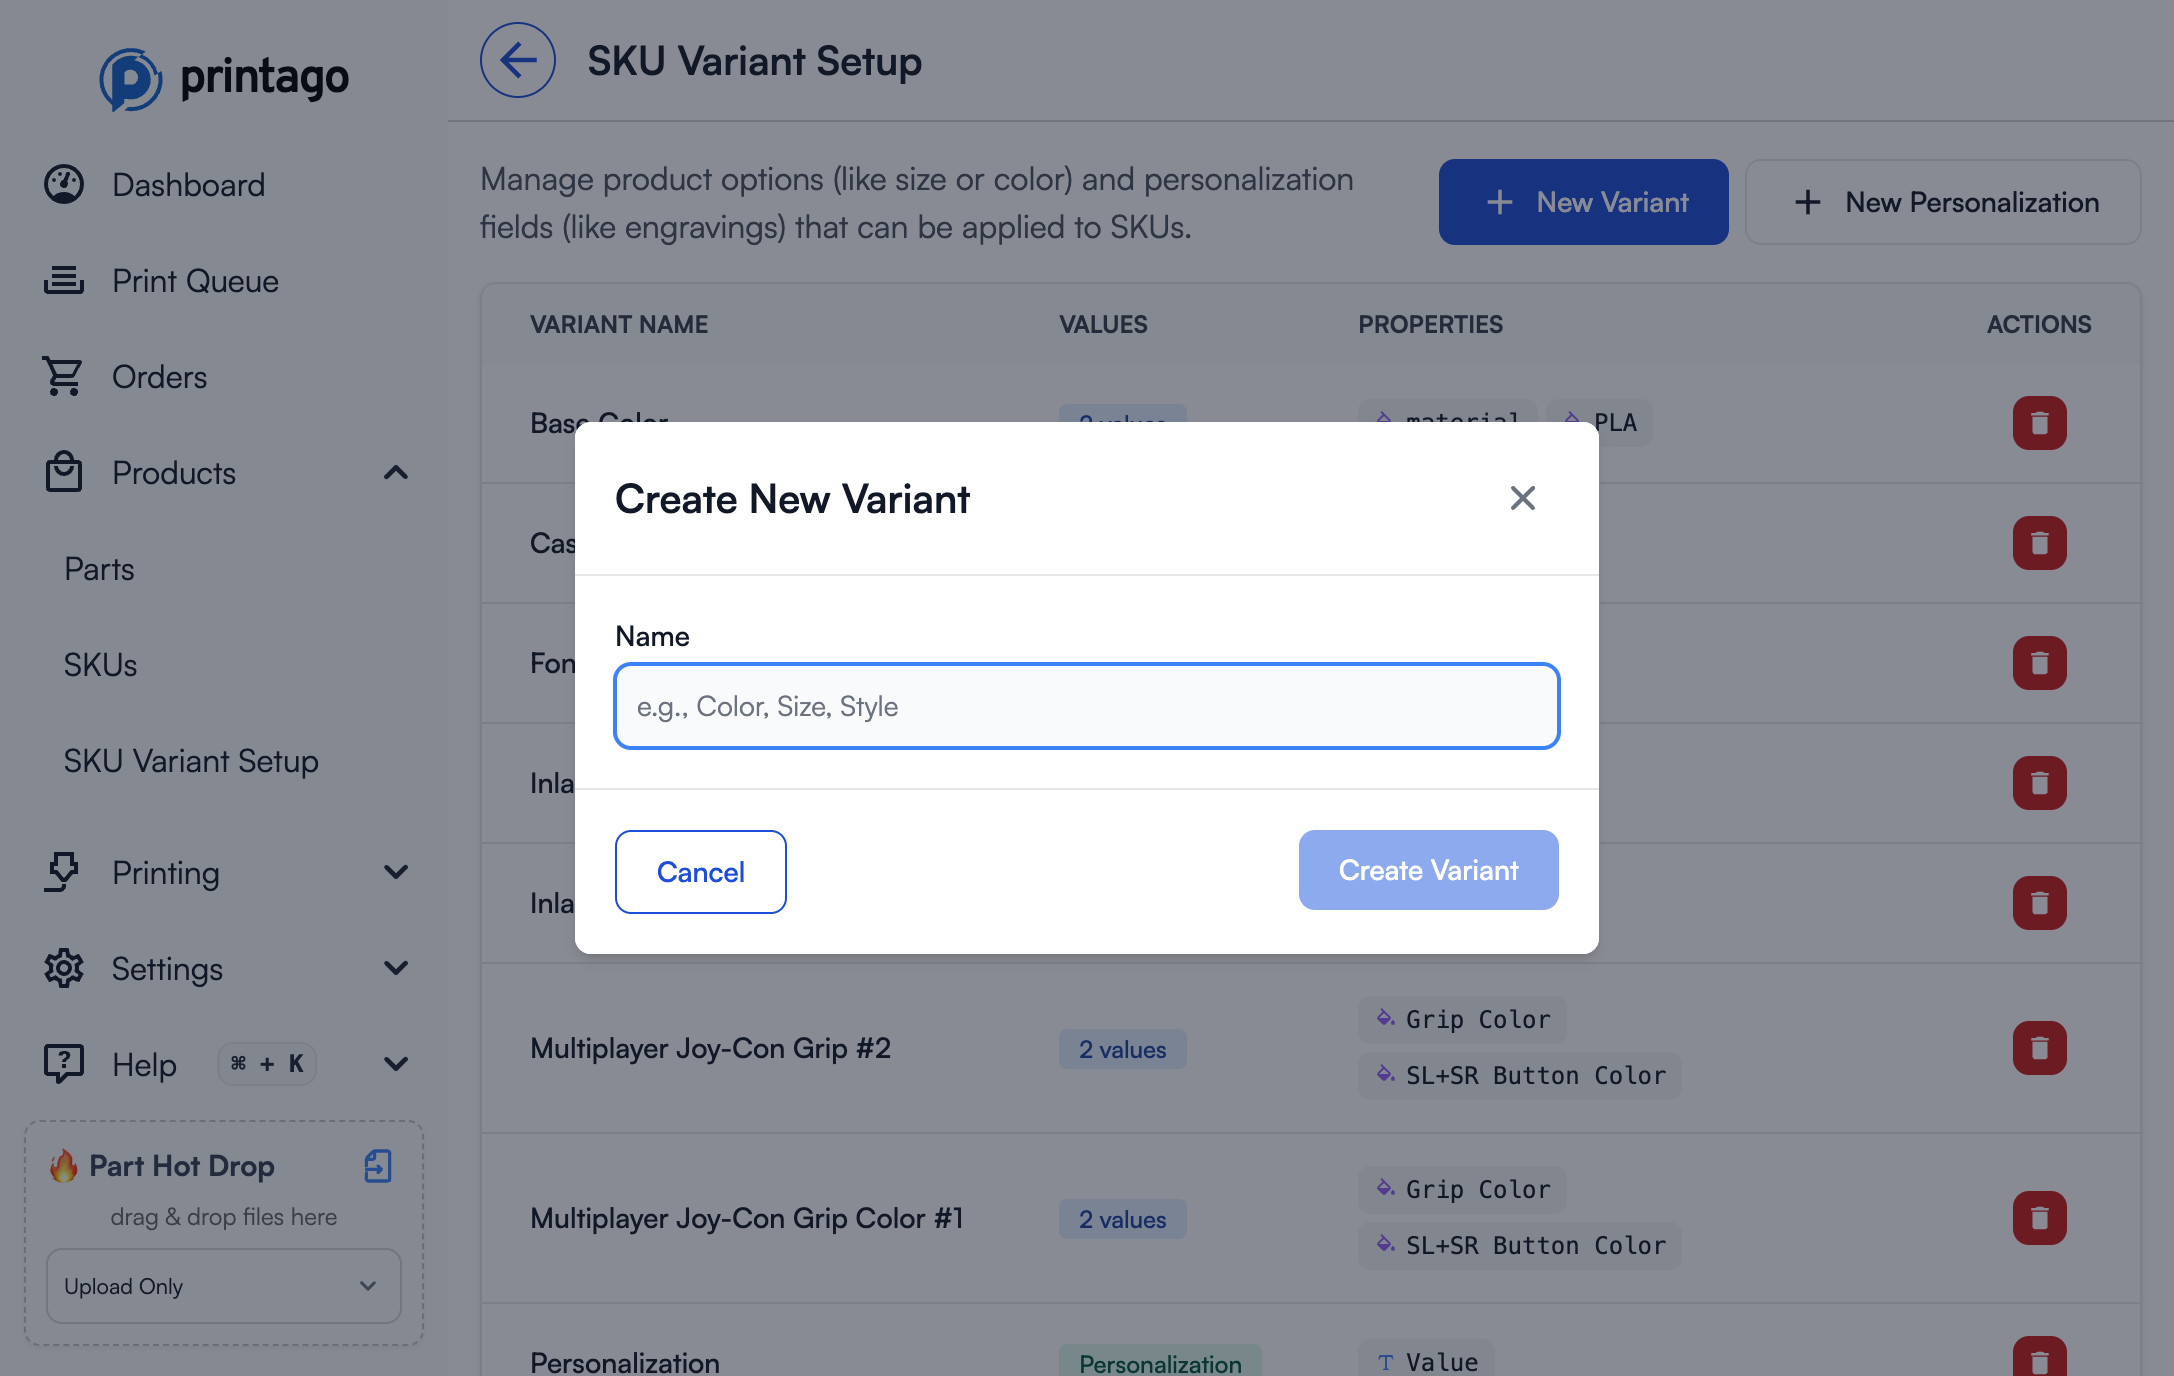
Step 1: Create a Variant
- Navigate to
Products → SKU Variant Setup - Click
New Variant(for standard options like colors, sizes, etc.) orNew Personalization(for customer text input) - Enter the variant name exactly as it appears in your e-commerce platform (the dialog's How do variants work? link walks through how an order's choice reaches a print)
- Click
Create VariantorCreate Personalization
Variant names are unique within your store, regardless of case and of whether the variant is a personalization. Orders and imports find variants by name, so if a name is already taken you'll be asked to reuse that variant instead of creating a second one.
Step 2: Add Properties
Properties define what each variant value will map to in production.
- Click on a variant in the table to edit it
- Click
Add Propertybutton - Enter a property name (e.g., "PLA Colors", "Primary Color", "size_cm", "plate_quantities")
- Select property type:
- Material/Color - For mapping to materials in your library
- Text - For passing values to OpenSCAD parameters
- Plate Quantities - For driving different plate quantities per variant (e.g., multi-packs)
- Click
Add Propertyto save
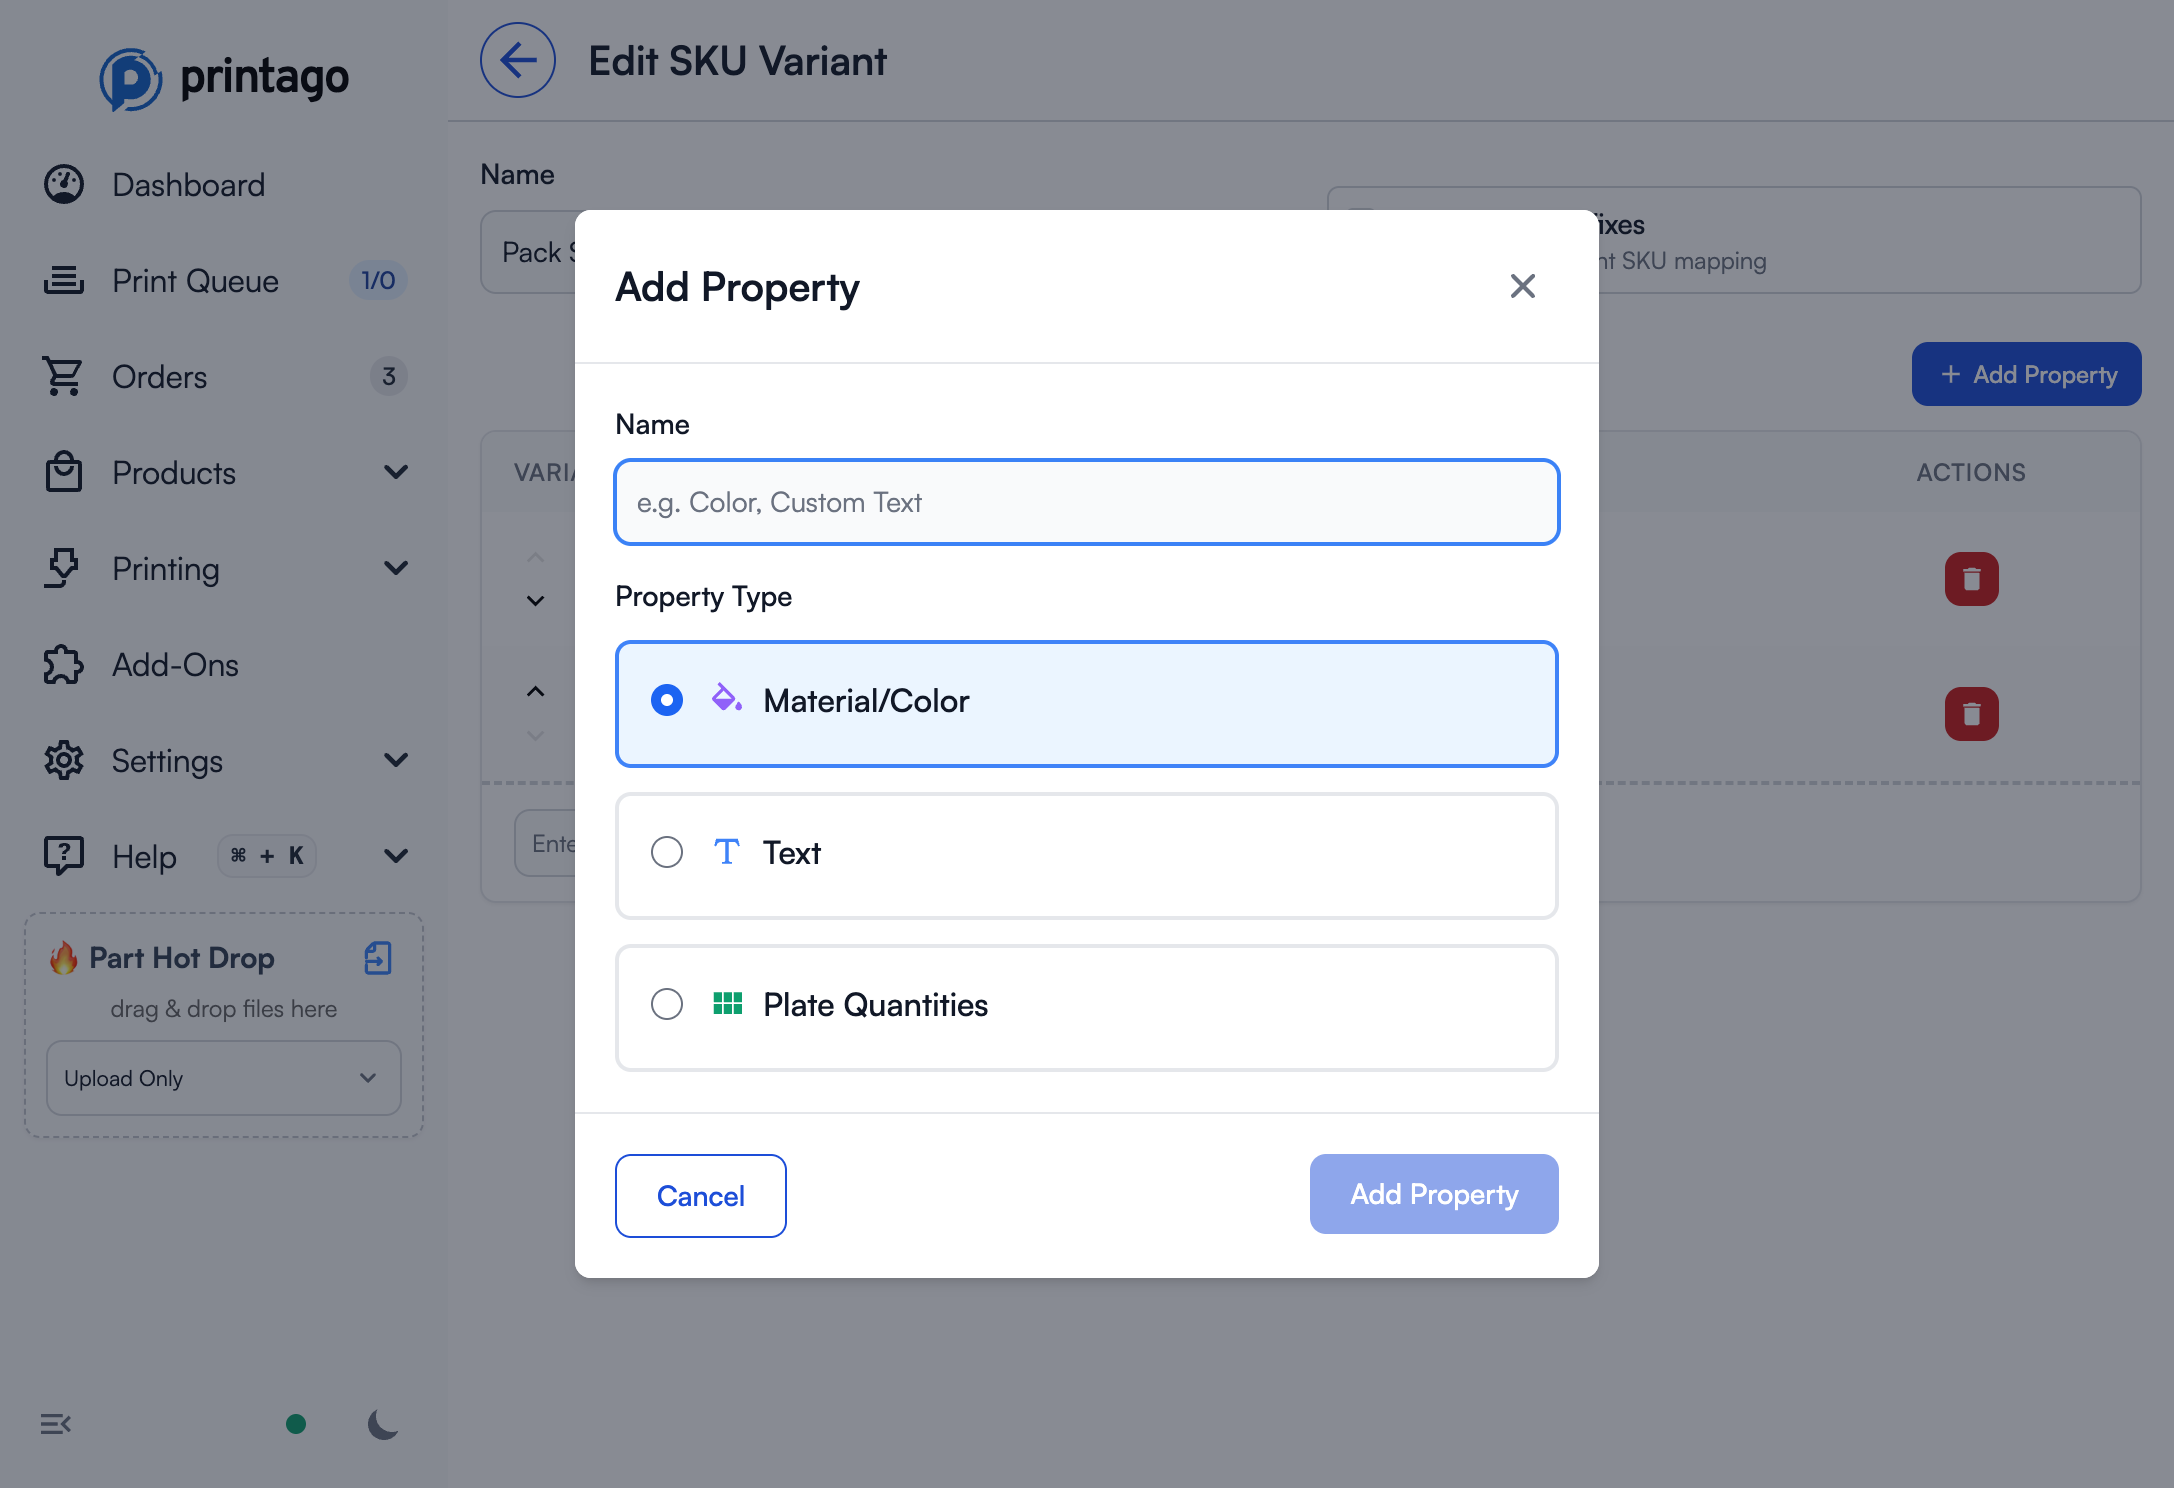
Use descriptive property names that indicate their purpose. "PLA Colors" is clearer than "Color1" when you're managing multiple material types.
Step 3: Add Variant Values and Map Properties
- In the variant editing page, enter a variant value name in the text field at the bottom of the table
- Click
Addto create the variant value - For each Property, map the appropriate value:
- Material Properties: Select from your Material library
- Text Properties: Enter the text/number value to pass to OpenSCAD
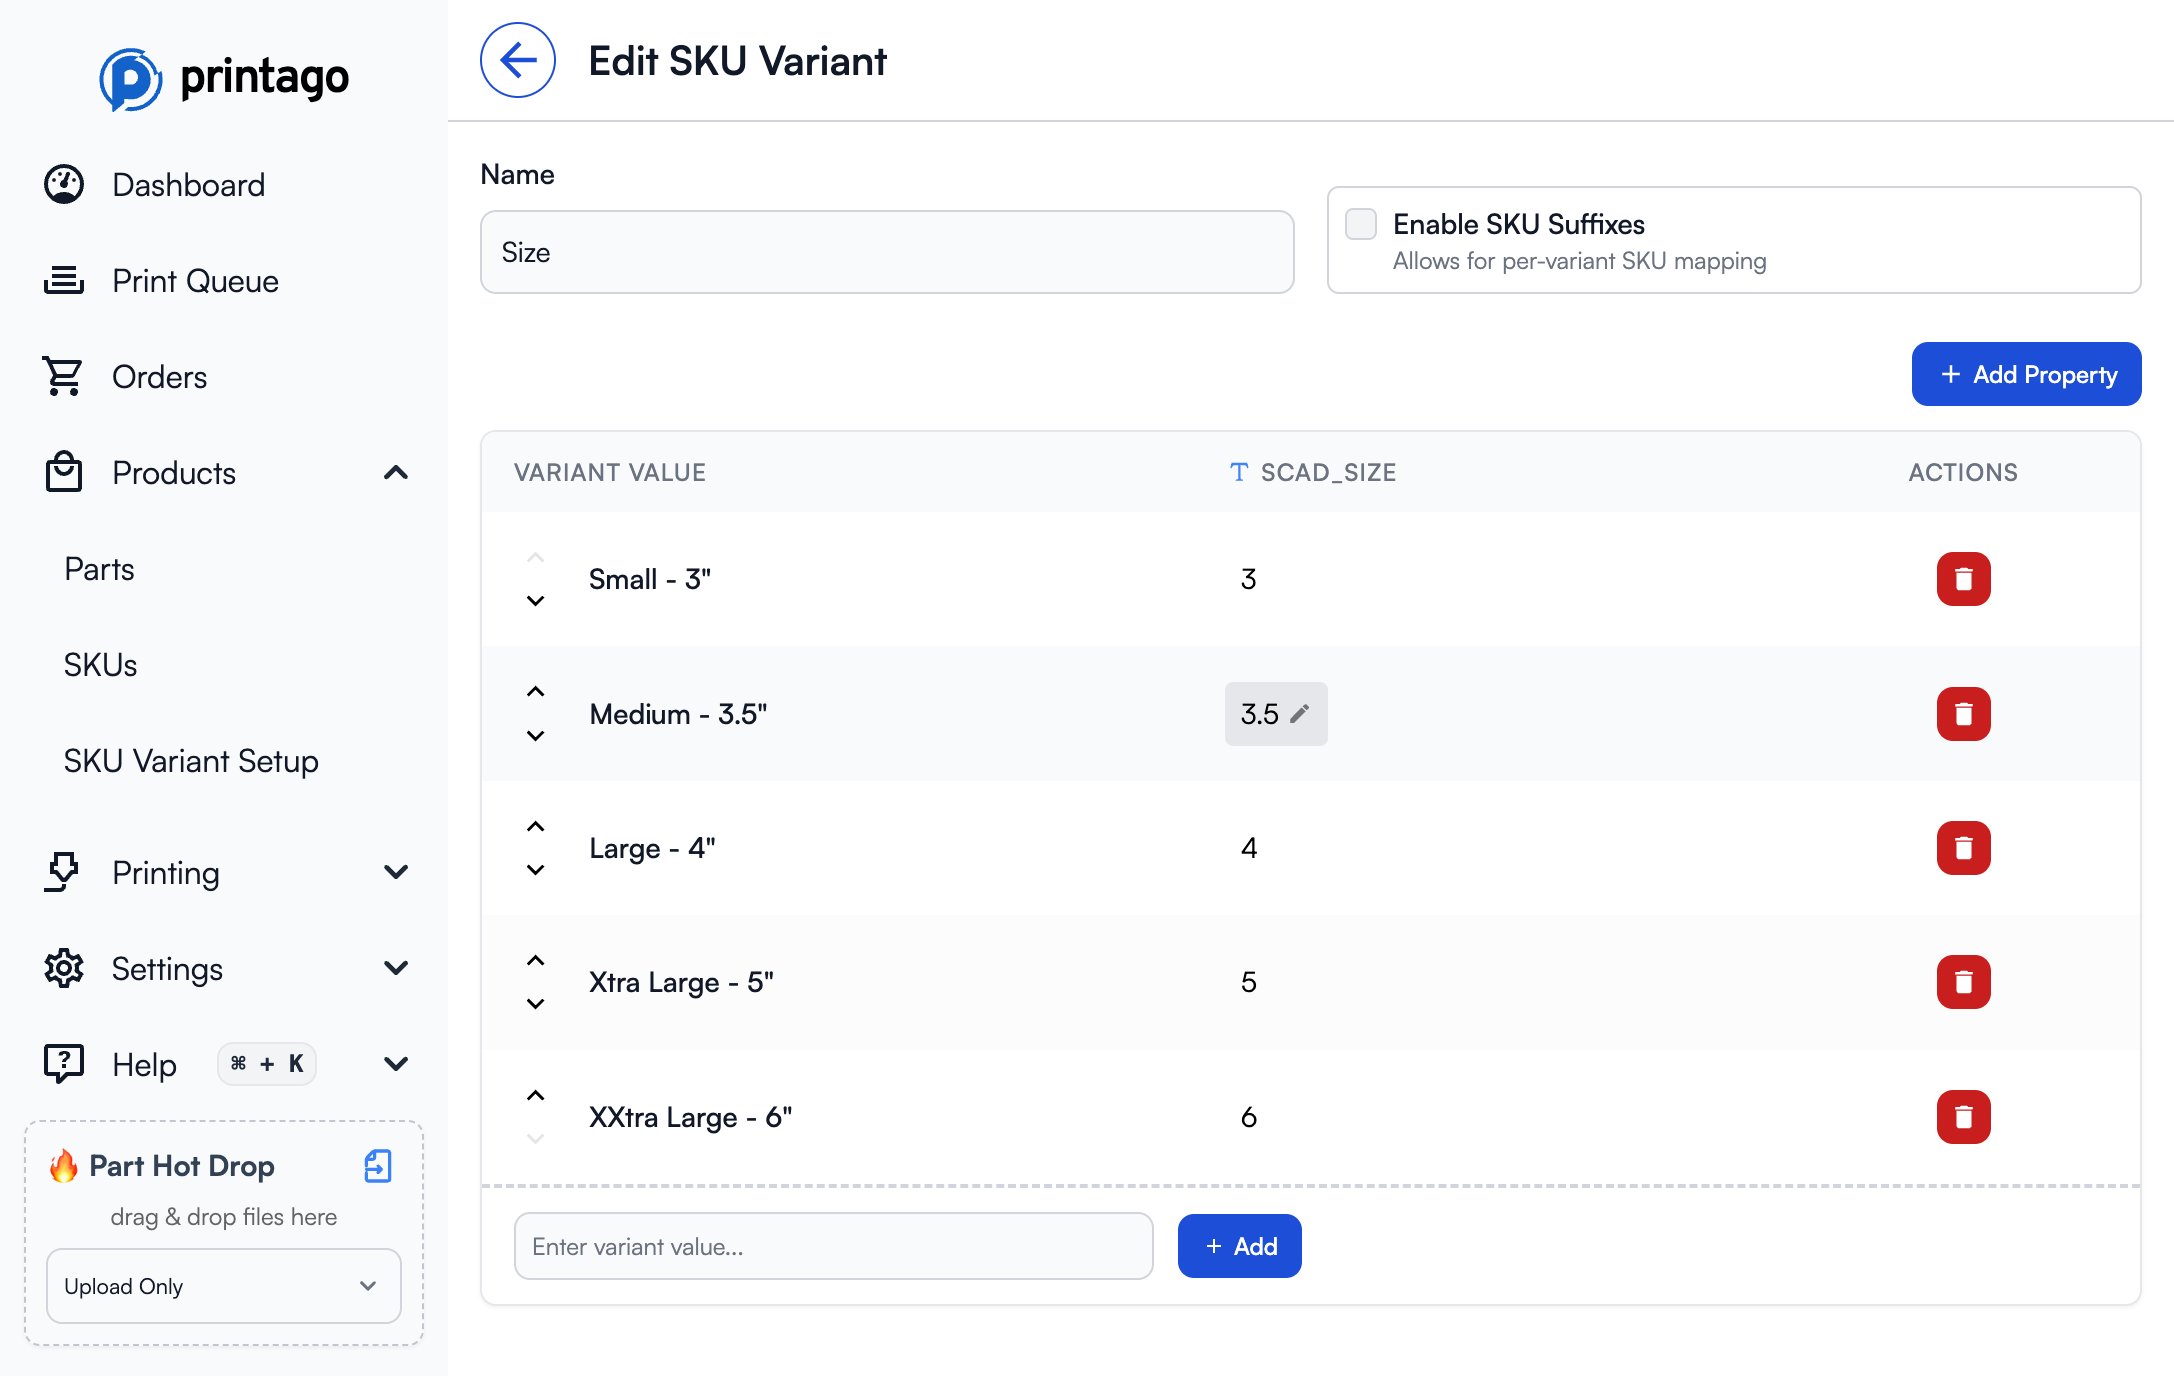
Step 4: Assign Variants to SKUs
- Open your SKU for editing (
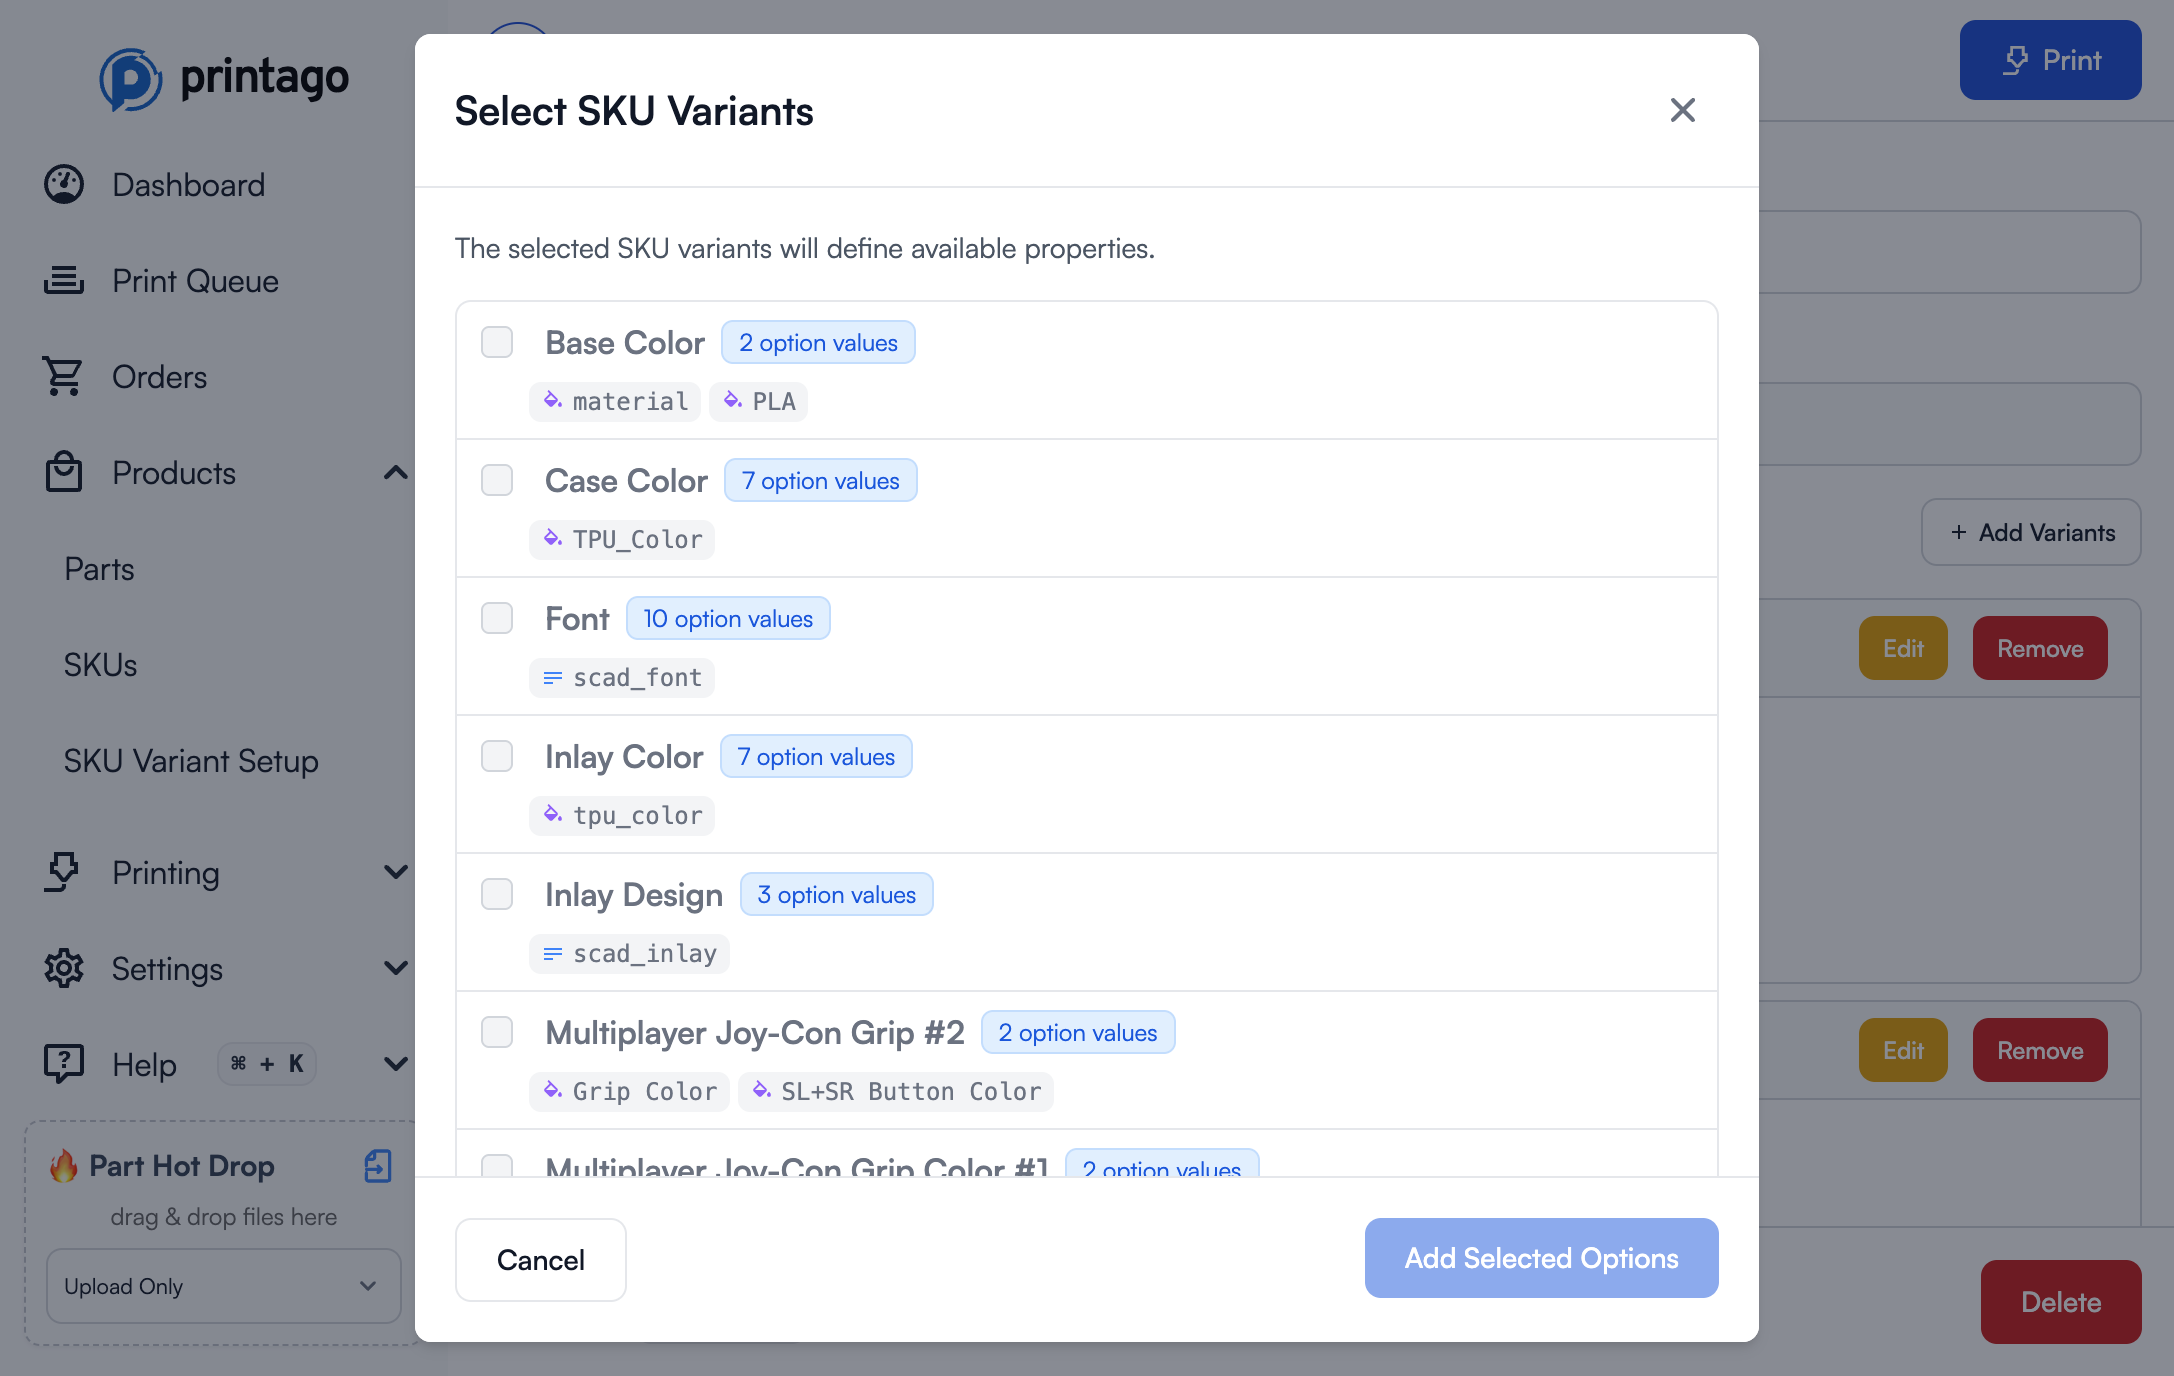
Products → SKUs, then click on a SKU) - Scroll down to the SKU Variant Setup section and click
Add Variants - In the "Select SKU Variants" dialog, check the variants you want to apply to this SKU
- Click
Add Selected Options
Once you've added variants to your SKU, they'll appear in the SKU Variant Setup section:
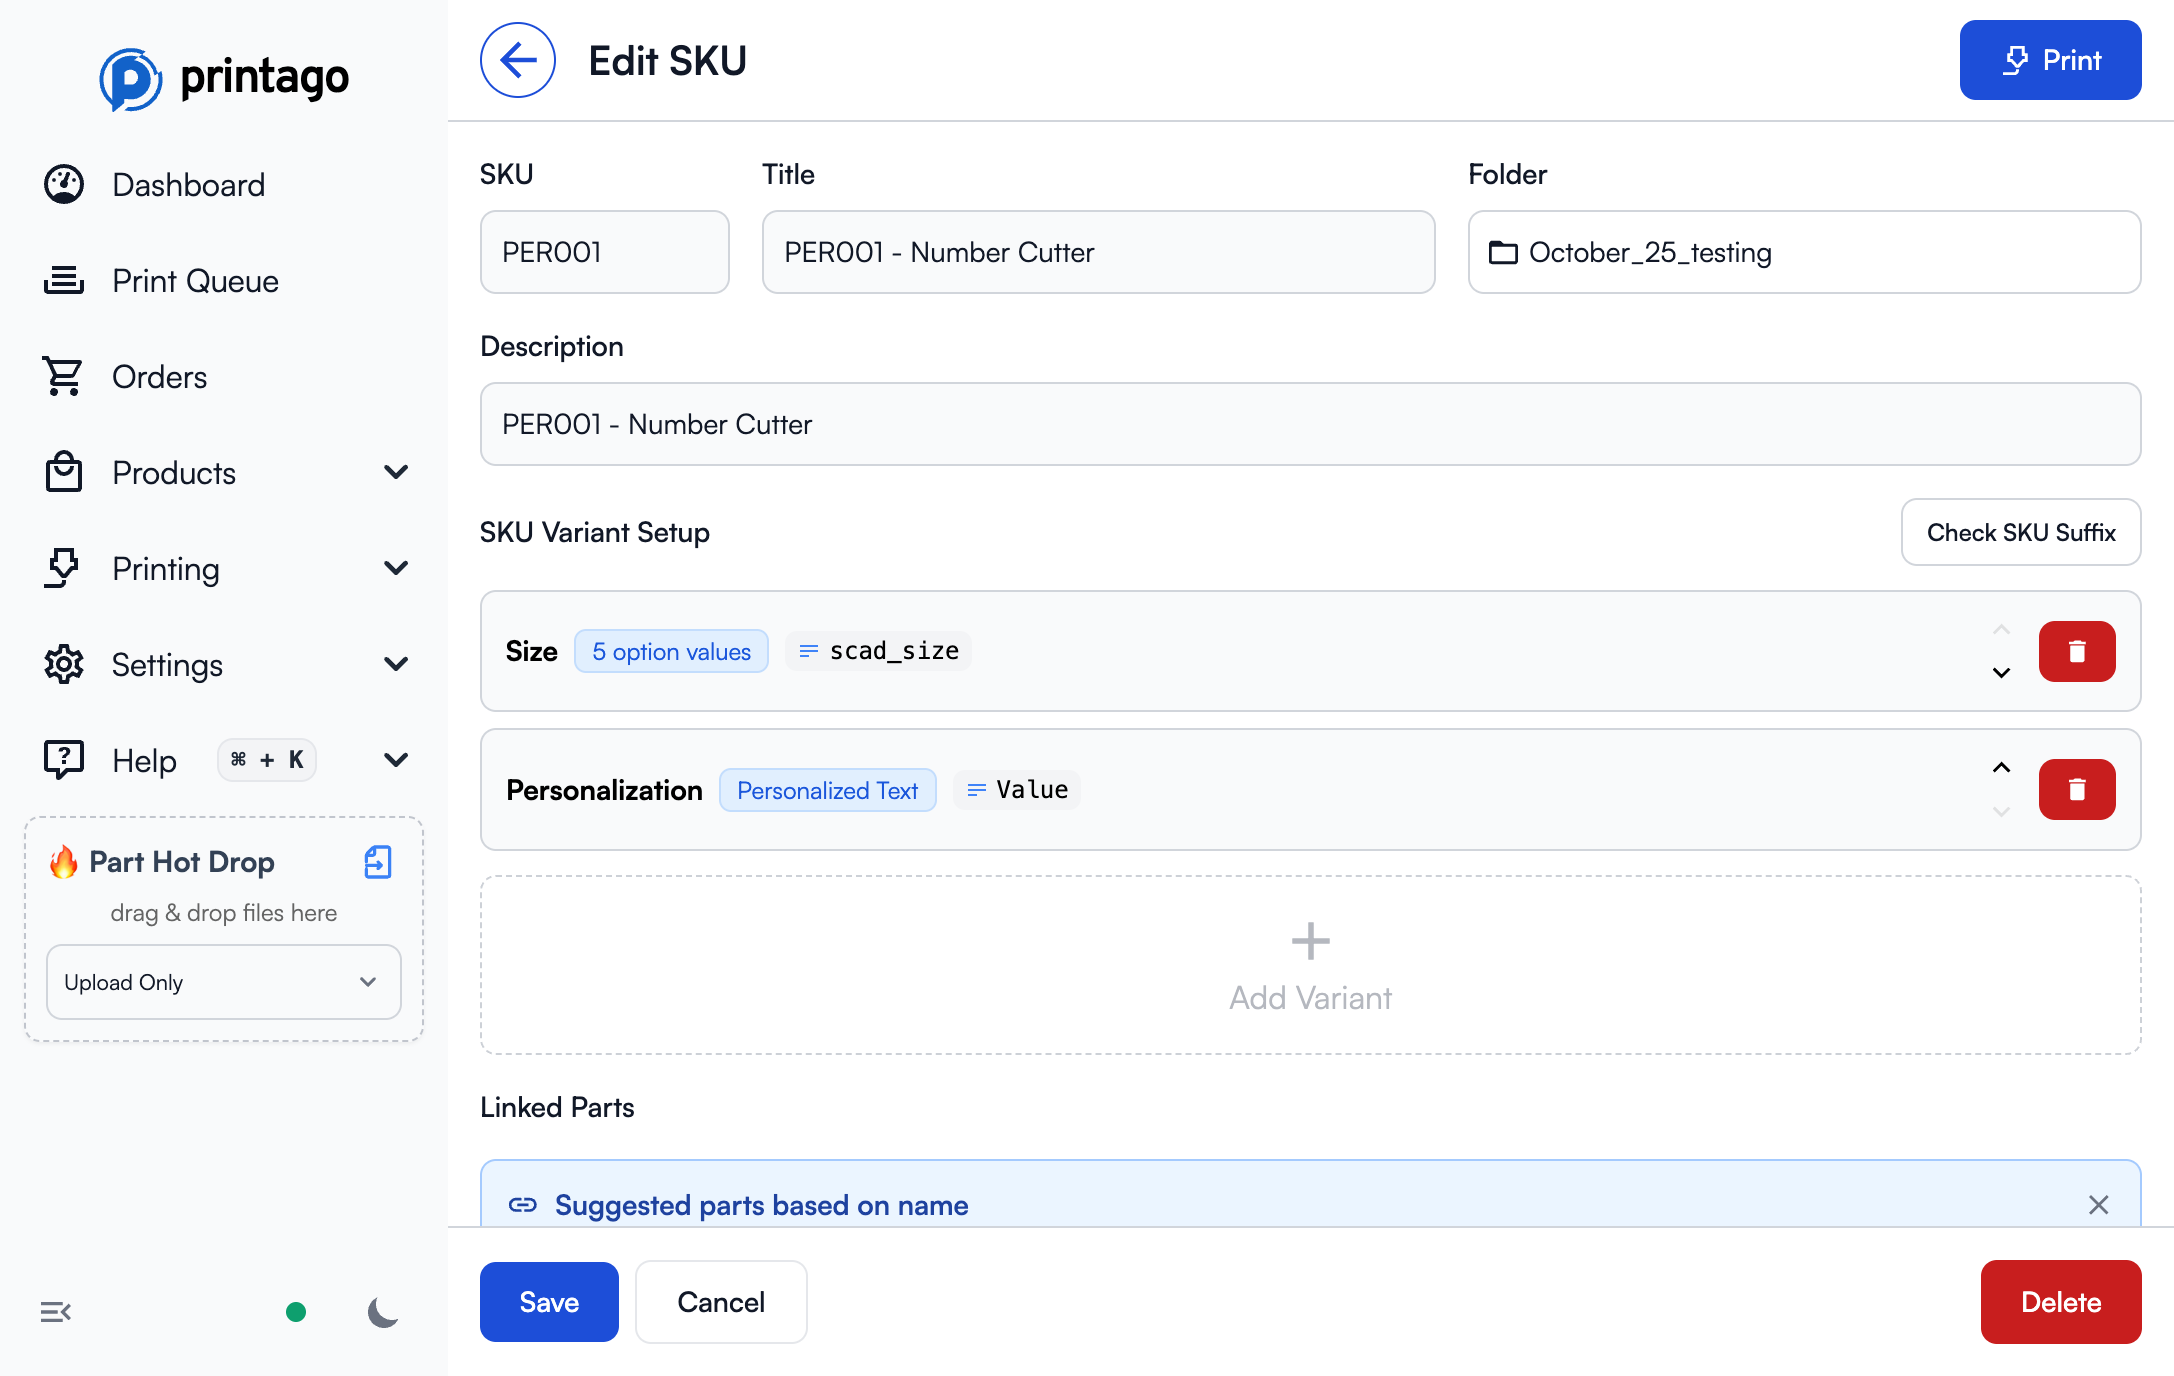
Every variant you attach is required by default: an order for this SKU that arrives without a value for it is held in reconciliation as missing required option. Tick Optional next to a variant when a customer can legitimately leave it out (an Etsy personalization question that isn't marked required, for example). An optional variant is never flagged as missing, isn't part of the SKU suffix, and its value is still validated whenever one does arrive. Etsy imports set this automatically from each question's required setting.
Step 5: Filter Variant Options for This SKU (Optional)
Not every SKU needs access to all variant values. For example, a "Premium Mug" might only be available in 3 of your 10 color options. Variant filtering lets you control which values are available when printing a specific SKU.
- In the SKU Variant Setup section, locate the variant you want to filter
- Click the filter icon (funnel) next to the variant
- Select a filter mode:
- Off: All variant values are available (default)
- Include only: Only checked values will be available
- Exclude: All values except checked ones will be available
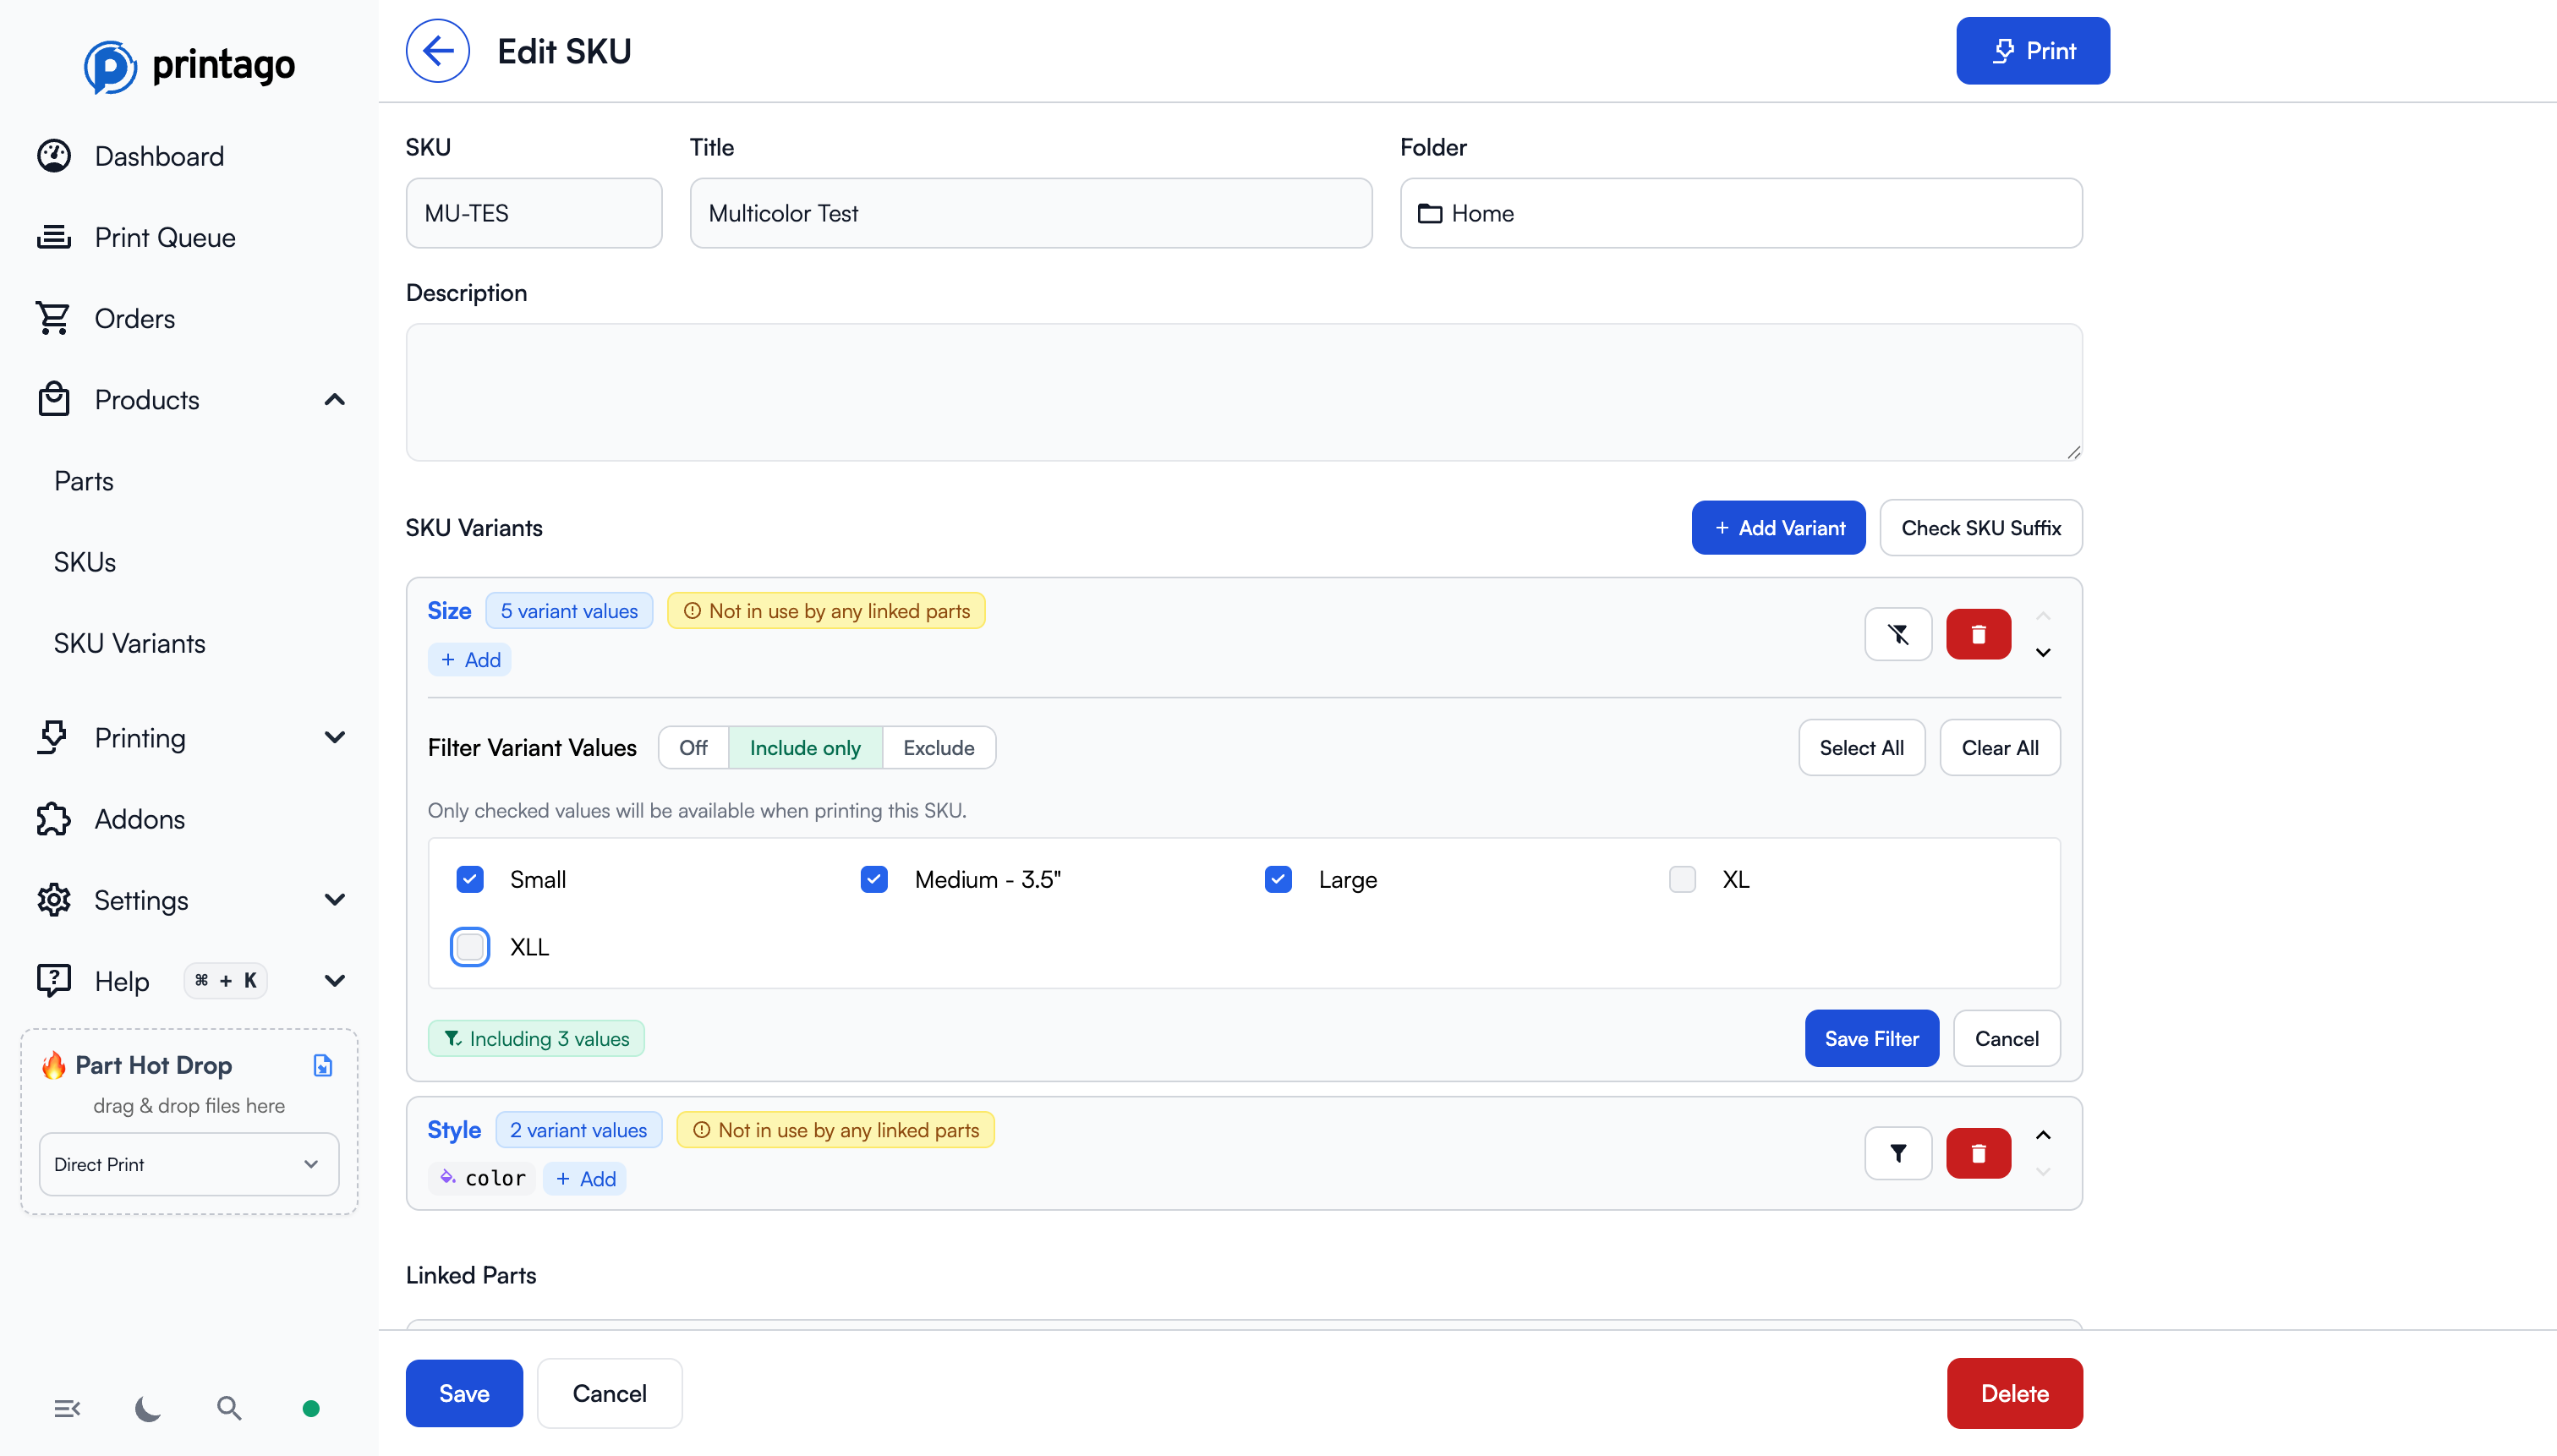
- Check or uncheck the variant values you want to include or exclude
- Click Save Filter to apply
The status indicator shows how many values are currently filtered (e.g., "Including 3 values" or "Excluding 2 values").
The filter applies everywhere this SKU resolves a value, including SKU Suffixes: an order whose code names a value this SKU leaves out does not match, and is held for review rather than printed with a value you don't sell.
- Use Include only when you want to lock down the available values - new values added to the variant later will NOT automatically appear for this SKU
- Use Exclude when you want new values to be automatically available - only the explicitly excluded values will be hidden
- Leave Off when all values (current and future) should always be available
Step 6: Add SKU-Specific Properties (Optional)
Properties can be either global (defined at the variant level, shared across all SKUs) or SKU-specific (defined for a single SKU only).
When to use SKU-specific properties:
- The property is unique to this product and won't be reused
To create a SKU-specific property:
- In the SKU edit page, find the variant binding in the SKU Variant Setup section
- Click the Add button next to the variant
- Enter a property name and select the property type
- The property is automatically scoped to this SKU only
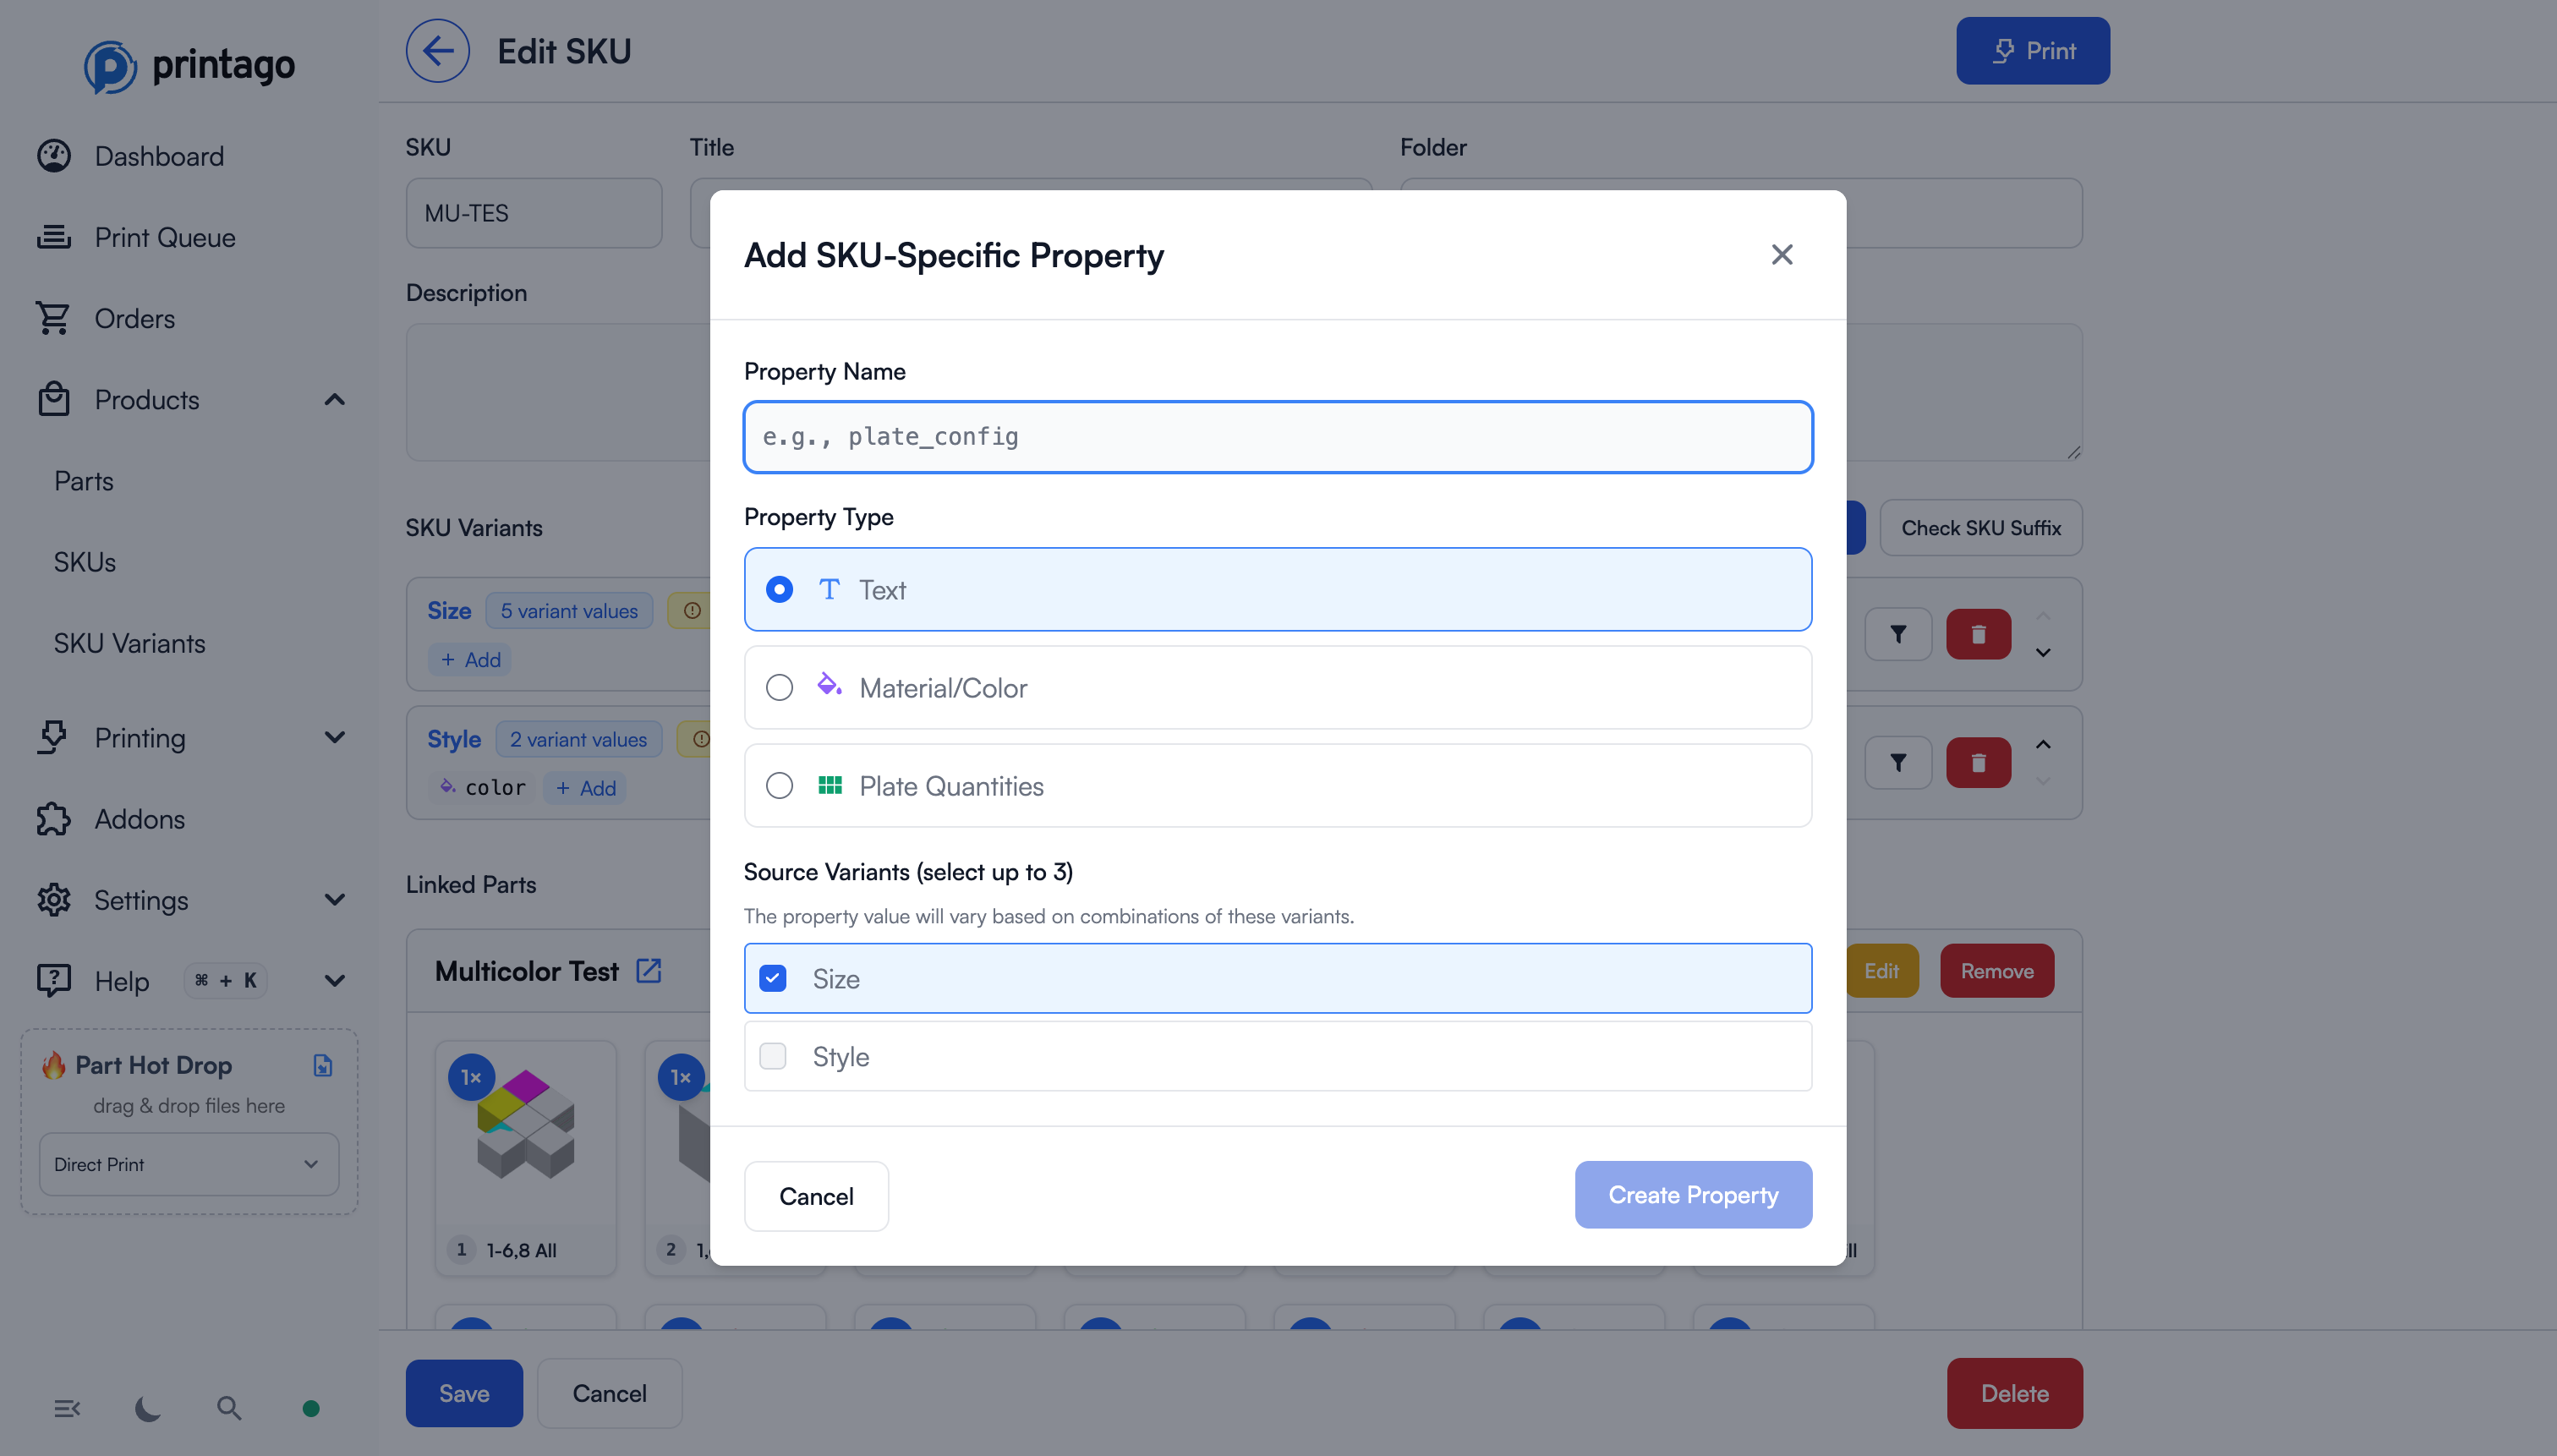
SKU-specific properties appear alongside global properties in the variant section, but they're only visible and usable for this specific SKU.
Step 7: Create Compound Properties (Optional)
Compound properties let you define property values based on combinations of multiple variant values. This is useful when a property varies based on two or three variant dimensions together. Compound properties are SKU-specific: you create them from a SKU, and they apply to that SKU only. Any property type can be compound.
Example use case: You have a 3MF with multiple pre-arranged plates for different Size and Style combinations. A "Small + Minimal" order prints Plate 1, while a "Large + Deluxe" order prints Plate 3. A compound Plate Quantities property lets you select the right plate based on both variant selections.
To create a compound property:
- Click Add next to any variant in the SKU Variant Setup section
- In the dialog, check multiple variants in the Source Variants section (up to 3)
- Enter a property name and select the type
- Click Create Property
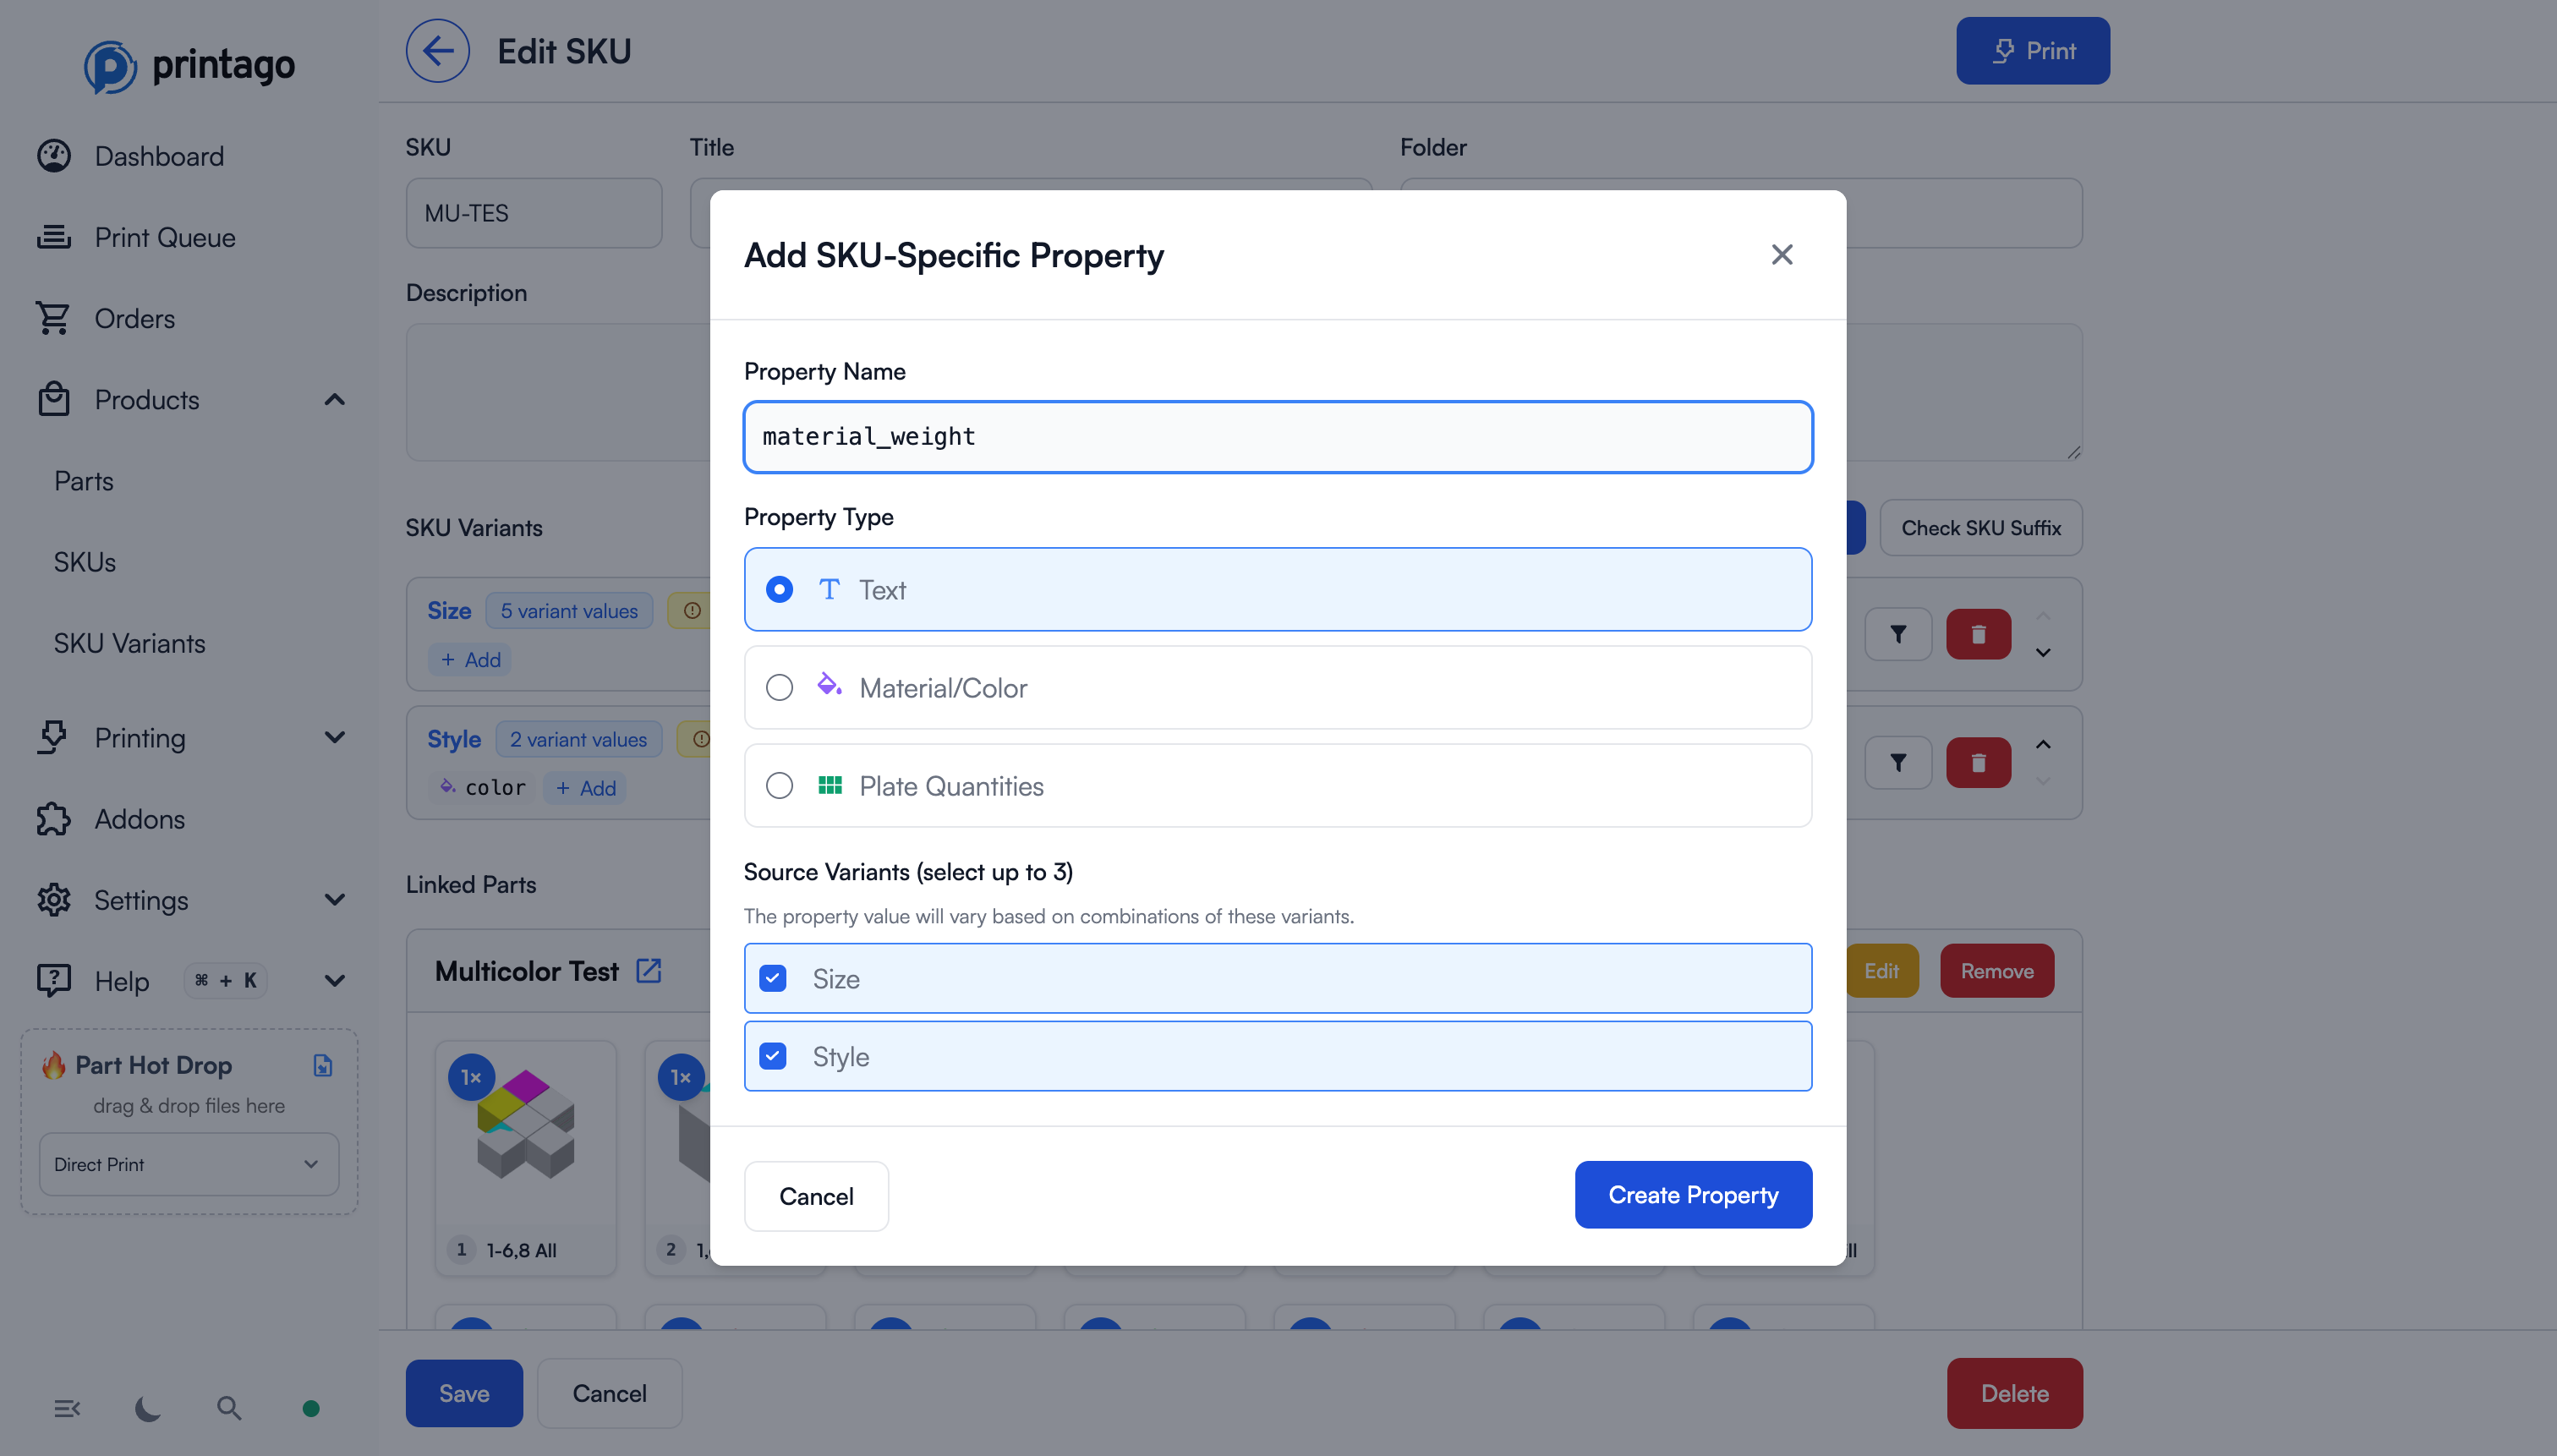
- Click on the property button (showing the property name with a number like "(2)") to open the matrix editor
- The matrix shows all combinations of the selected variants
- Click any cell to enter a value for that specific combination
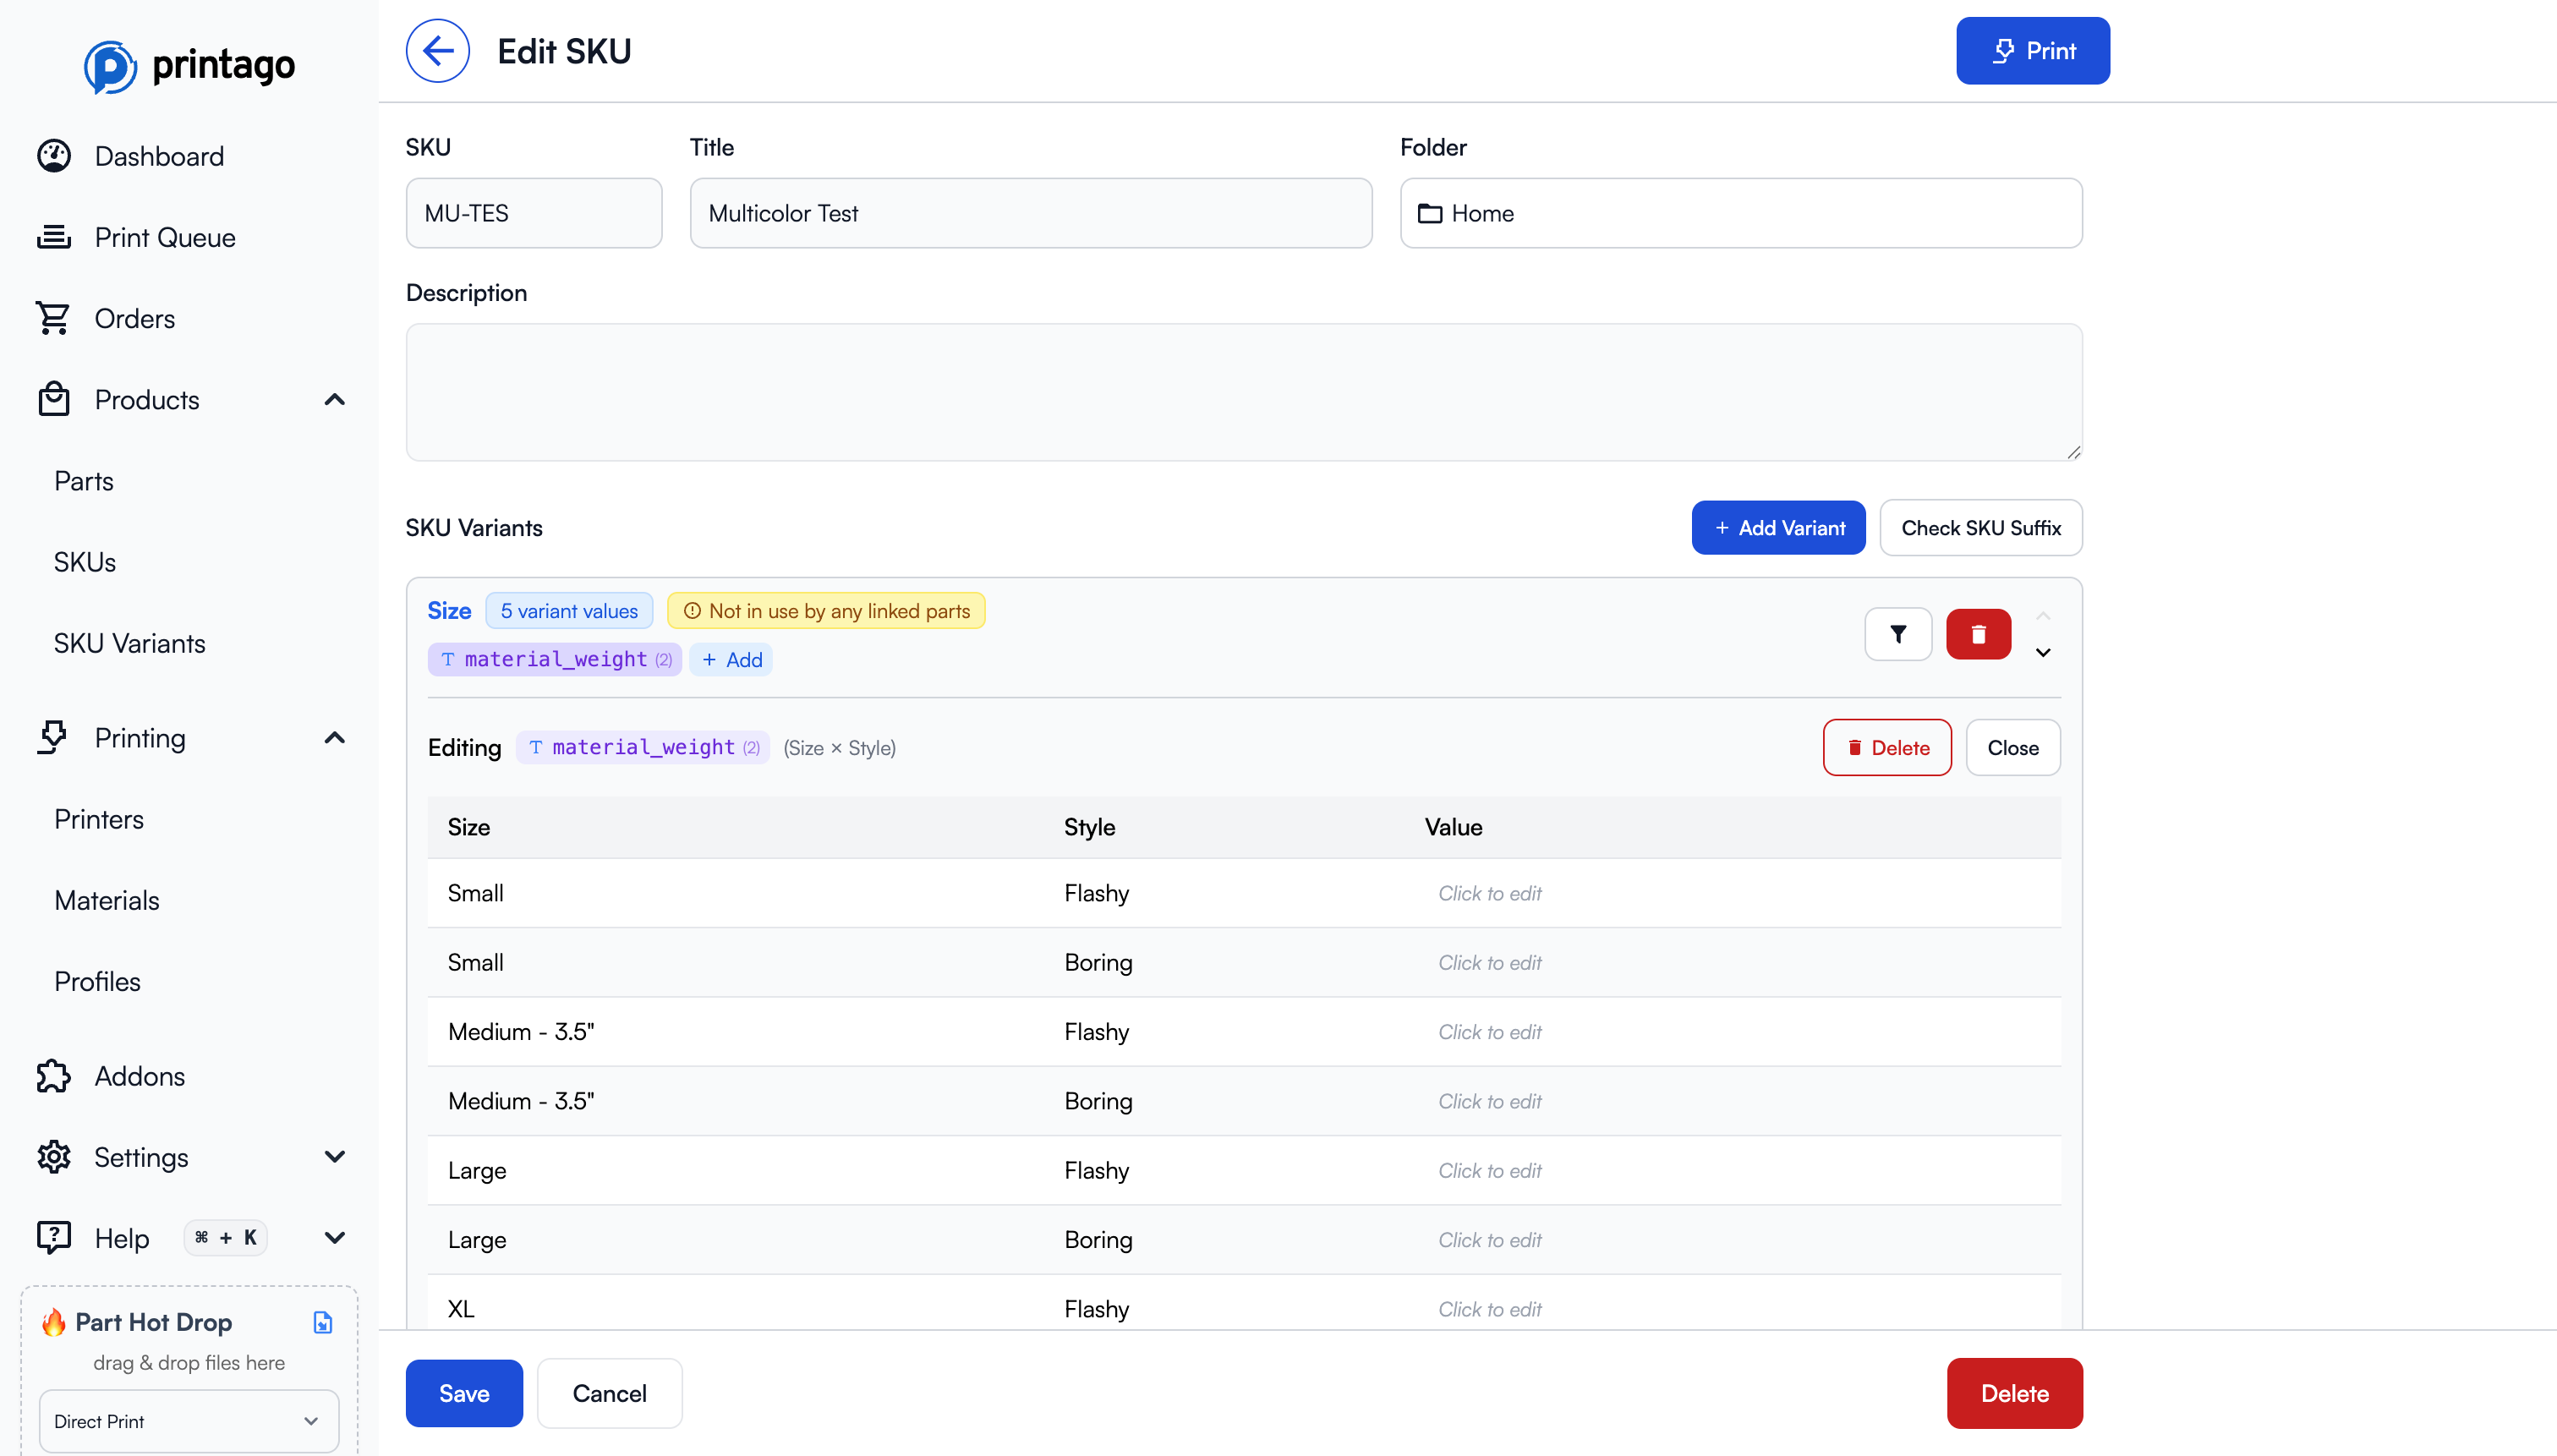
Compound properties are indicated by a number in parentheses showing how many variants they combine (e.g., "material_weight (2)").
Step 8: Map Properties to Parts
Now you need to map the variant properties to your parts:
Mapping Properties to Material Slots
For parts with materials (STL, 3MF, etc.):
- In the Linked Parts section, click
Editon the part - In the Materials section, you'll see each material slot from your part
- For each material slot, click
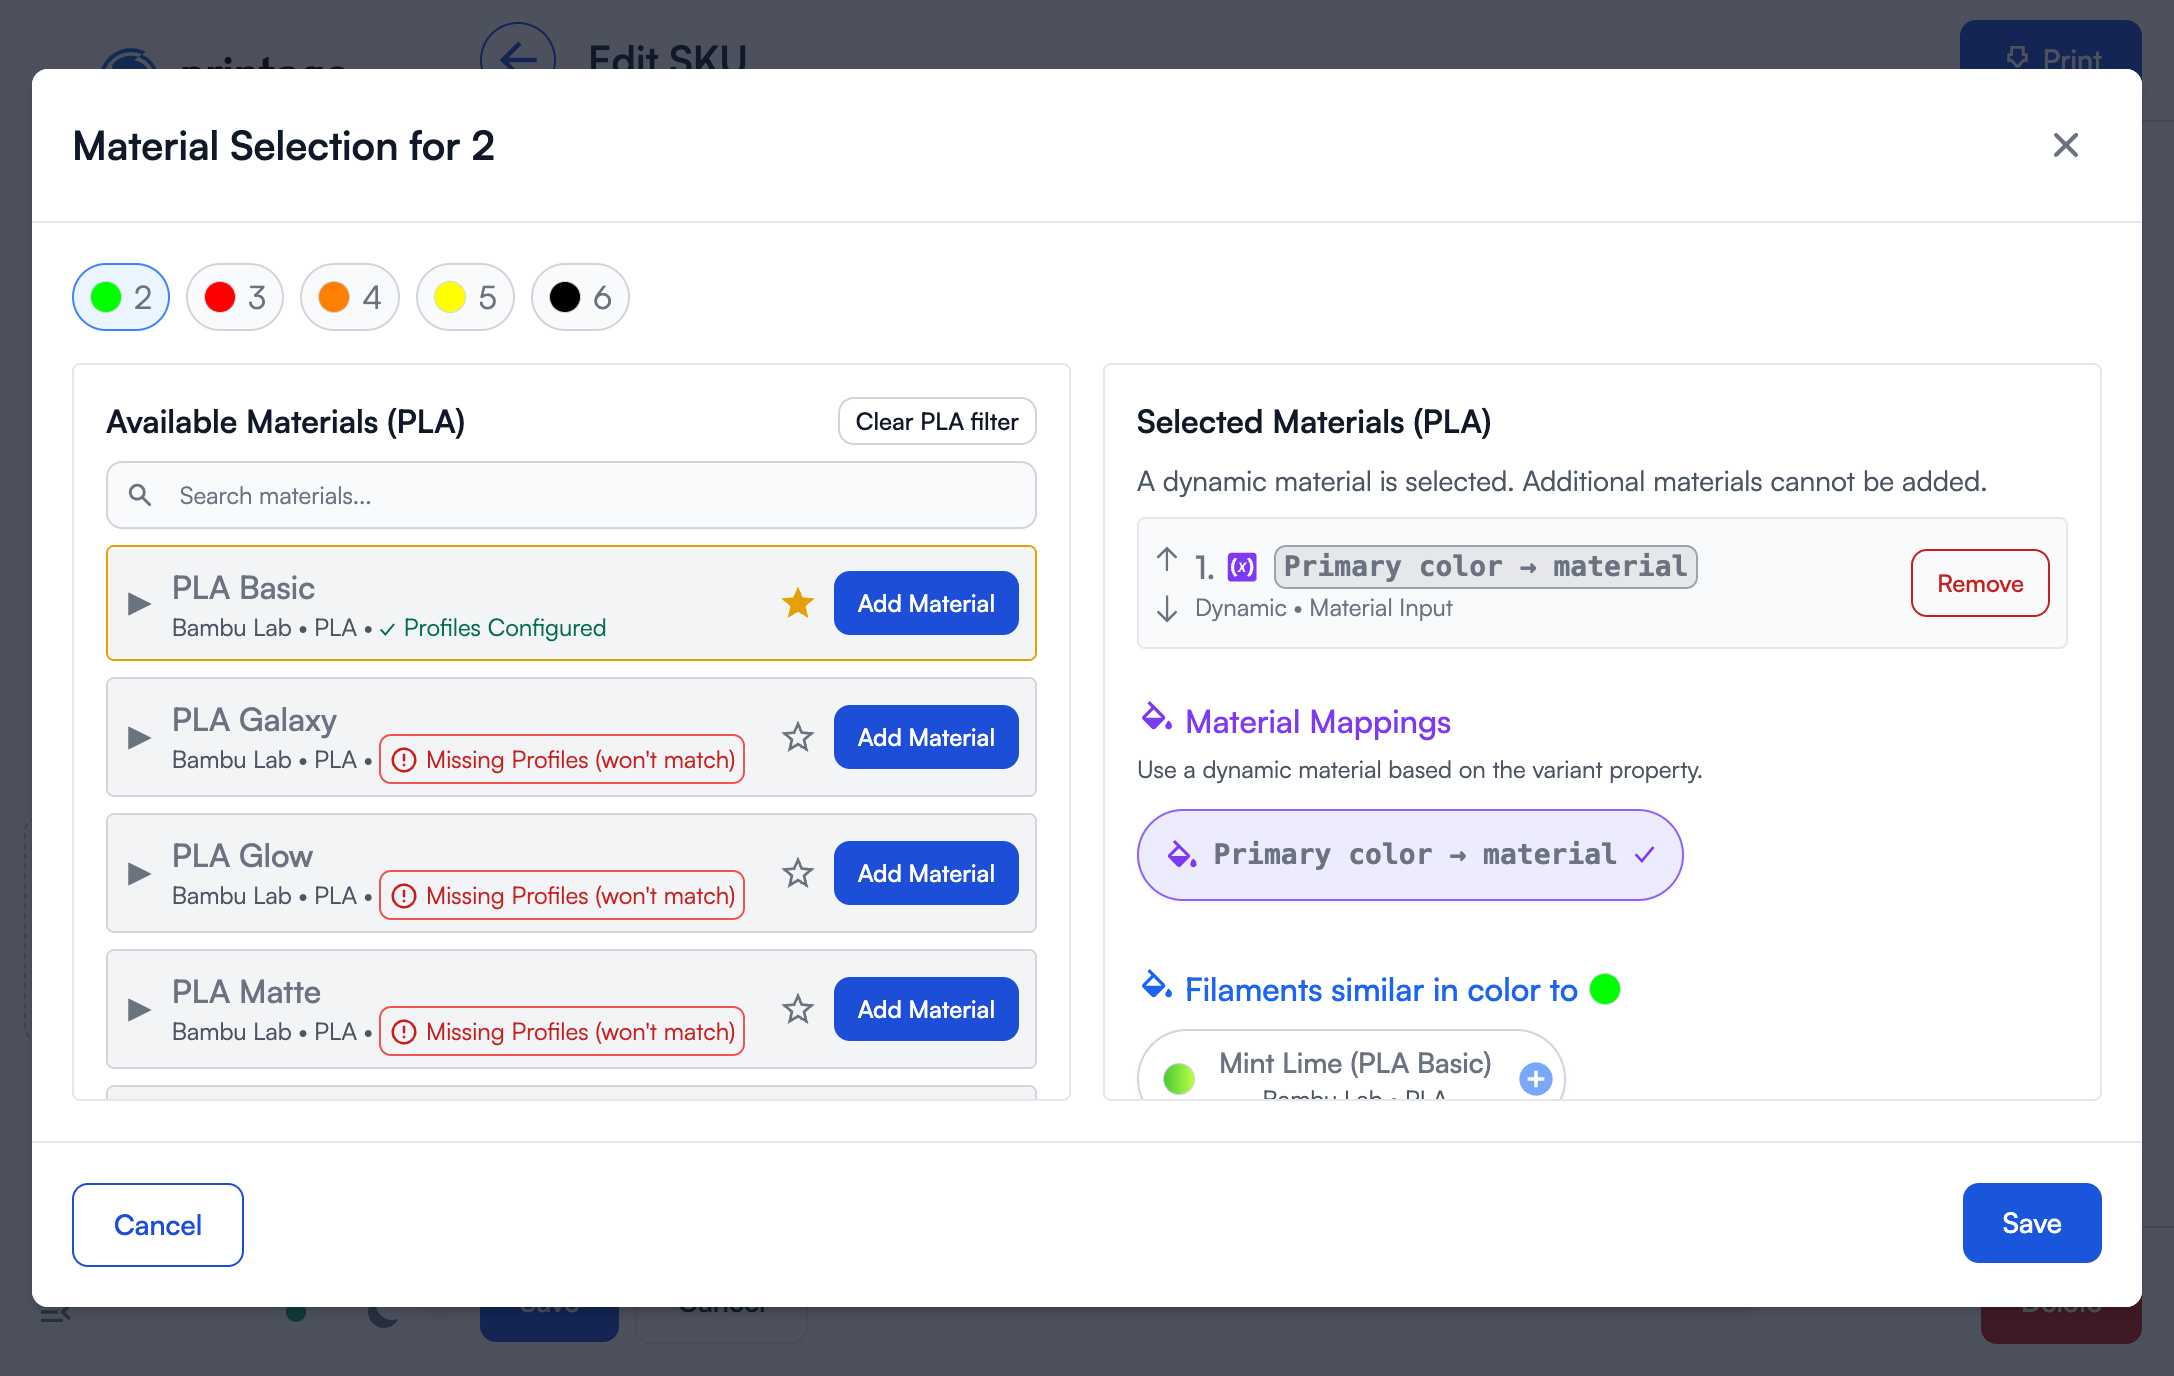
Configure - In the Material Mappings section (at the bottom), click the button for the property you want to use (e.g., "Primary color → material")
- Click
Saveto apply the mapping
- Once saved, materials mapped to properties will show "Overridden" status with the property name
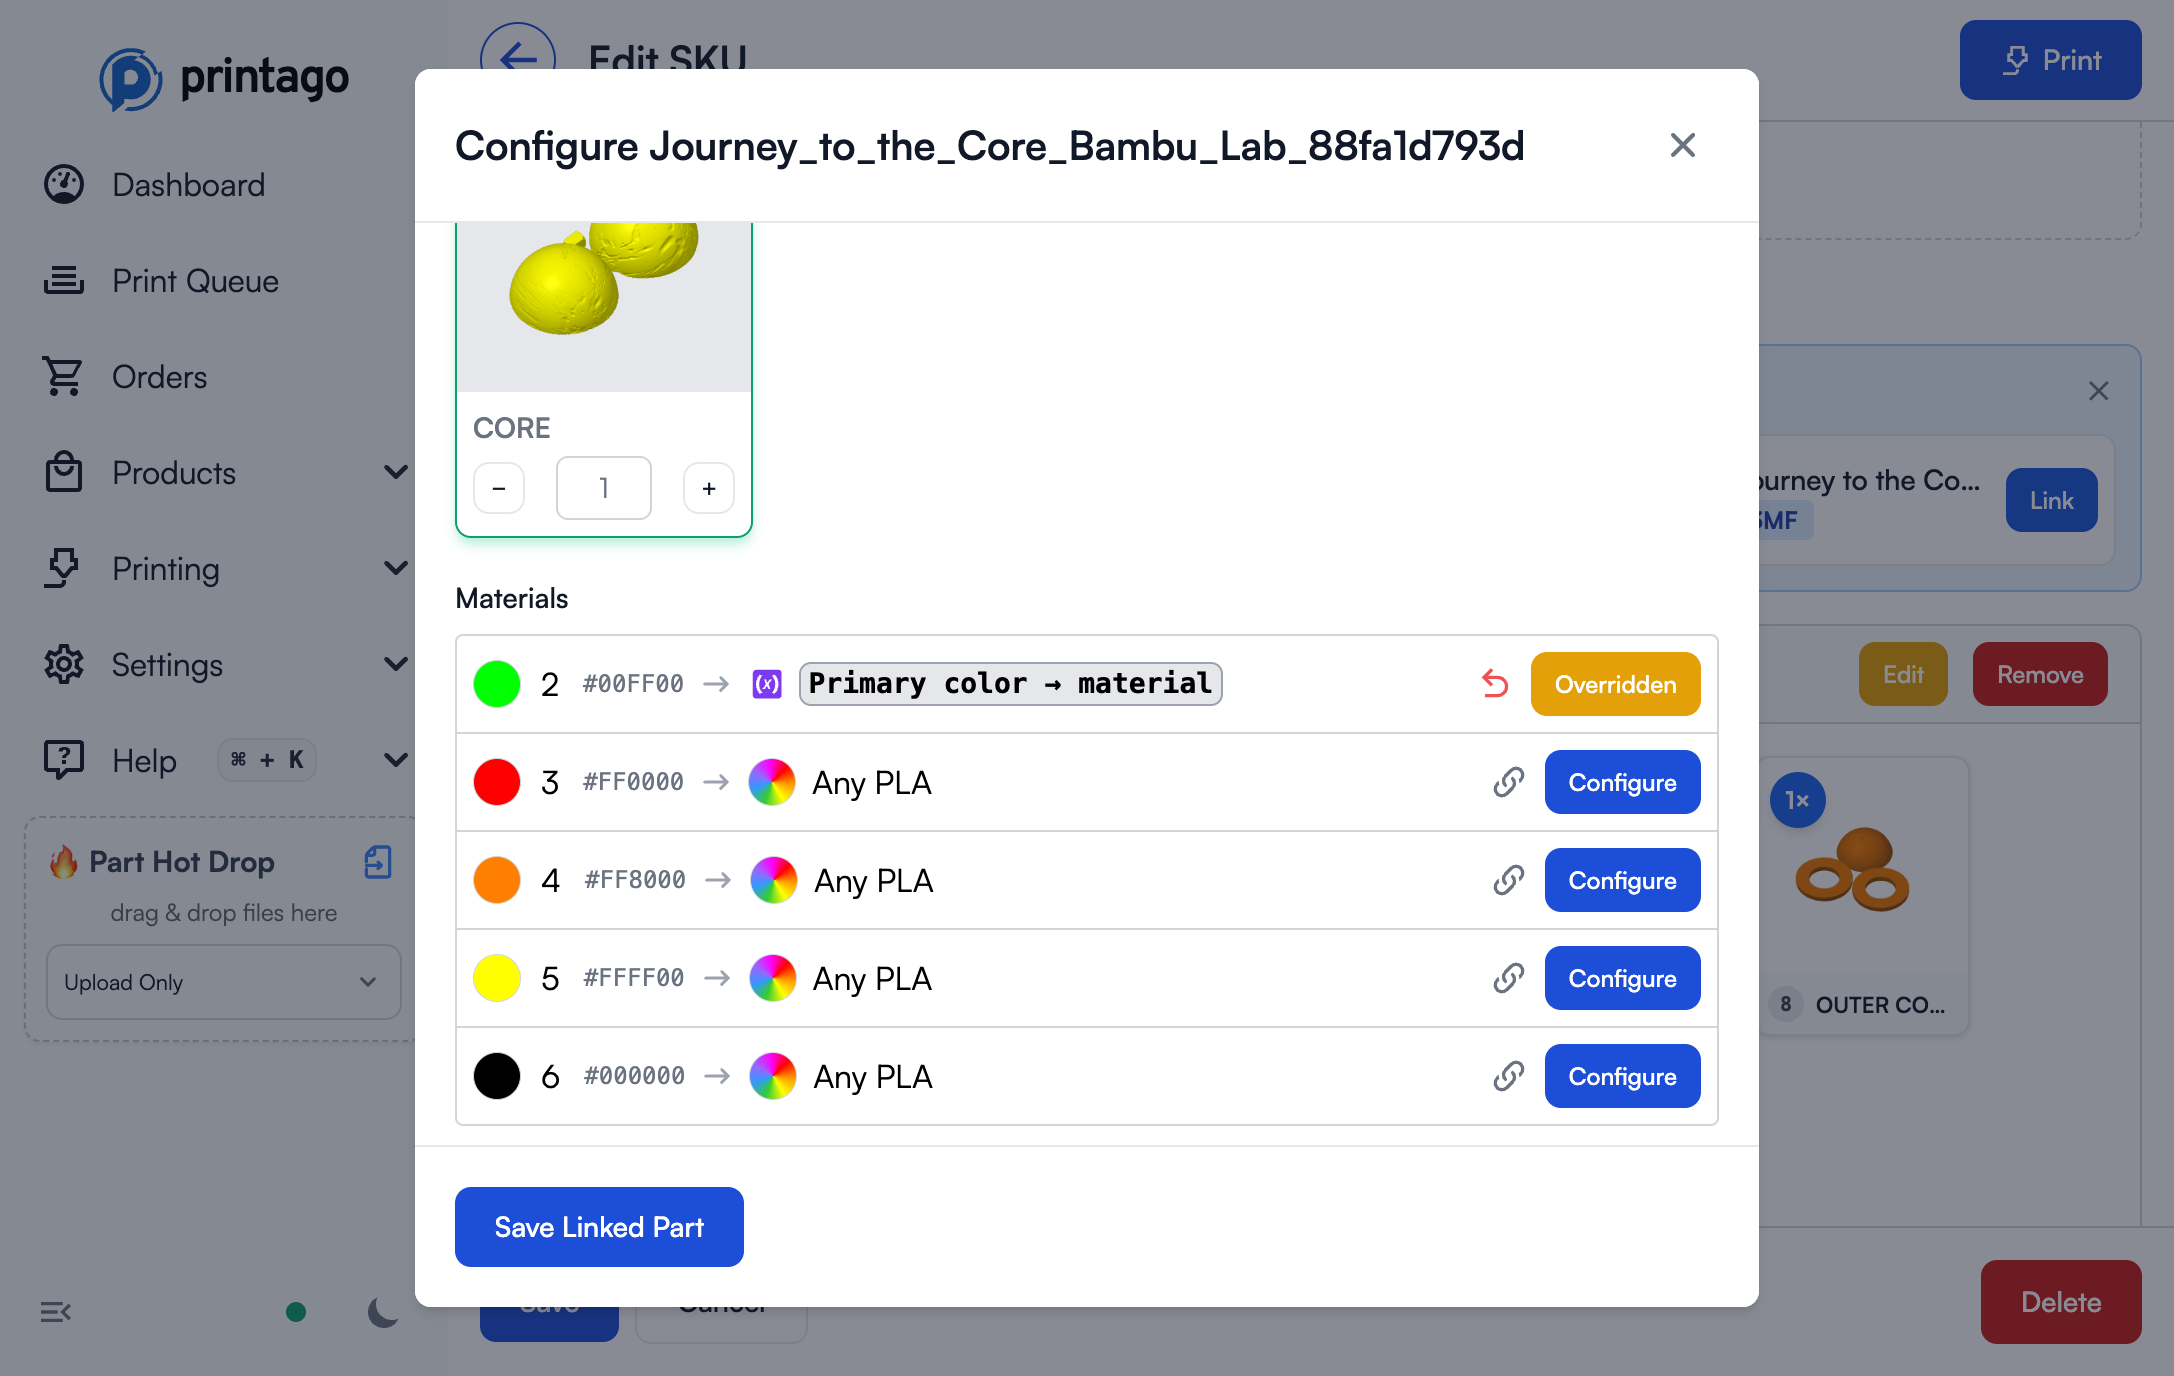
When a material slot is mapped to a variant property, it will use the material specified in the selected variant value. This allows one part file to handle multiple material/color combinations automatically.
Mapping Properties to OpenSCAD Parameters
For OpenSCAD parts with parameters:
- In the Linked Parts section of the SKU, click
Editon the OpenSCAD part - In the Parameters table, you'll see all parsed parameters
- Click the link icon next to a parameter
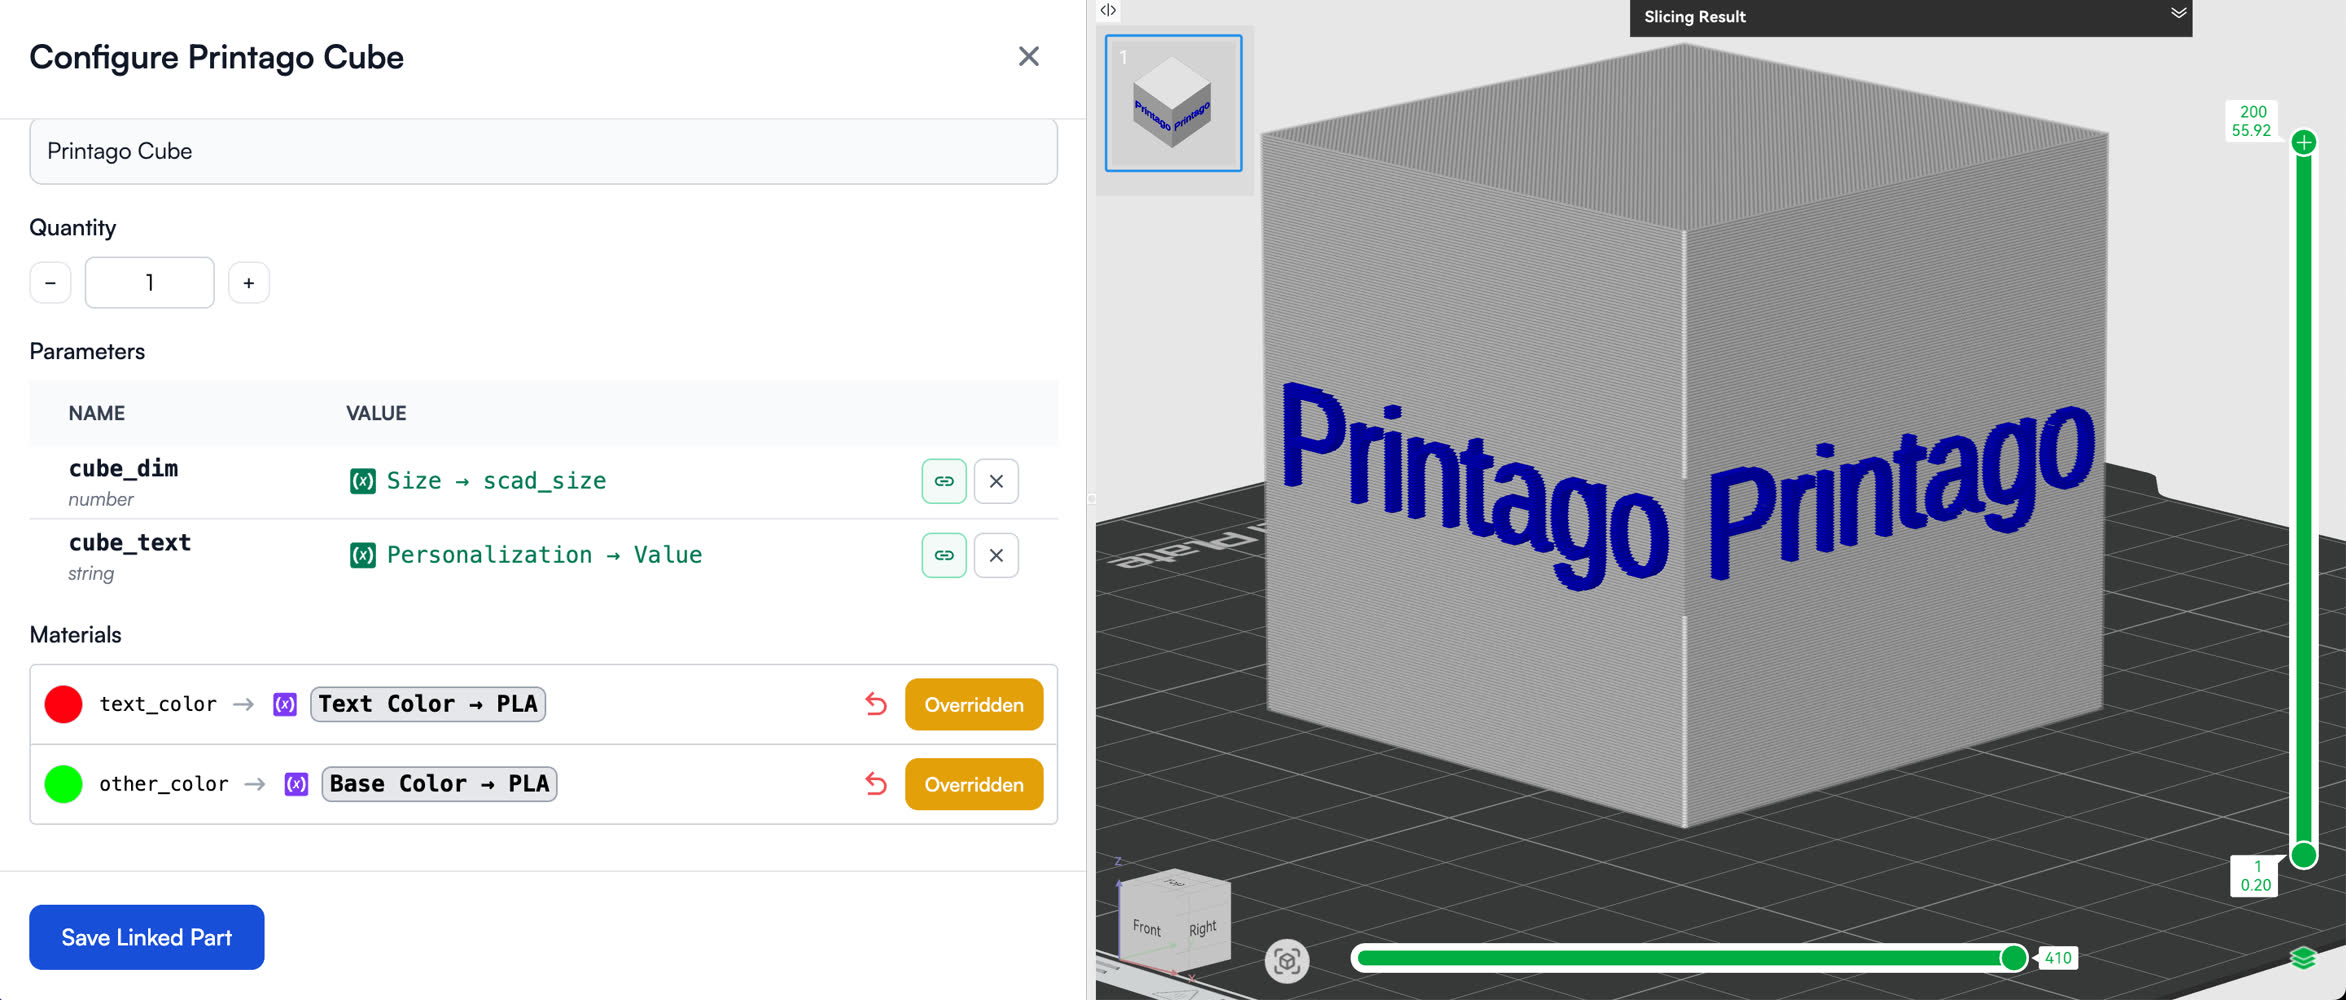
- Under Map to SKU variant property, pick the variant and Text property to use (e.g.,
Size → scad_size (text)) - Click
Save Linked Part. Linked parameters show the mapping (e.g., "Size → scad_size")
Printago finds a parameter only when it's declared as a plain value at the top of the file, before any module: scad_size = 3; or label = "Hi";. A line like size = scad_size; is not a parameter, and there is nothing to link.
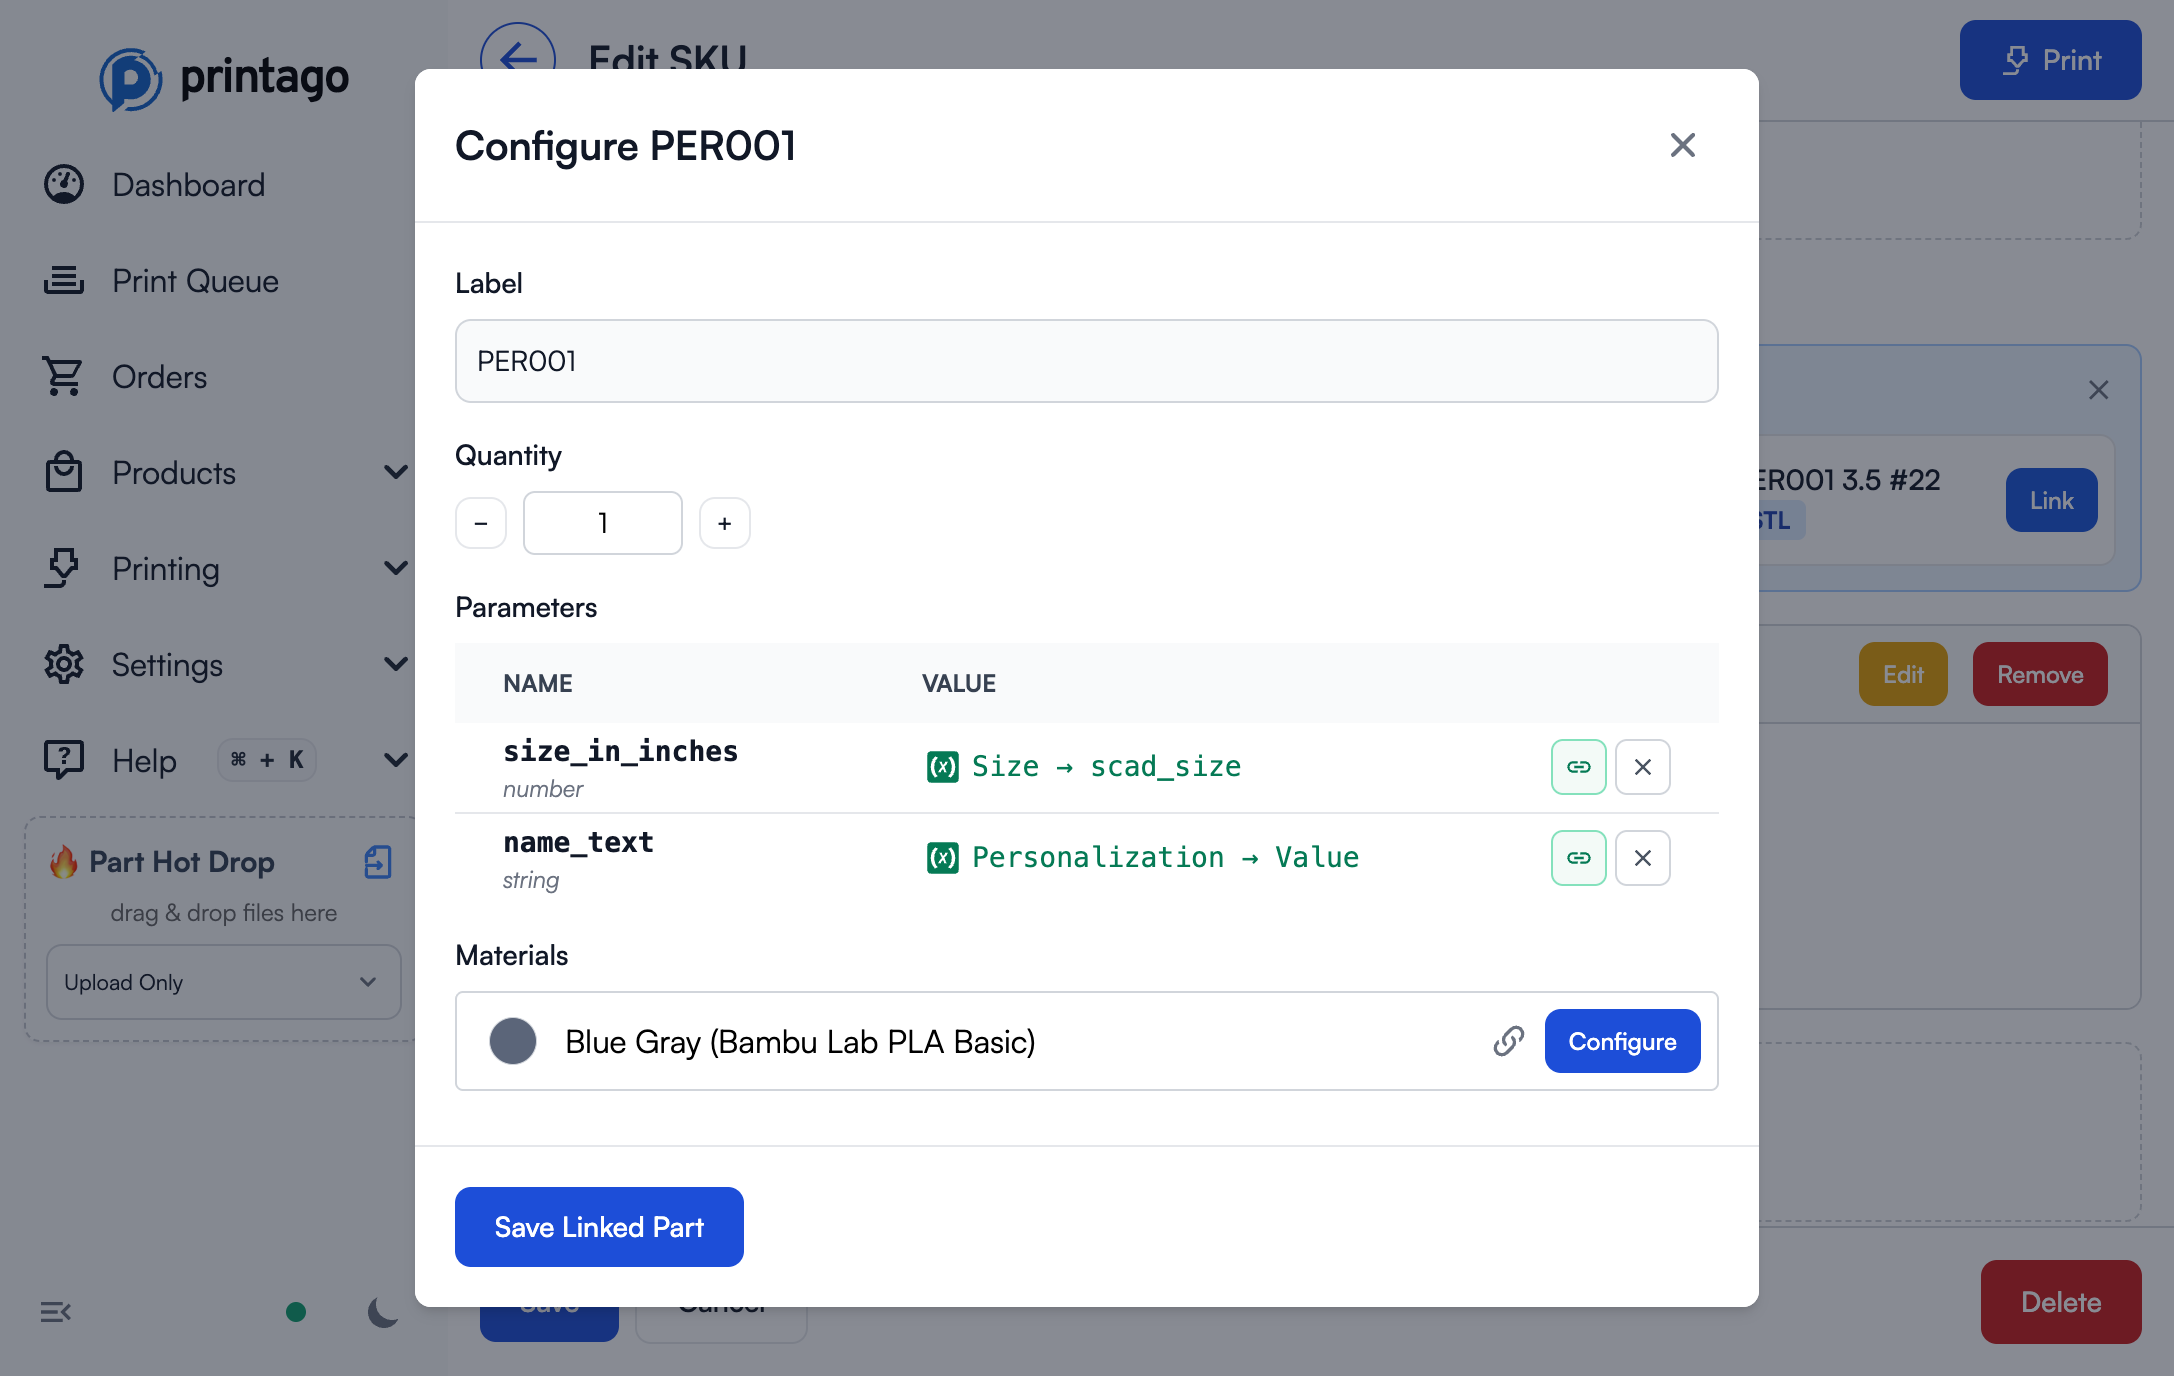
Text properties can feed both numbers and text. The parameter's default in the file decides which: width = 10; receives the property value as a number, label = "Hi"; receives it as text. Make sure every value you enter for a numeric parameter is a number.
Mapping Plate Quantities to Parts
For multi-plate 3MF parts where you want to control quantities per variant:
- In the Linked Parts section, click
Editon the part - In the Plates section, click the link icon (next to "Editing each")
- Select the Plate Quantities property you want to use (e.g., "Pack Size → plate_quantities")
- Click
Save Linked Part
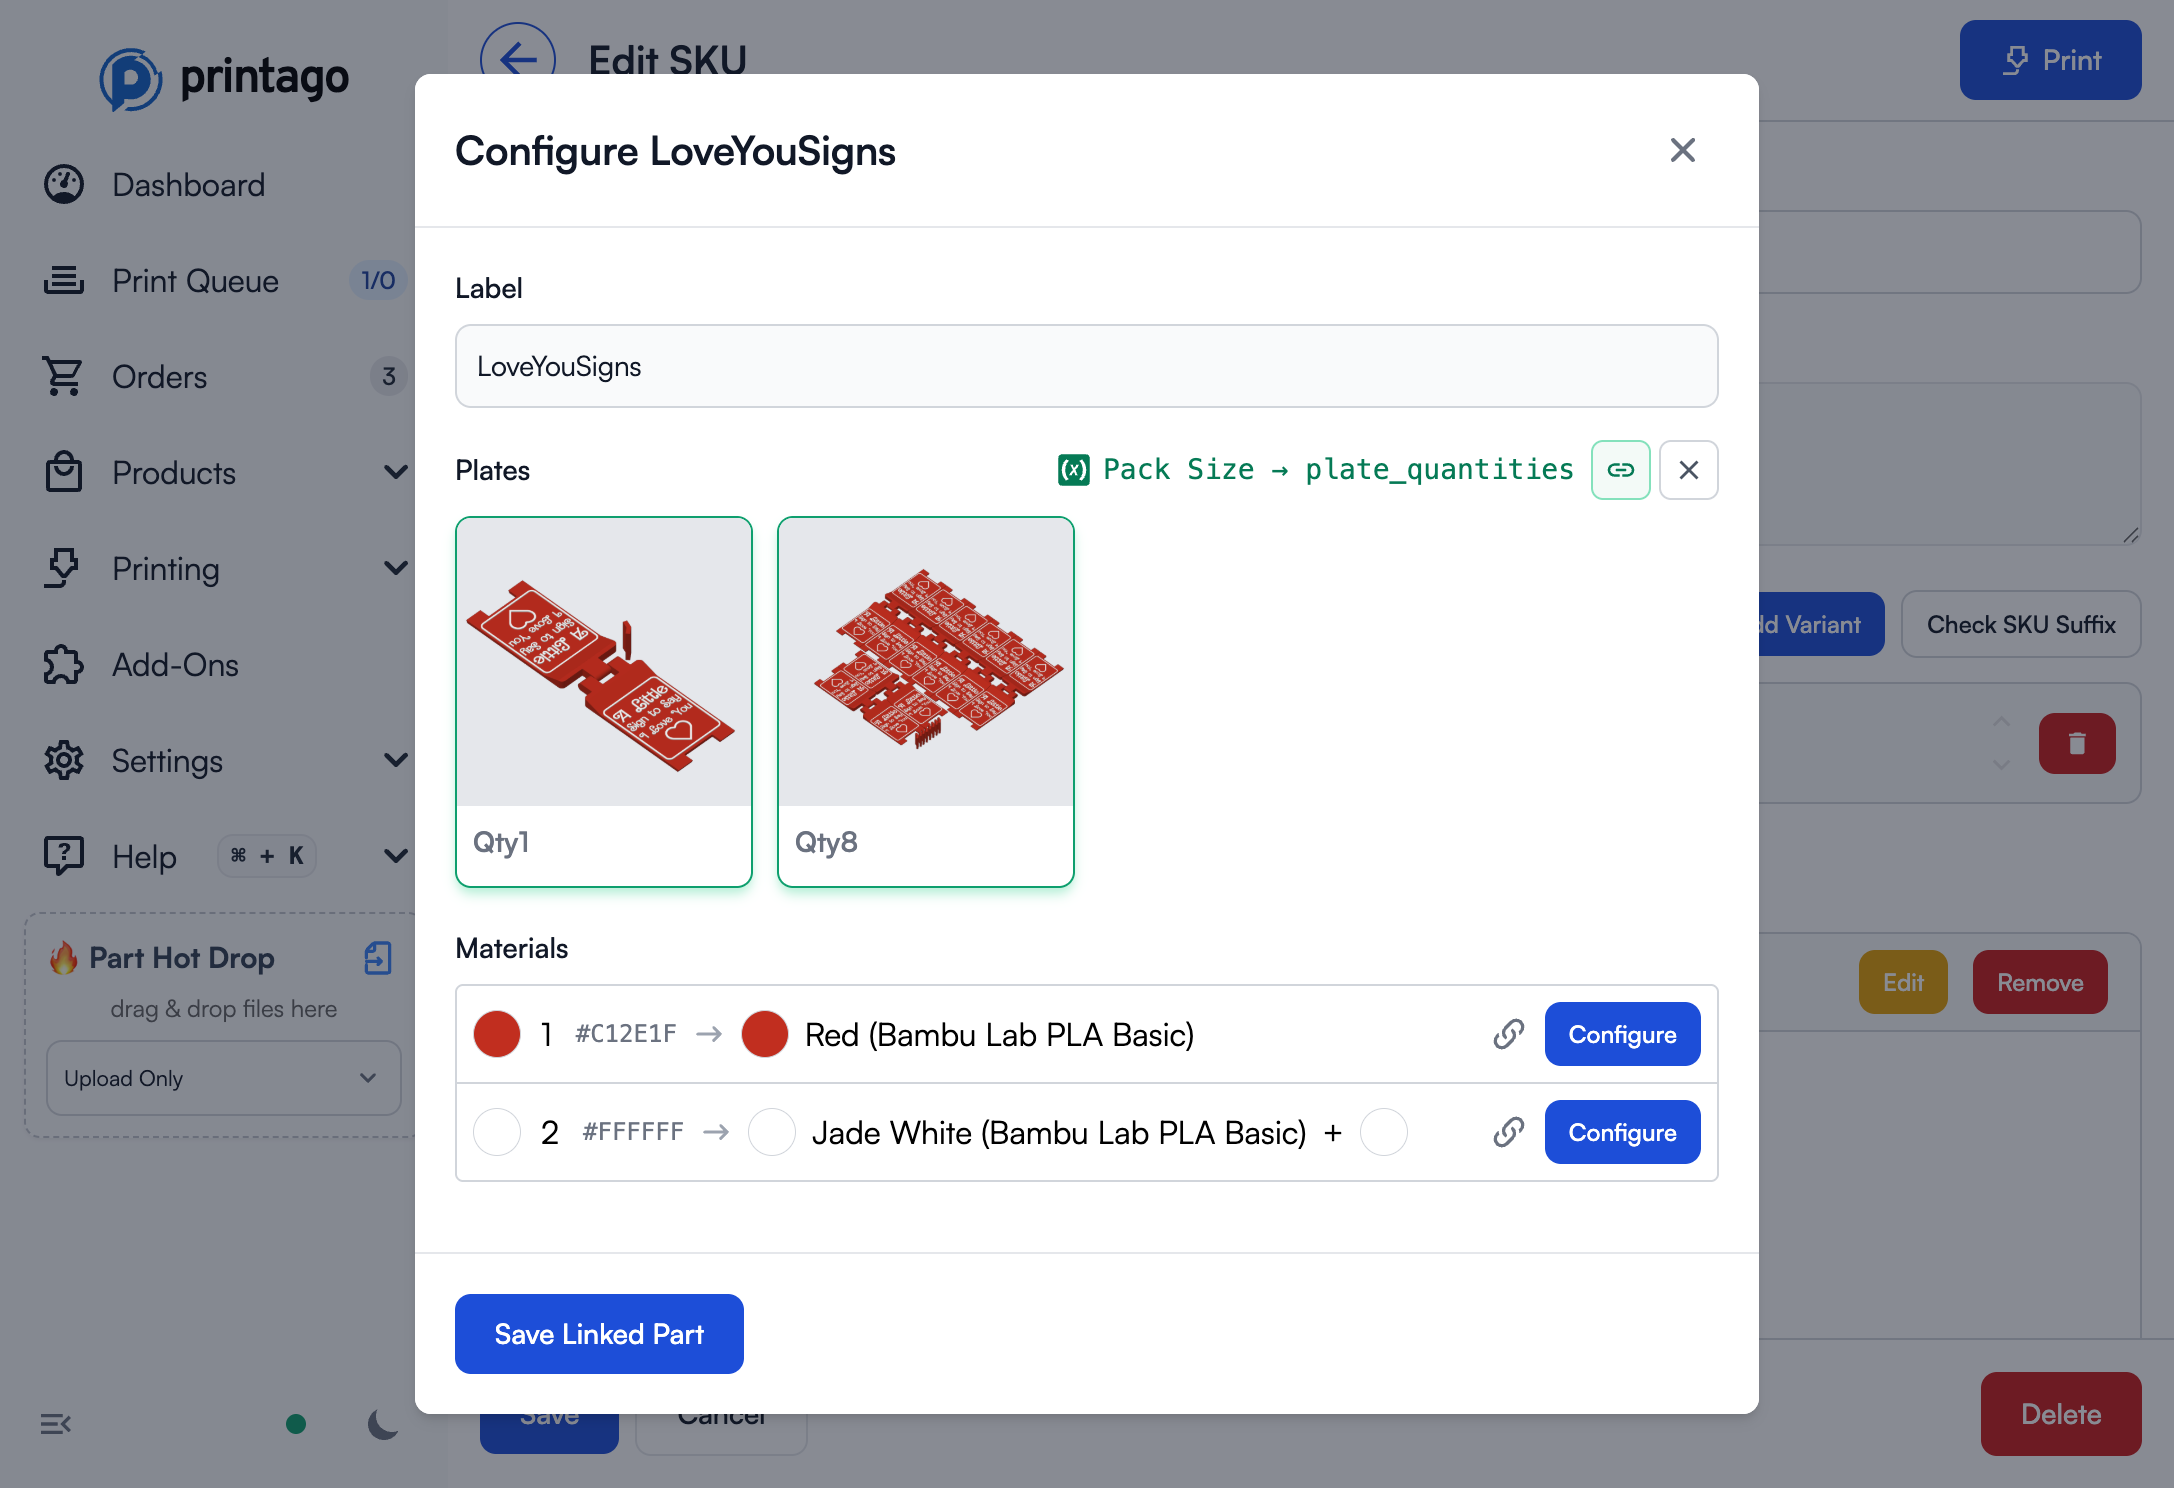
Once linked, the plate quantities will automatically adjust based on the selected variant value.
Configuring Plate Quantities for Each Variant Value:
- Navigate to
Products → SKU Variant Setup - Click on your variant to edit it
- For each variant value, click its cell in the Plate Quantities property's column (it reads "No plates" until you set some)
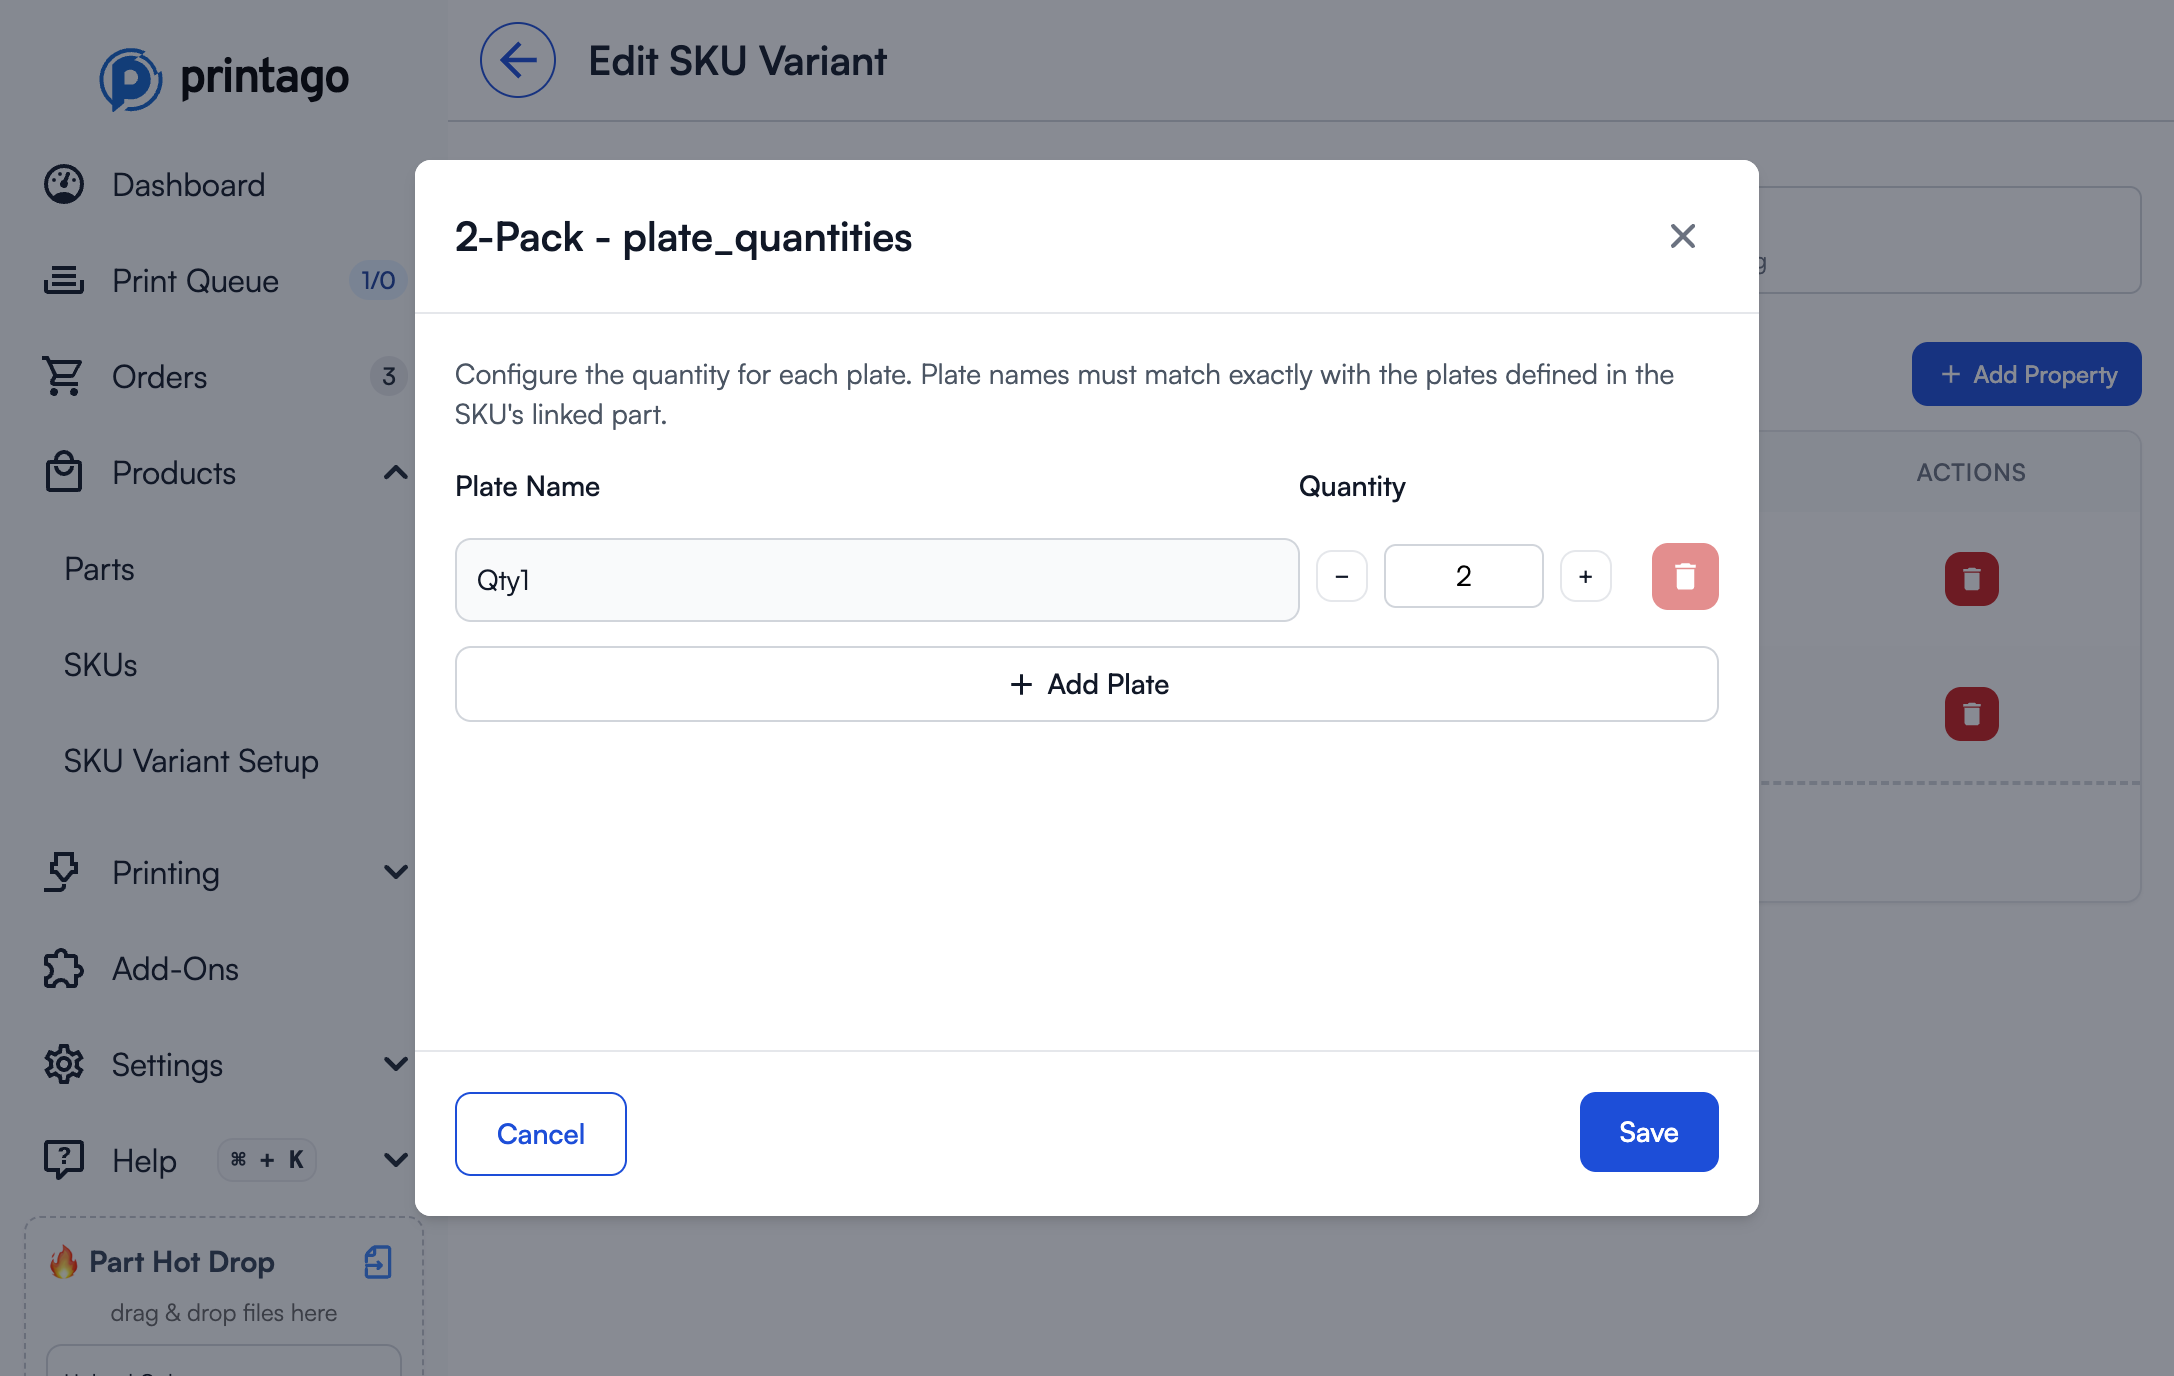
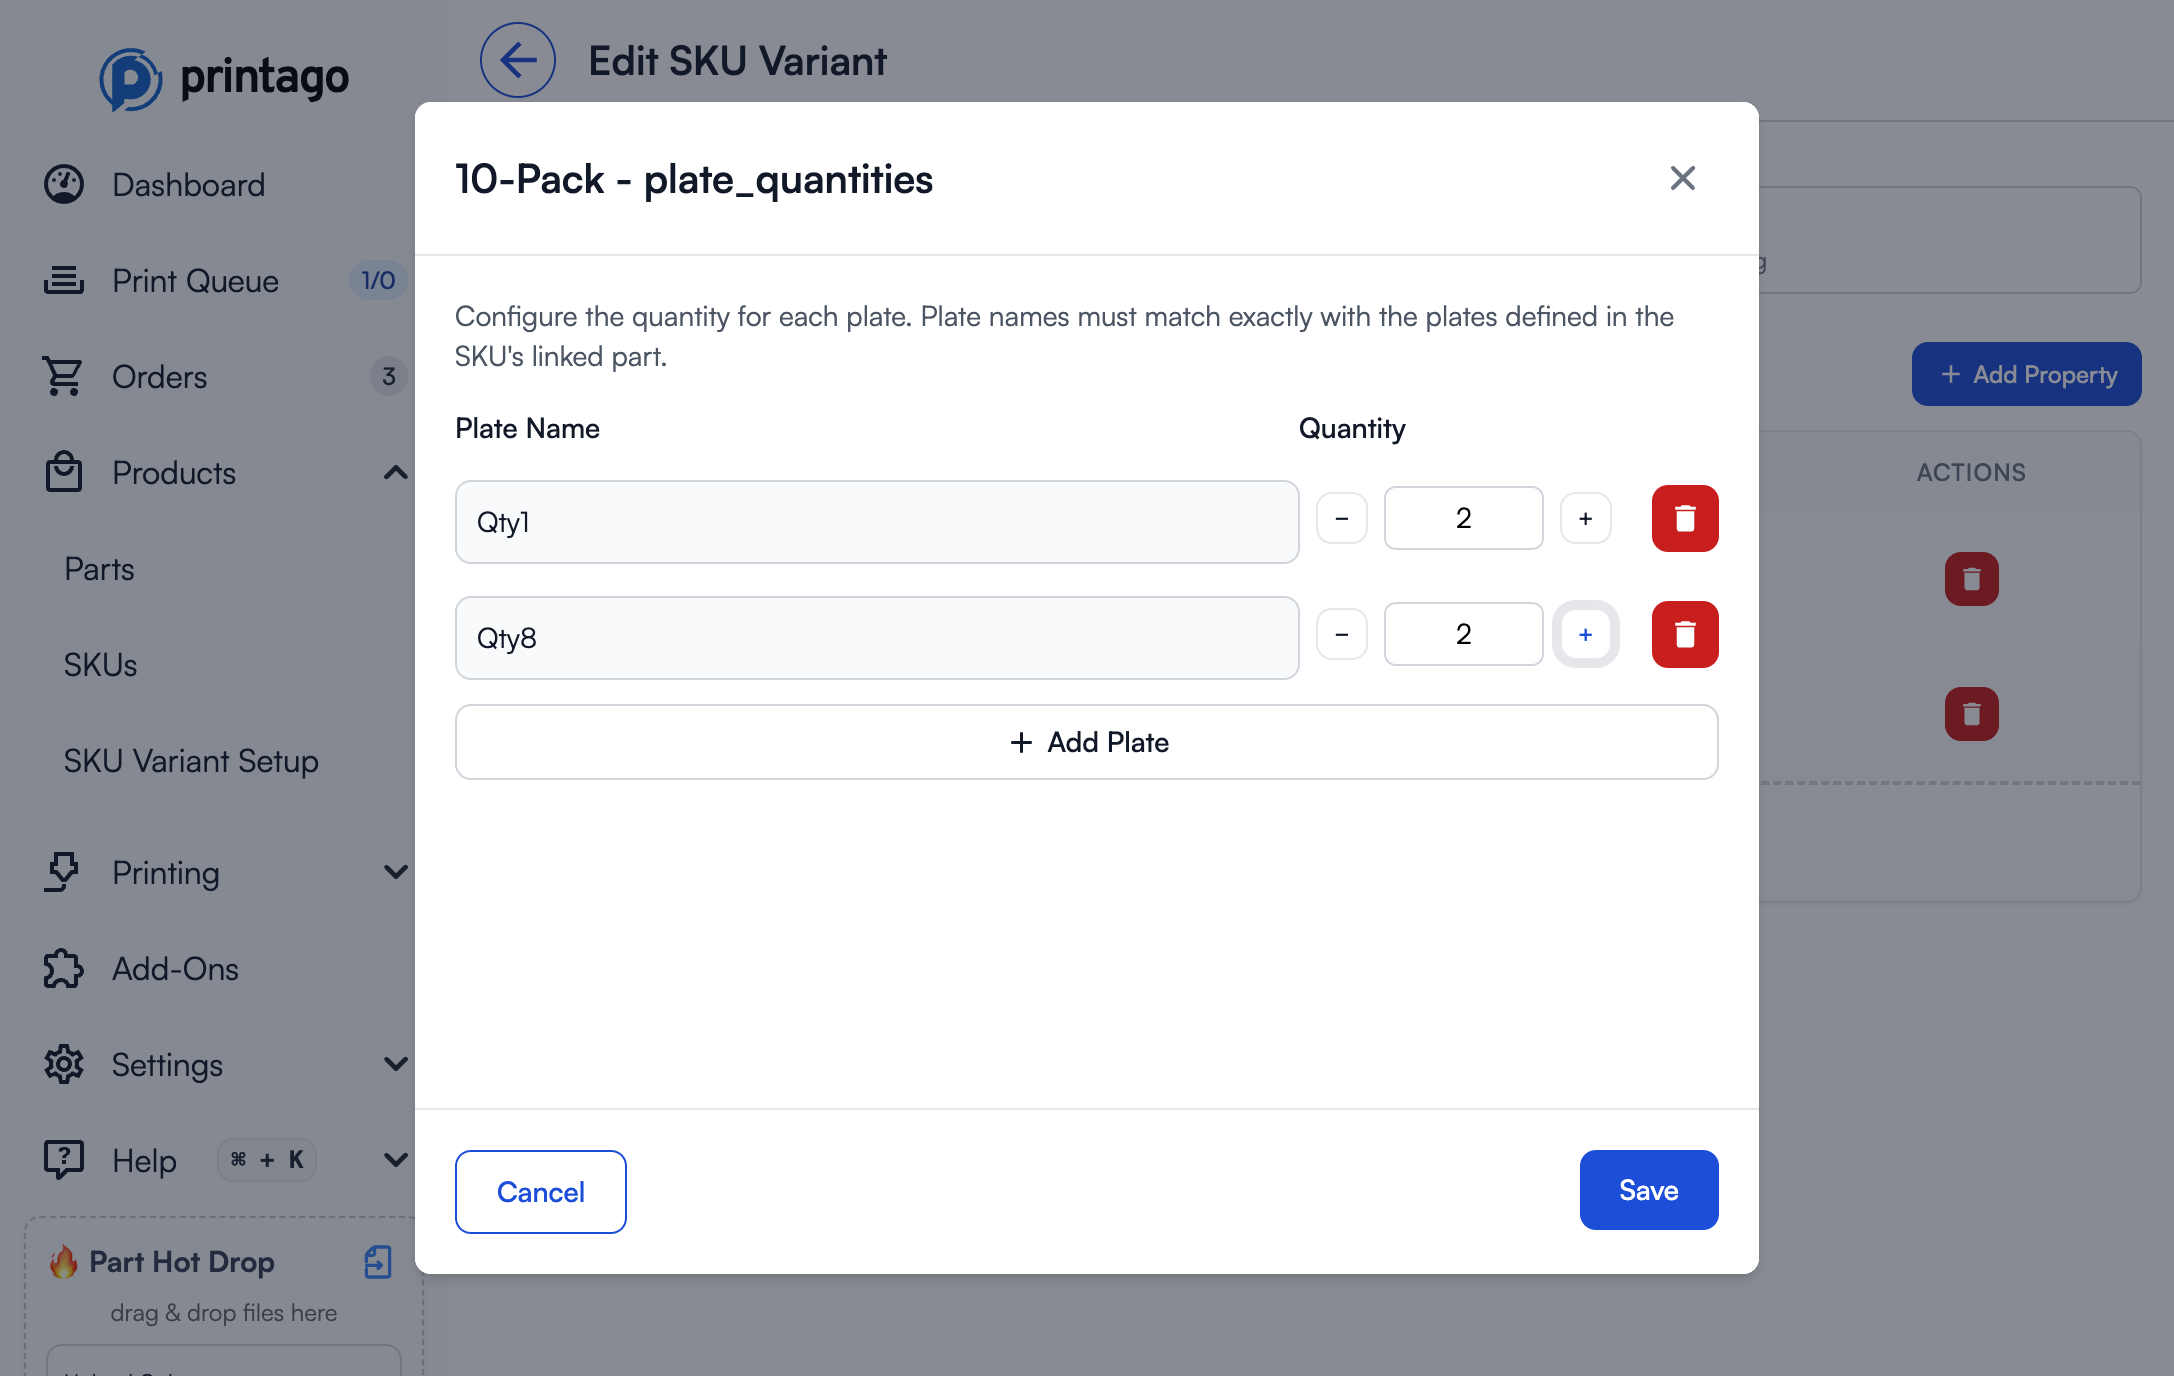
- In the dialog, set the quantity for each plate:
- Enter the plate name (must match the plate name in your 3MF file)
- Set the quantity (how many times to print this plate)
- Click
Save
If a plate never appears in any variant value configuration (quantity is always 0), Printago will show a warning badge on that plate. This helps you identify plates that may have been accidentally excluded from all variant values.
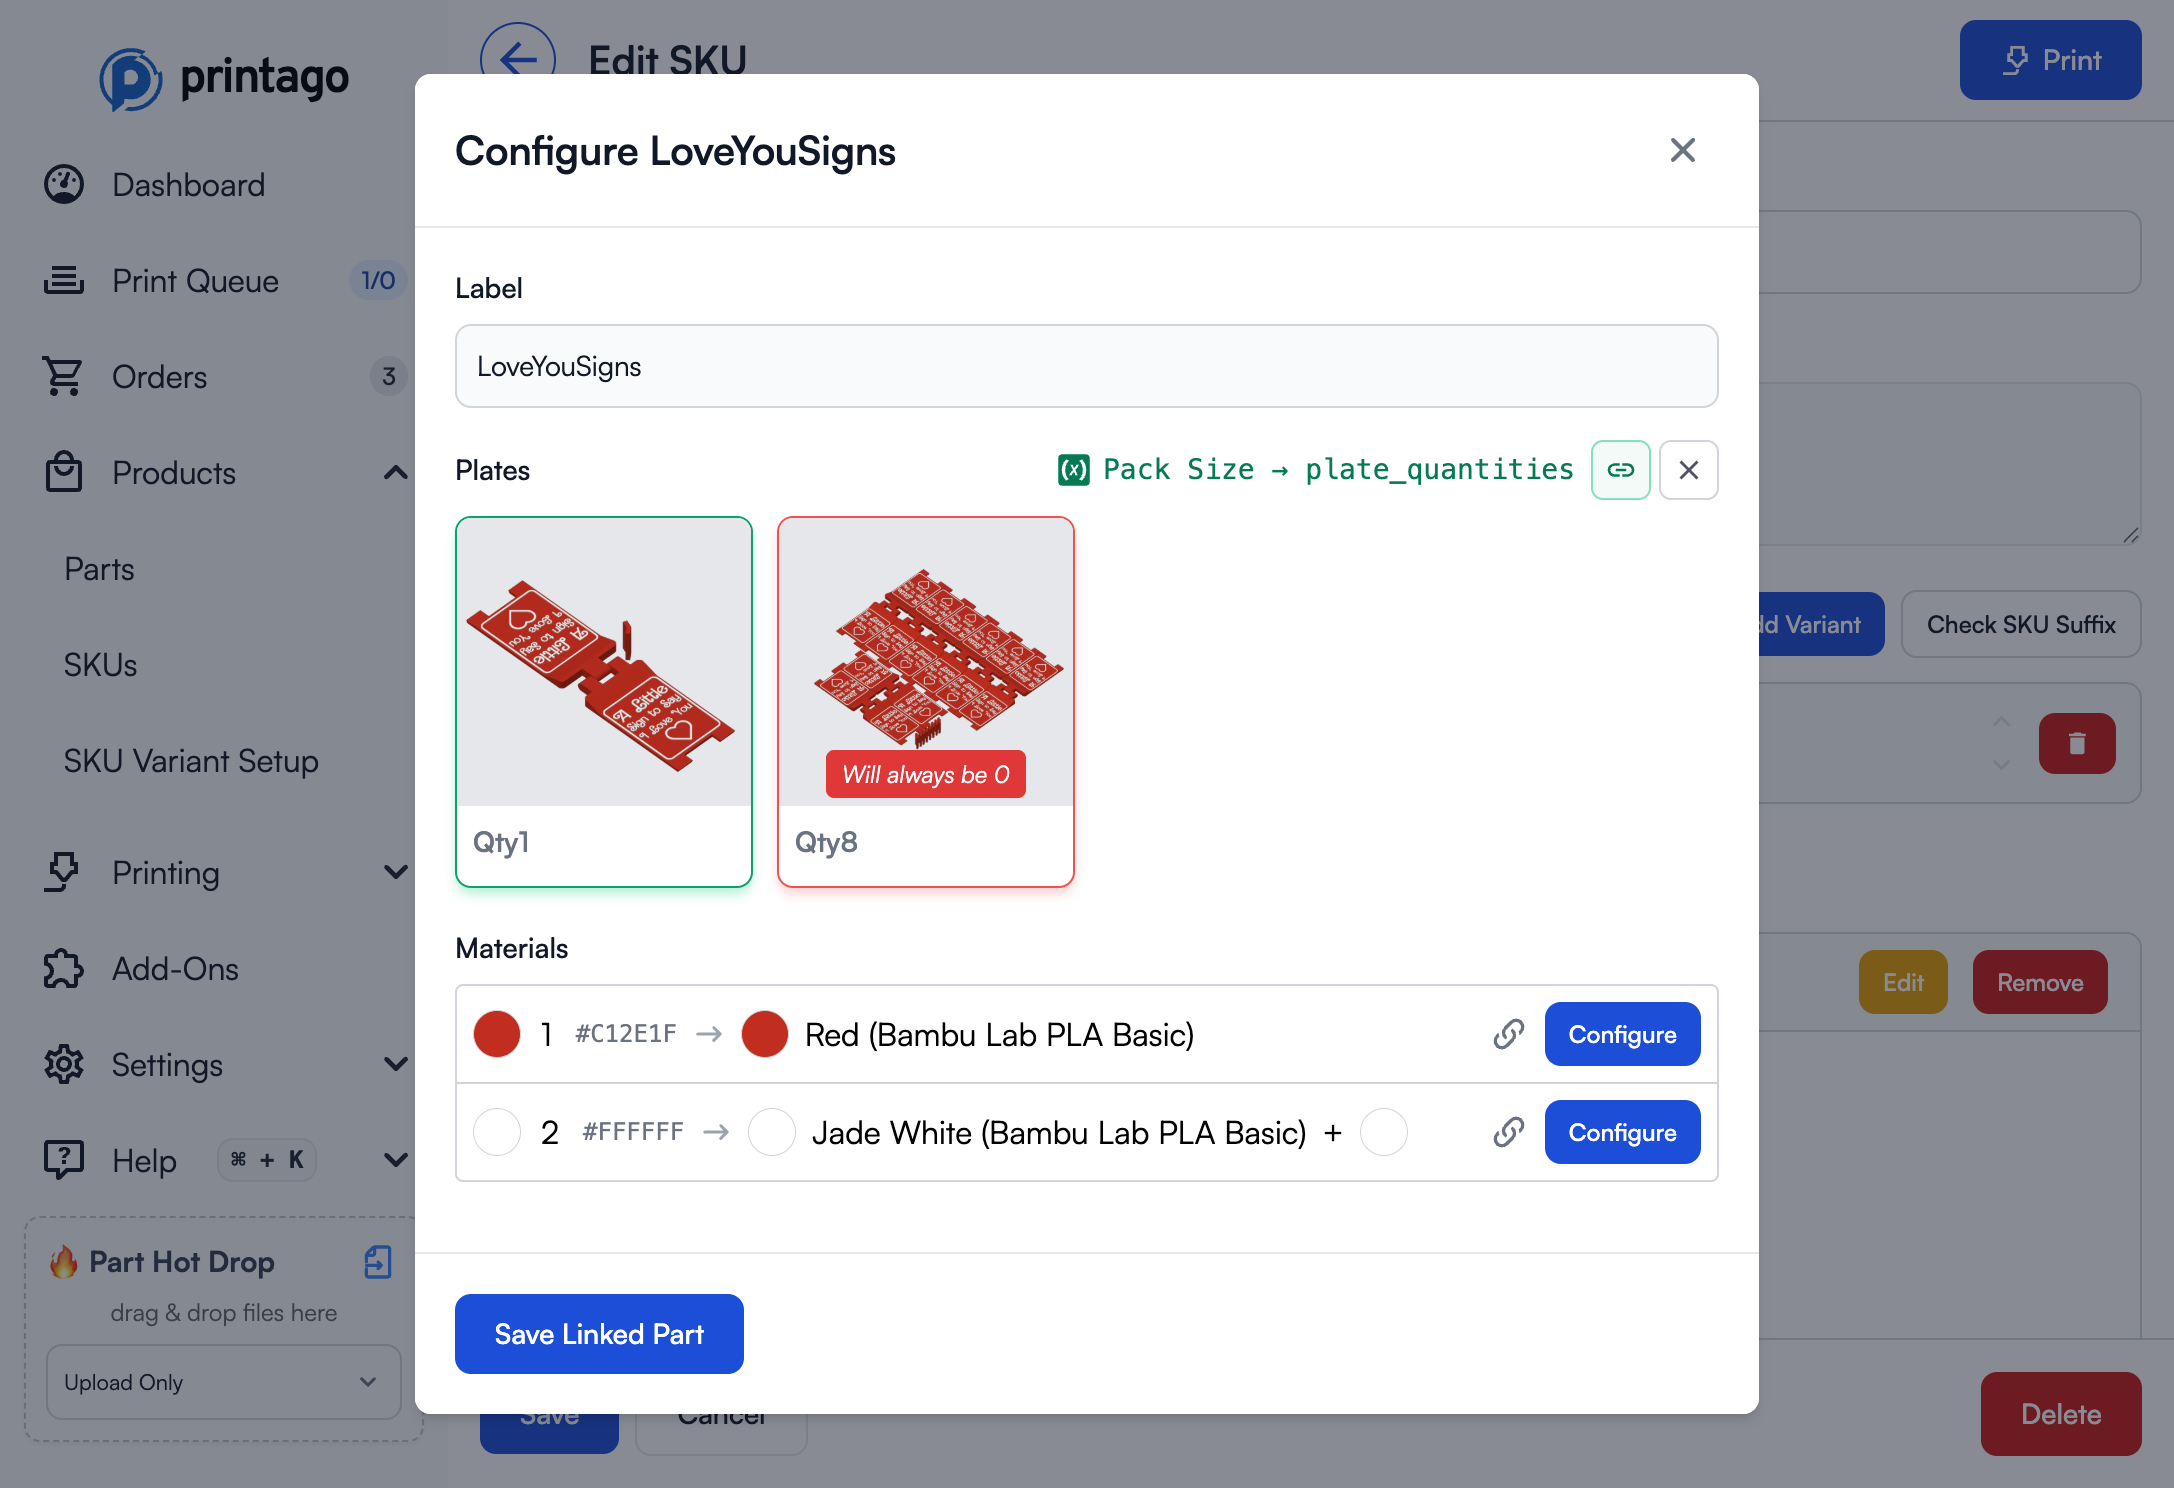
Plate Quantities let you optimize production for multi-pack products. Instead of printing 10 individual plates for a 10-pack, you can print 1 plate with 8 items and 2 plates with 1 item each, dramatically reducing print time and material waste.
Printing SKUs with Variants
When you click the Print button on a SKU, Printago automatically determines which view to show based on whether variants are configured:
Options View (Default for SKUs with Variants)
If your SKU has variants configured, Printago shows the Options View - a simplified interface that lets you select from your pre-configured variant options:
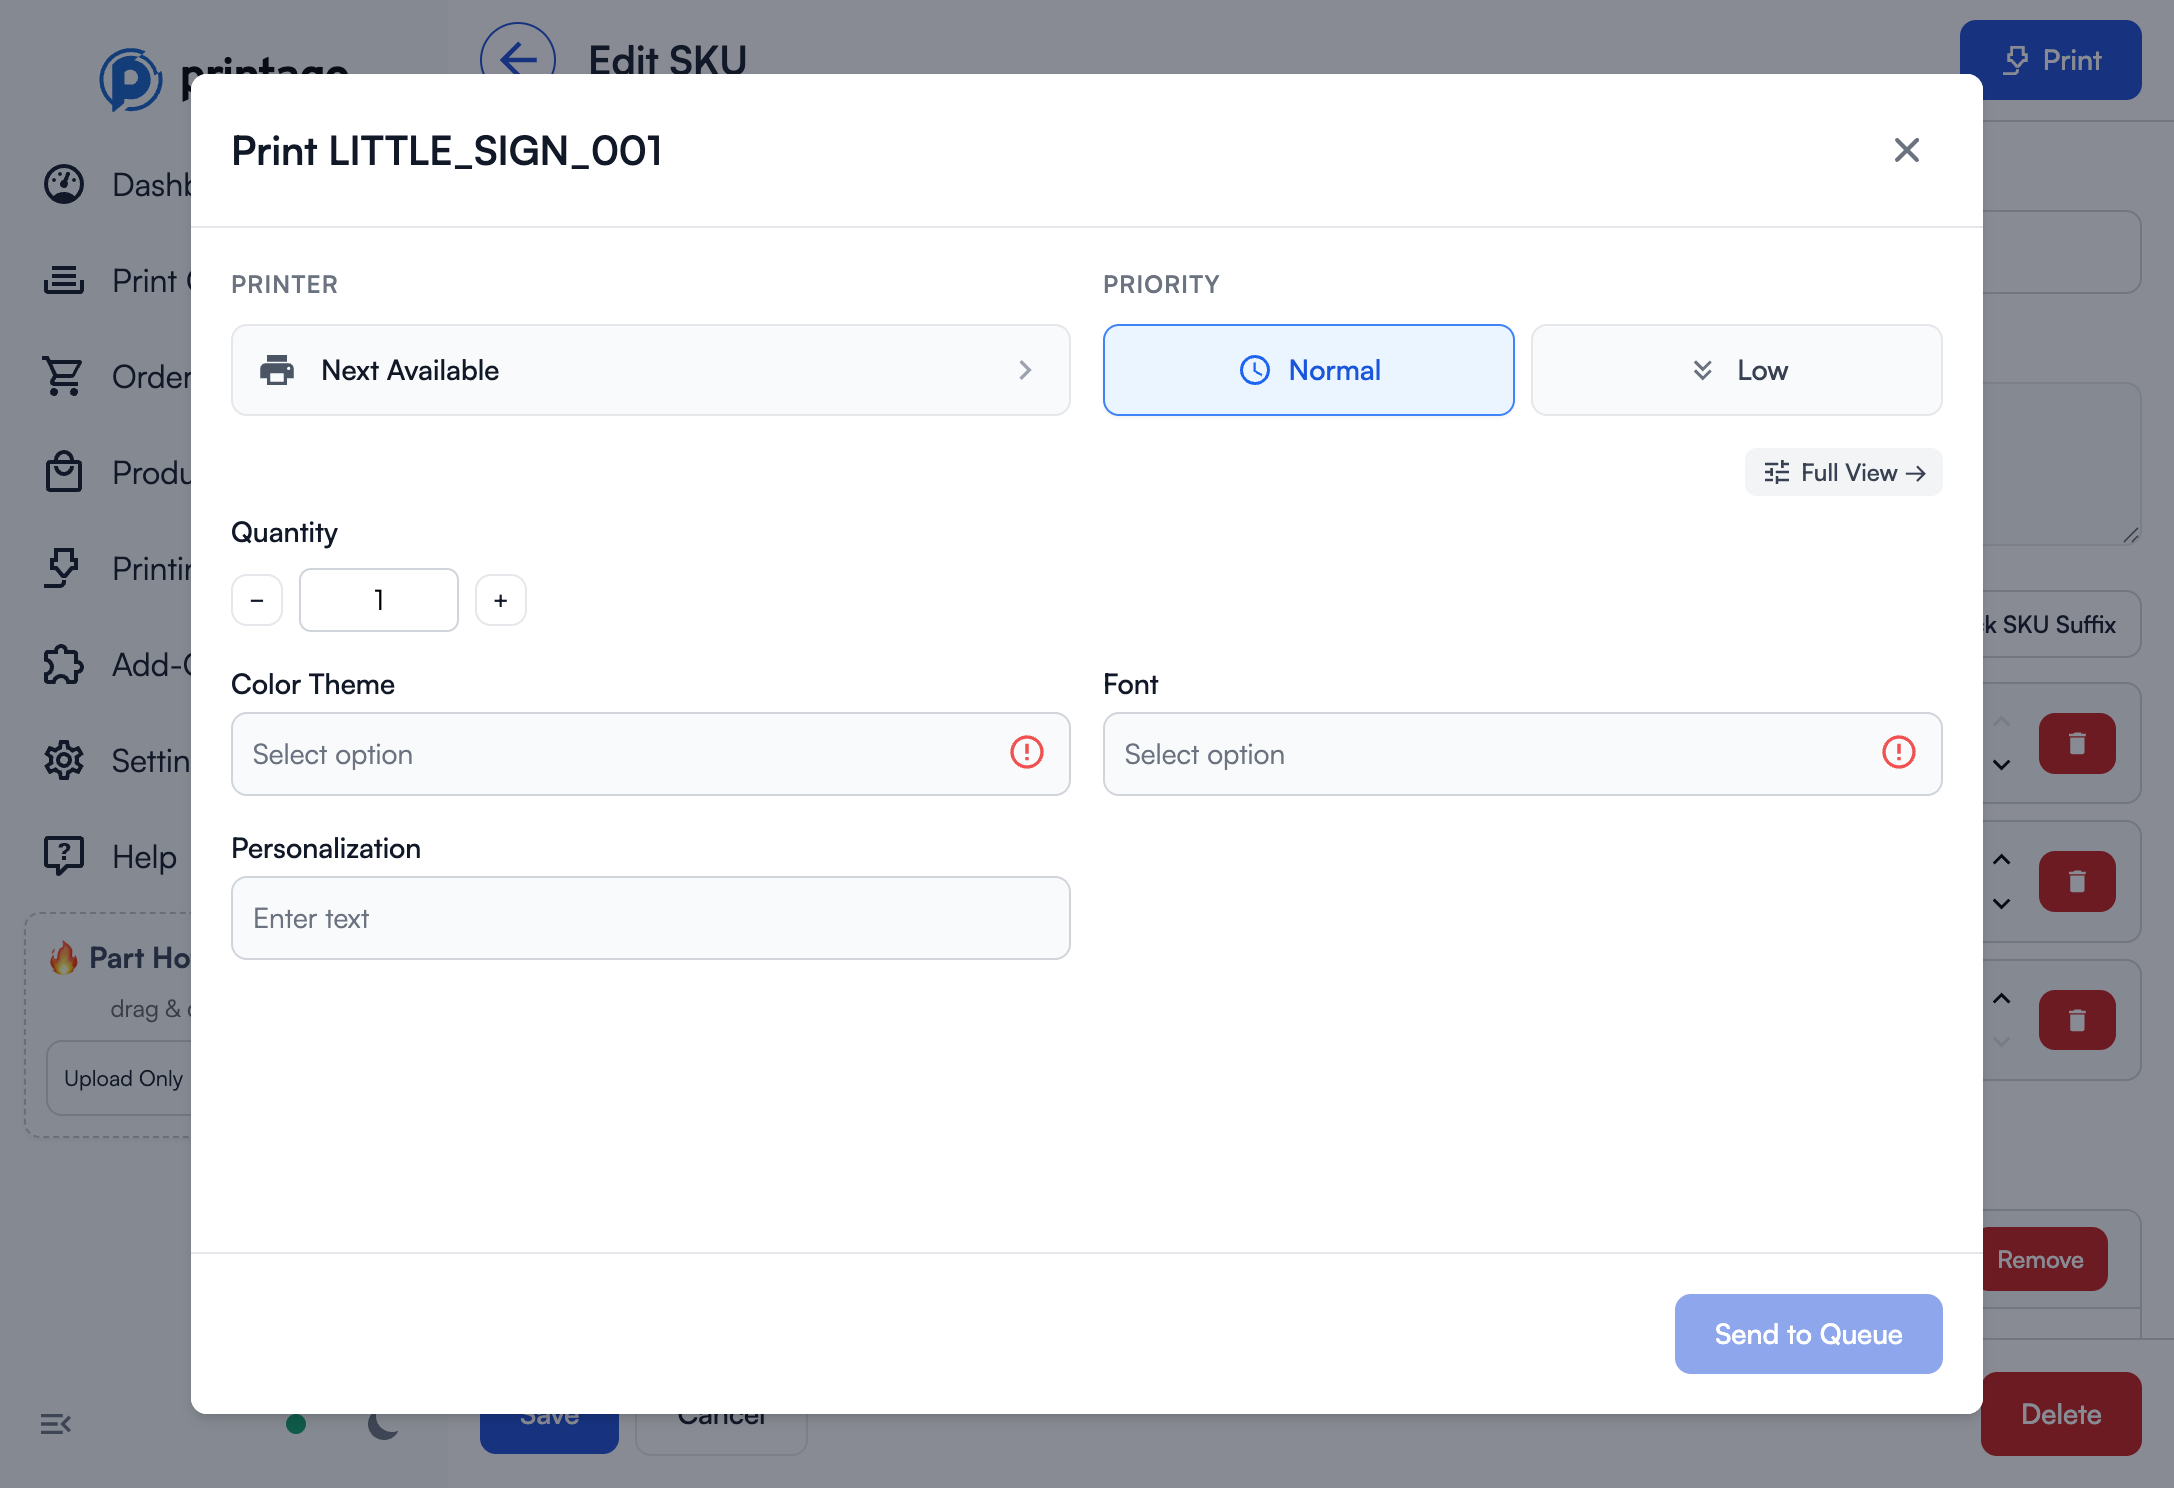
In Options View, you:
- Select variant values from dropdowns (e.g., "Color Theme", "Font")
- Enter personalization text if configured
- Choose printer and priority settings
- Set quantity
Printago automatically maps your selections to the correct materials, parameters, and plate quantities based on your variant configuration.
Full View (Manual Control)
Click Full View → to switch to complete manual control over all aspects of the print:
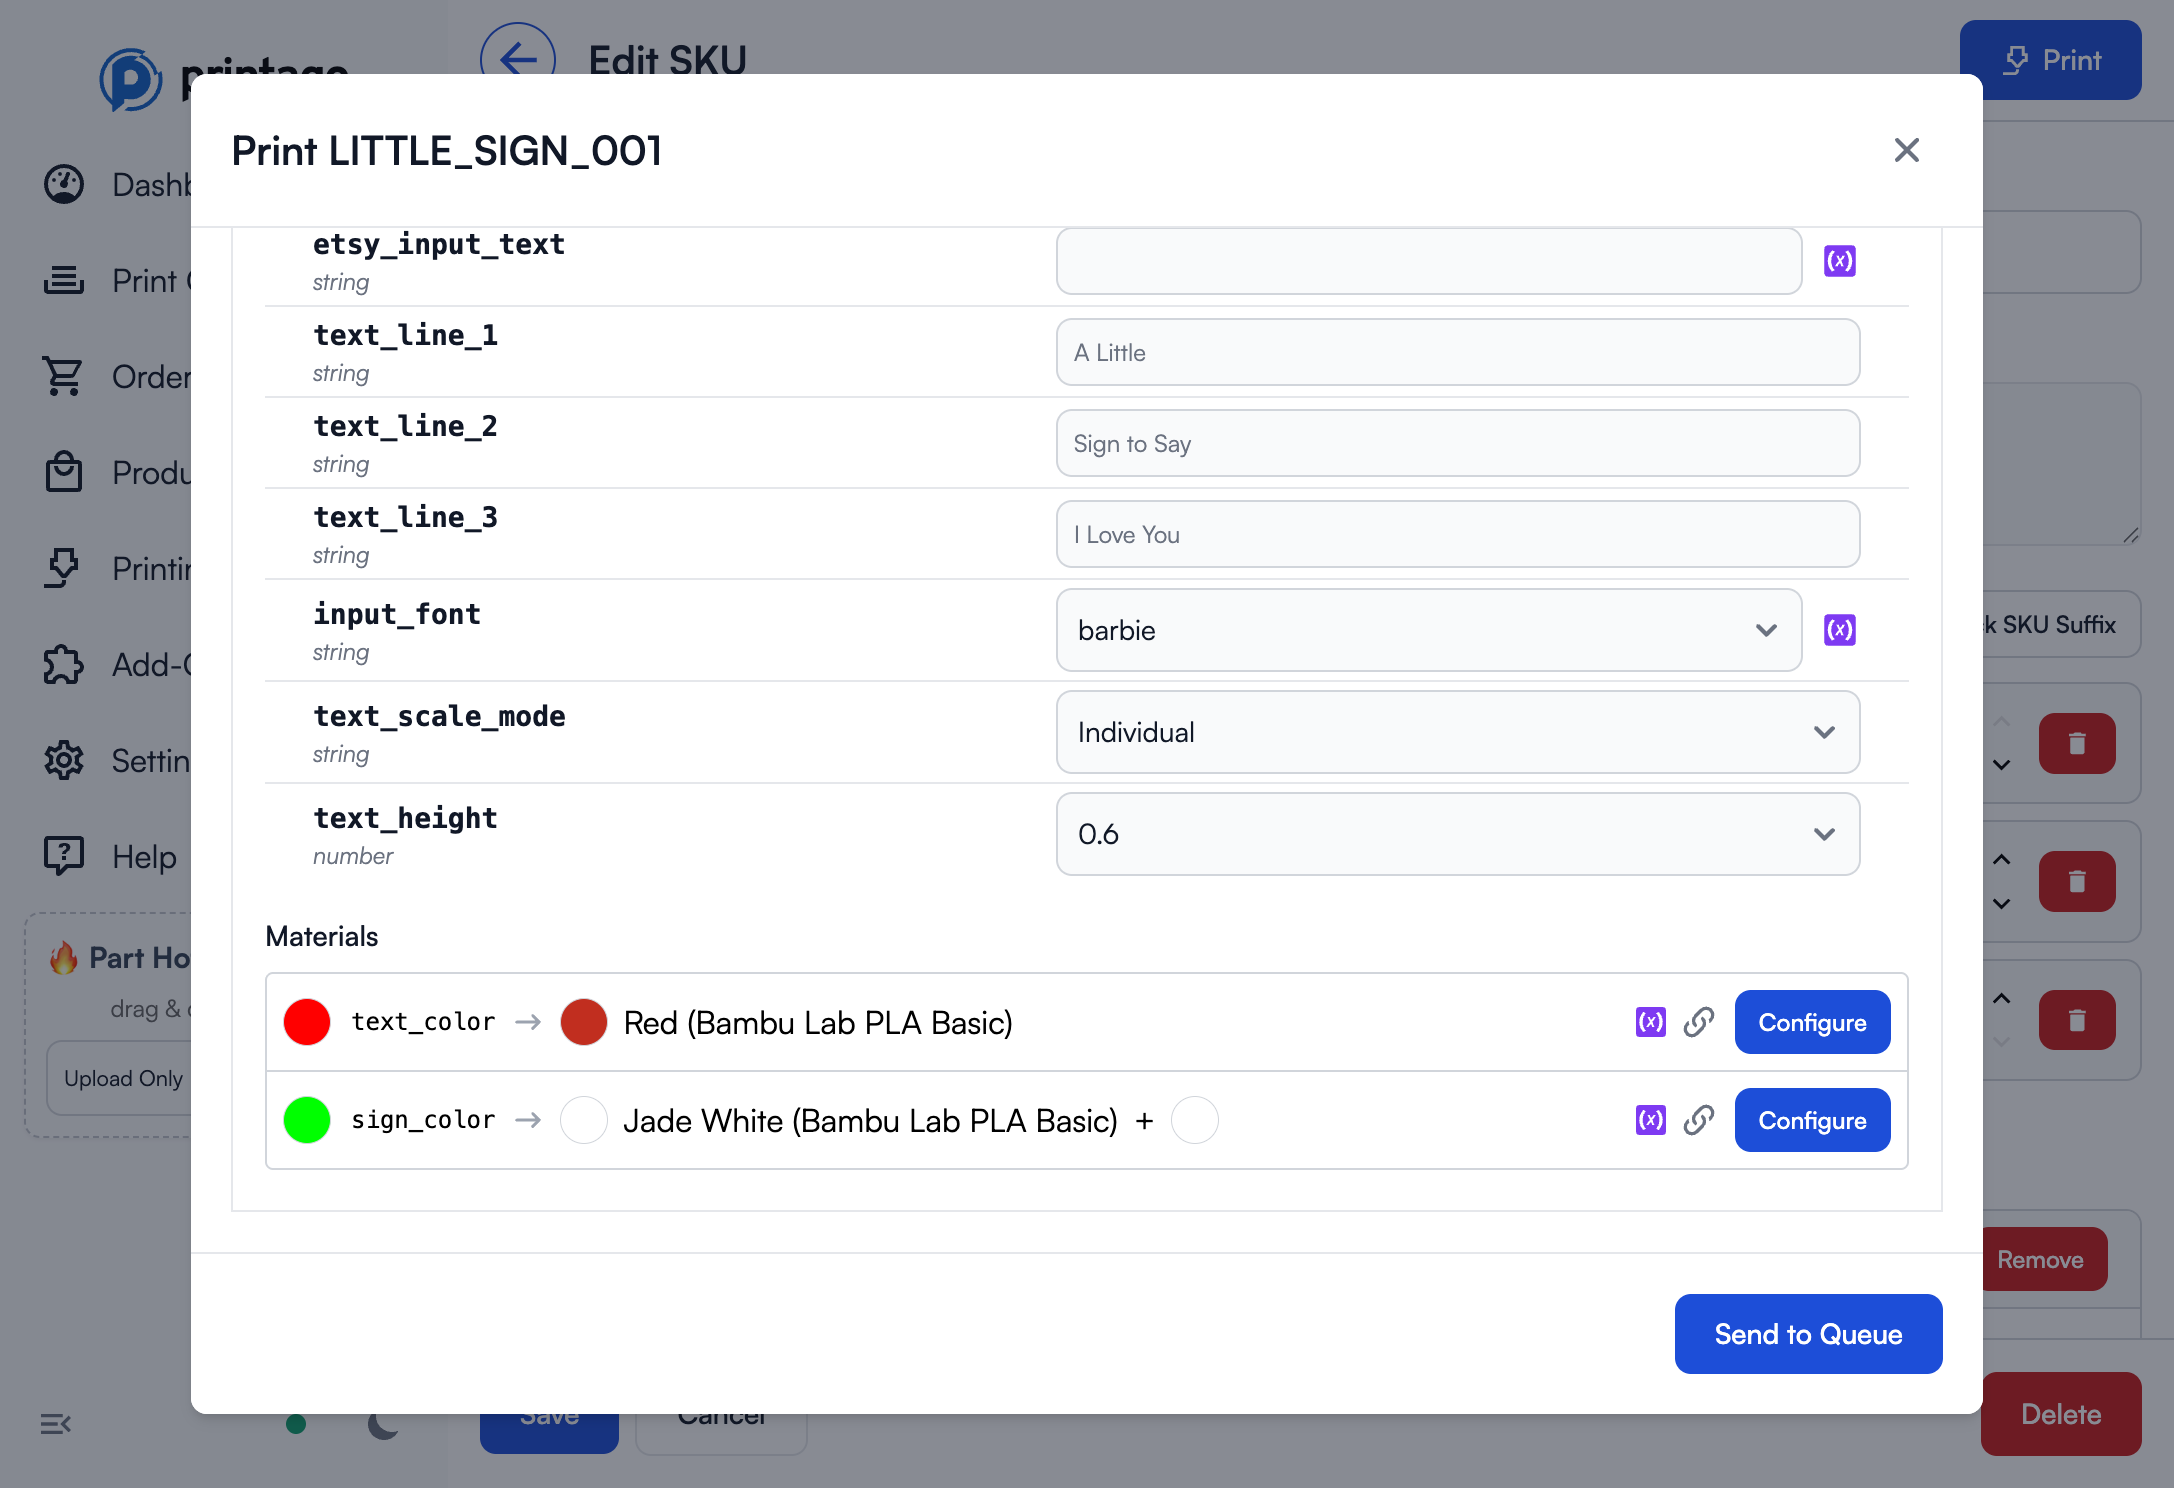
In Full View, you can:
- Manually edit all OpenSCAD parameters
- Override material selections for each material slot
- Adjust plate quantities individually
- Make one-off customizations without changing variant configuration
You can freely switch between Options View and Full View during print setup. Options View is faster for standard orders, while Full View gives you complete control when you need it.
If a SKU has no variants configured, clicking Print goes directly to Full View, since there are no pre-configured options to select from.
ColorSCAD Integration
For SKUs using ColorSCAD parts, Variants can map to programmatic colors:
- Your OpenSCAD file defines colors:
color("primary") make_part1(); - Printago detects the "primary" color identifier
- In SKU Variant mapping, assign a Material Property to "primary"
- Customer selects variant value (e.g., "Hero")
- Printago automatically uses the mapped Primary Color material
This enables complex multi-color OpenSCAD designs with customer-selectable color schemes!
Best Practices
Planning Your Variants
Start with a superset approach: If you have multiple SKUs that use similar options, create Variants with all possible values:
"Color" Variant might need:
- PLA Colors property (for PLA SKUs)
- TPU Colors property (for TPU SKUs)
- PETG Colors property (for PETG SKUs)
- Primary Color property (for multi-color SKUs)
- Secondary Color property (for multi-color SKUs)
Each SKU only uses the Properties it needs, but you maintain one unified Variant.
Naming Conventions
Variant Names: Match your e-commerce platform
- ✅ "Color" (if that's what your store shows)
- ✅ Keep "Color" and add an alias "Mug Color" if one storefront names it differently
- Capitalization and extra spaces don't matter, but the words do: "Color" won't match "Shade" without an alias
Property Names: Use descriptive internal names
- ✅ "PLA Colors", "Primary Color", "size_in_cm"
- ❌ "prop1", "c1", "p"
Variant Values: Match your store's value names (or add value aliases), but also consider:
- Future-proofing: Will this name still make sense in 6 months?
- Clarity: Is "Black" clear, or do you need "Matte Black" vs "Glossy Black"?
Testing Your Setup
Before launching with e-commerce automation:
- Create a test order manually in Printago
- Select each variant combination
- Verify materials are assigned correctly
- Check that OpenSCAD parameters produce expected results
- Print a physical sample of each major variation
Performance Tips
- Reuse Variants: Create general-purpose Variants (like "Color") that can be used across many SKUs
- Property organization: Group similar Property types together for easier management
- Documentation: Keep notes on which Properties are used by which SKUs
- Regular audits: Periodically review unused Variant Values and Properties
Troubleshooting
For an order held for review (SKU not found, or an option flagged missing, unknown, filtered out, or not on this SKU), see When an Order Doesn't Match.
Wrong Materials Assigned
Problem: Parts are printing with incorrect materials
Solutions:
- Review Property mappings in Variant Values
- Verify correct Properties are mapped to parts in SKU
- Check for conflicting Property assignments
- Ensure Material library items haven't been renamed/deleted
OpenSCAD Parameters Not Working
Problem: Text properties aren't affecting OpenSCAD output
Solutions:
- Verify the parameter is declared as a plain value at the top of the file, before any module (
width = 10;), so Printago detects it - Check that Text Properties contain valid values (numbers for numeric parameters)
- Ensure parameters are linked correctly (check for link icon in configuration)
- Test the OpenSCAD file locally with the expected parameter values
Missing Color Slots in 3MF
Problem: Can't find all colors to map Properties to
Solutions:
- Verify 3MF was created with color painting enabled
- Check that all desired colors are actually used in the 3MF file
- Re-export the 3MF from your slicer if colors are missing
- Static colors don't need Property mapping - only dynamic ones
Variant Values Not Appearing When Printing
Problem: Some variant values are missing from the print dialog
Solutions:
- Check if variant filtering is enabled - click the filter icon to review filter settings
- If using Include only mode, ensure the values you need are checked
- If using Exclude mode, ensure the values you need are NOT checked
- Click Off to disable filtering and show all values
Compound Property Values Not Applying
Problem: Compound property values aren't being used during printing
Solutions:
- Verify values are set for all required combinations in the matrix editor
- Check that the property is linked to the correct part parameter or material slot
- Ensure both/all source variants have values selected during printing
- For specificity issues, remember that more specific matches (2-3 variant) override less specific ones
SKU-Specific Property Not Visible
Problem: A SKU-specific property created for one SKU isn't appearing
Solutions:
- SKU-specific properties only appear on the SKU where they were created
- To use the property on other SKUs, create it as a global property at the variant level instead
- Check if you're editing the correct SKU - navigate to Products → SKUs and open the right one
Getting Help
SKU Variants are powerful but can be complex to set up initially. We're here to help!
Support Resources
- Documentation: You're reading it! Re-read sections for specific scenarios
- Discord Community: Ask questions in #variants channel - Join Discord
- Video Tutorial: Watch our step-by-step setup guide [Link to video]
- Support Email: support@printago.io for complex scenarios
1:1 Setup Assistance
Need hands-on help? We offer free 1:1 video calls with Printago founders to help you set up SKU Variants correctly for your specific products.
What we'll help with:
- Planning your Variant structure
- Mapping complex multi-color designs
- E-commerce integration setup
- OpenSCAD parameter configuration
- Troubleshooting existing setups
Book your session: Click the "Schedule 1:1 Setup Call" button on the SKU Variants page, or book directly here.
Many of our most successful users started with a 1:1 setup call. Don't hesitate to reach out - we love helping businesses automate their workflows!
Related Topics
- Matching Orders to Variants - How an order finds its SKU and values: name matching, aliases, and SKU suffixes
- Variant Examples - Complete setups for common products
- SKU Management - Creating and organizing SKUs
- Orders - Processing e-commerce orders automatically
- OpenSCAD Parts - Creating parametric designs
- ColorSCAD - Multi-color OpenSCAD support
- Materials - Managing your material library
- Shopify Integration - Connecting your Shopify store
- Etsy Integration - Connecting your Etsy shop
Need help with SKU Variants? Join our Discord community or email support@printago.io!