3MF Project Files
3MF (3D Manufacturing Format) parts are complete projects that preserve all your slicer settings, modifiers, and design decisions. Printago fully supports 3MF files from Bambu Studio and Orca Slicer.
What Makes 3MF Special
3MF files save everything about your print setup:
- Object placement on the build plate
- All modifiers (support enforcers/blockers, seam placement, etc.)
- Negative parts for complex geometries
- Support structure settings
- Color painting and multi-material assignments
- Print settings and configurations
3MF in Printago
3MF files in Printago work across different printer models. A 3MF made for an A1 Mini works on an X1 or P1, as long as everything fits on the build plate.
Sliced vs Unsliced 3MF Files
Understanding the difference between sliced and unsliced 3MF files is important for getting the most flexibility from Printago.
Unsliced 3MF Files (Recommended)
Unsliced 3MF files contain the 3D model and settings but no GCODE. These are the files you create by simply saving your project in Bambu Studio or Orca Slicer.
How to export: In Bambu Studio or Orca Slicer, use File → Save Project or press Ctrl/Cmd + S.
Benefits:
- ✅ Works on any compatible printer (A1, P1, X1, etc.)
- ✅ Printago can reslice with different materials
- ✅ Material profiles are applied automatically
- ✅ Can switch from PLA to PETG, Sparkle to Matte, etc.
- ✅ Uses correct settings for each printer model
When Printago slices: After a job is matched to a printer, it goes through a slicing step using:
- The printer profile from the matched printer
- The filament profiles from your assigned materials
- The process profile from the 3MF or printer default
Sliced 3MF Files (GCODE 3MF)
Sliced 3MF files contain pre-generated GCODE. These are created by exporting the plate after slicing.
How to export: In Bambu Studio or Orca Slicer, slice your model, then use File → Export plate sliced file.
Limitations:
- ⚠️ Locked to specific printer model
- ⚠️ Cannot be resliced by Printago
- ⚠️ Material changes won't affect print settings
- ⚠️ Uses the exact GCODE that was exported
When to use: Only use sliced 3MF files when you need absolute control over the exact GCODE being sent to the printer, or when you've done extensive manual GCODE modifications.
Use unsliced 3MF files whenever possible. They give you maximum flexibility and allow Printago to optimize settings for each printer and material combination.
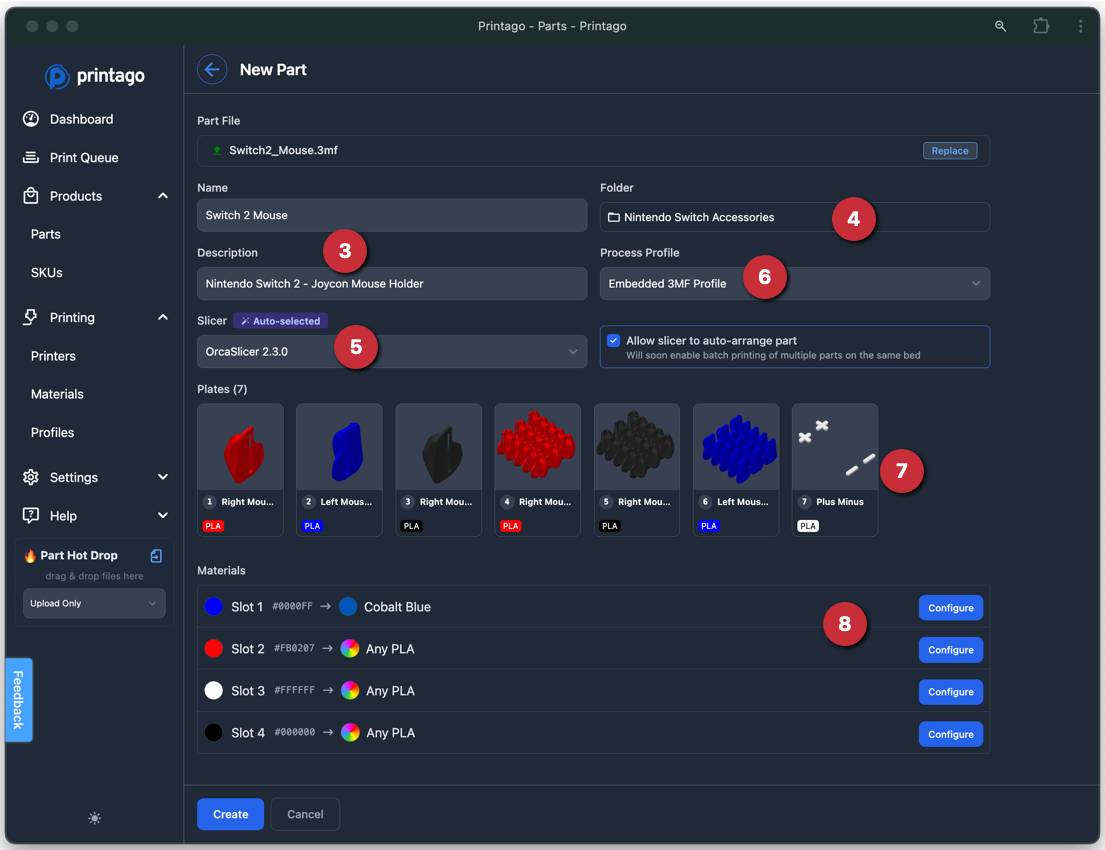
Adding 3MF Parts
- Go to
Products -> Partsand click+ Add Part - Drag in your .3mf file or browse to upload
- Name your part and add a description if needed
- Choose where to save it (defaults to your current folder)
- Printago will auto-select the right slicer version (look for the "Auto-Selected" badge)
- Pick your process profile:
Embedded 3MF Profile: Uses the settings saved in the fileCustom Profile: Use one of your snyced User Settings for this part.Printer Default: will use the default profile assigned to any printer the part matches with
- Check the build plates and materials found in your file
- Match materials to your Material library
- Click
Createto finish
Why Use 3MF?
- Keep your settings: Your exact slicer setup stays the same
- Works anywhere: Use the same file on different printers
- Multi-material ready: Required for color changes and material switching
- Handle multiple plates: Print or add plates to SKUs one by one