OpenSCAD Parts
OpenSCAD support in Printago lets you create dynamic, customizable 3D models that respond to customer input without touching code. Let's explore how it works!
What is OpenSCAD?
OpenSCAD is a programming language for creating parametric 3D models. Instead of manually sculpting models, you write code that generates them. With Printago's native OpenSCAD support, you can:
- Create dynamic, customizable models
- Automate model scaling and sizing
- Add personalization options like text and color
- Modify existing STL files
- COMING SOON: Drive on-demand models generated from e-commerce customer input.
Editing OpenSCAD Files
To create and edit OpenSCAD files, download OpenSCAD. Be sure to download one of the Development Snapsnot versions for your computer.

If you're new to OpenSCAD, this documentation will not serve as a tutorial. However, you will find a few example snippets.
If you're interested in using OpenSCAD in Printago, reach out to support@printago.io or chat with the development team on our Discord server - we will gladly help you!
Importing Files
Printago supports the use and import commands in OpenSCAD. You may use fonts or other OpenSCAD libraries, or import STLs, SVG, or DXF files.
use <ArianaVioleta.ttf>     // fonts
use <text_tools.scad>       // OpenSCAD library
import("iphone16_case.stl") // STL Geometry
import("customer_logo.dxf") // Flat-Geometry import (SVG works too)
Do not use variables as import or use arguments. The Printago OpenSCAD parser will not find these files.
filename = "customer_logo.dxf");
import(filename);
Dynamic Models
Dynamic models in Printago use OpenSCAD parameters to create variations of your 3D models automatically. Common uses include:
- Custom text engravings
- Adjustable dimensions
- Personalized designs
- Size variations
- COMING SOON: Define parts colors (parametric painted models)
Parameter Types
You can use several types of parameters in your OpenSCAD models. Initial values of each parameter will be used as the default parameter value in Printago.
- Text: For names, messages, or identifiers
input_text_1 = "Custom"; - Numbers: For dimensions and measurements
size_in_inches = 8.0; - Boolean: Presented as a checkbox in Printago
size_text_equal = false; - Selection: Can be text or Numbers and presented as a dropdown selection in Printago. Note that the comment following the variable declaration drives the values of the dropdown.
part_output = part1; //[part1, part2, part3, part4]
Printago will not import variables below the first set of curly braces
use <Arial.ttf>
variable1 = "Text";
{ }
private_variable = "not parsed";
Font Support
Printago supports TTF and OTF fonts.
Adding OpenSCAD Parts to Printago
- Click
Products->Parts - Click the
+ New Partbutton in the upper right. - Browse to select your main
.scadfile. - Follow the prompts to upload any
useorimportfiles, and review the parsedParameters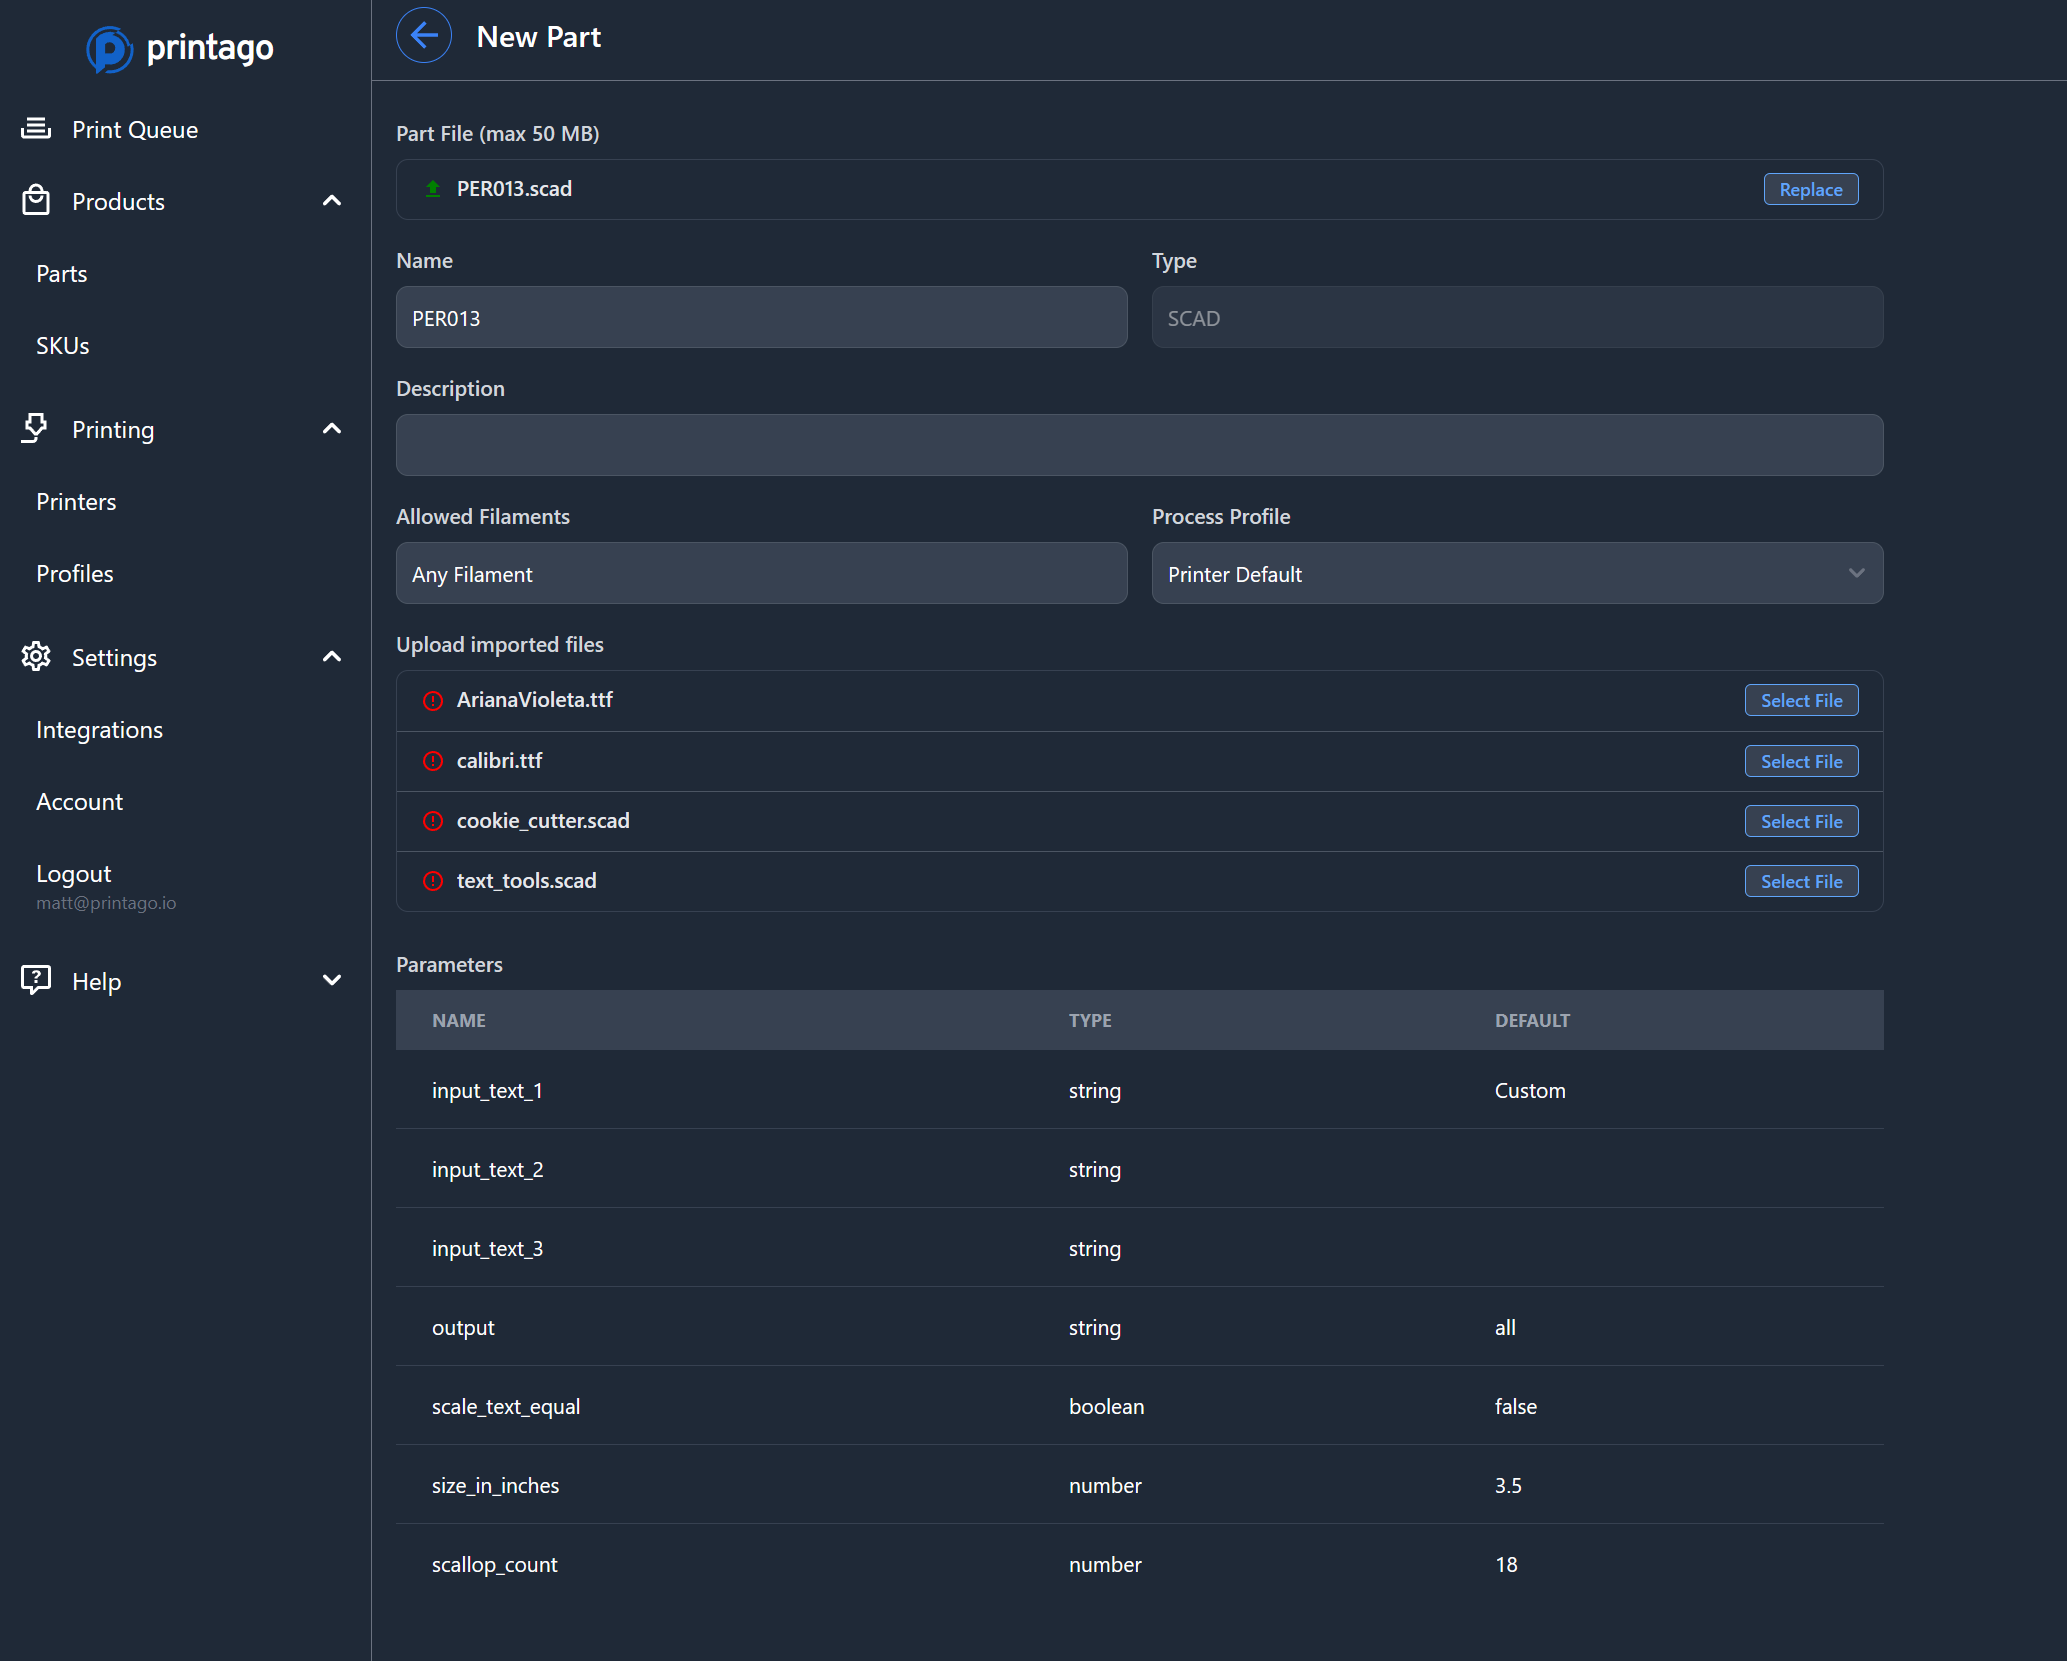
- Save the Part.
Printing the Part
- Find your saved part in the parts list and open it, clicking the
Printbutton. - Set any parameters, quantity, and
Printthe part.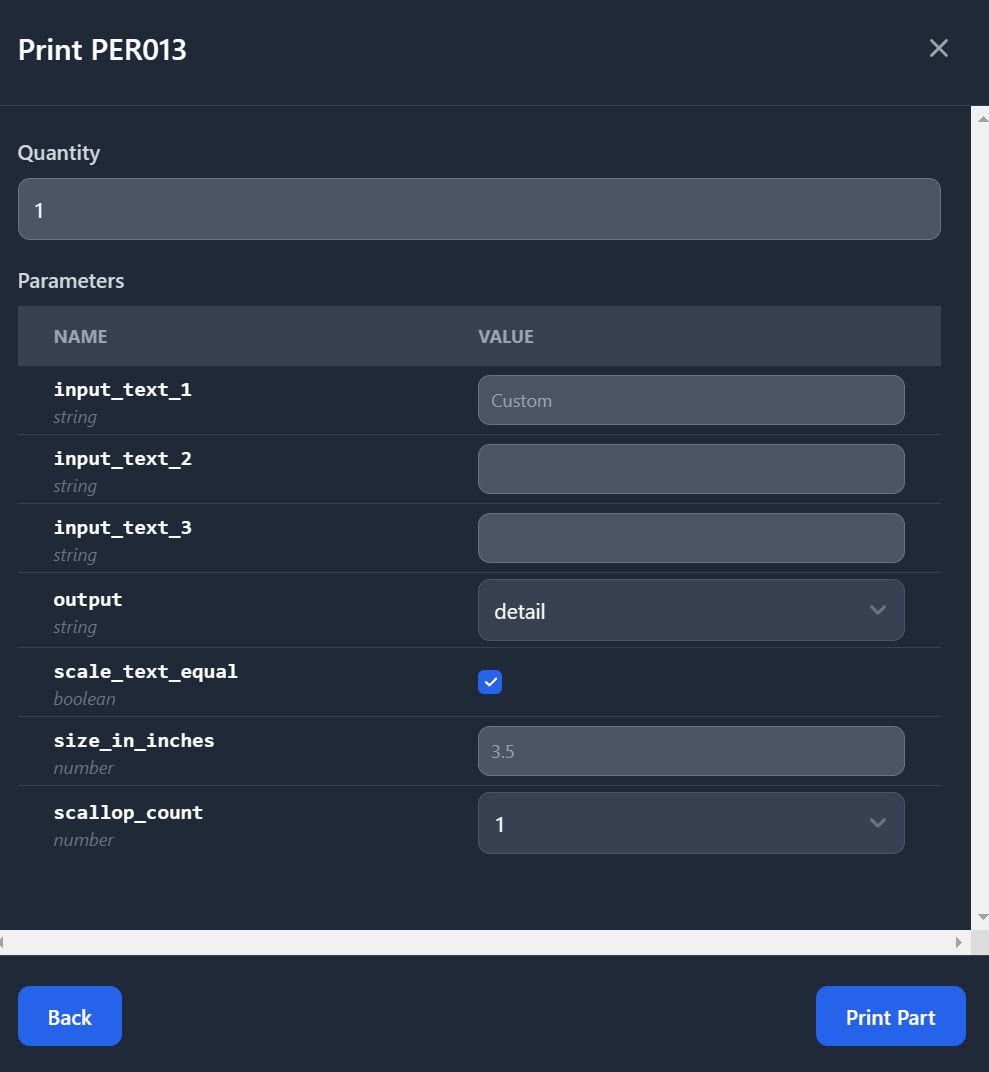
Best Practices
Modular Design
- Break complex models into separate functional modules - this makes troubleshooting easier and allows for code reuse across projects. For example, split a custom box design into lid, base, and hinge modules
- Create reusable components for common elements like screw holes, mounting brackets, or text engravings. Store these in separate files and import them when needed
- Keep parameter definitions organized at the top of your files in clear sections (dimensions, features, customization options). This makes it easier to modify your designs
- Use clear, descriptive names for modules and variables that indicate their purpose - prefer
wall_thicknessoverwtandcreate_mounting_holes()overholes()
Performance Optimization
- Use appropriate
$fnvalues: low (20-30) during development for quick previews, higher (60-180) for production quality. Avoid values over 180 unless necessary - Minimize boolean operations in complex designs - each
difference()andunion()adds computational overhead. Consider combining shapes where possible - Cache expensive calculations in variables rather than repeating them. For example, store complex trigonometric calculations you'll use multiple times
- Test designs across their full parameter ranges to ensure they render correctly at all valid sizes and configurations
Error Handling
- Set min/max constraints for numeric parameters using
assert()to prevent impossible dimensions or broken geometry. For example, ensure wall thickness is always greater than printer nozzle size - Provide sensible default values that work for most common use cases.
- Validate text input lengths and characters to prevent overflow or rendering issues. Consider font size and available space
- Add assertions to catch invalid parameter combinations that could break the model, like when hole diameter exceeds part width
Common Use Cases
Product Customization
- Name engravings and custom text with proper font scaling, kerning, and depth control based on text length
- Adjustable dimensions that maintain proper proportions and structural integrity across size ranges
- Optional features that can be toggled on/off while ensuring the base model remains printable
- Custom logos and branding elements with proper depth and detail preservation at various scales
Batch Production
- Sequential serial numbers with customizable formats, prefixes
- Automated date stamps in various formats (YYYY-MM-DD, batch codes, etc.)
- Unique identifiers and tracking codes that follow industry standards (UPC, EAN, etc.)
- QR codes and barcodes optimized for 3D printing with proper relief and size constraints
- Batch numbers and production codes that integrate with your inventory management system
Design Variants
- Multiple color options with proper wall thicknesses for multi-material printing
- Style variations from single code base while maintaining consistent quality and printability
- Configurable size ranges that automatically adjust internal structures and support requirements
- Material-specific adjustments like clearances for different filament shrinkage rates
Troubleshooting
Rendering Issues
Common rendering problems can be resolved by:
- Checking syntax errors in your code using OpenSCAD's built-in validator
- Verifying parameter types match expectations (numbers for dimensions, strings for text)
- Validating file paths for imported components relative to your project structure
Performance Problems
If your design is rendering slowly:
- Reduce geometric complexity by simplifying curved surfaces where possible
- Optimize boolean operations by combining them or rethinking the construction method
- Cache repeated calculations in variables instead of recalculating
- Monitor memory usage during rendering and break up large designs
- Consider breaking into smaller modules that can be rendered independently
Need help! Join our Discord community for latest info and support!
Additional Resources
Check out our OpenSCAD Libraries page for a collection of useful libraries that can extend your OpenSCAD capabilities in Printago.