Text Placeholders
Key Concepts
A text placeholder is a 3D text object in a Bambu Studio or OrcaSlicer project whose name begins with PrintagoParam. The name is the whole marker; the text inside it is only what prints when nobody supplies anything else. Upload the 3MF and Printago turns every placeholder it finds into a parameter on the part, shown with the marker stripped off, so a text object named PrintagoParamSerial is labelled Serial. Fill that parameter in and Printago rebuilds the text geometry with your value before slicing, which is what lets serial numbers, names, and other per-print text be printed as part of the model rather than applied to it afterwards.
Because a placeholder's full name is its key, two text objects named the same thing are one placeholder taking one value, which is what you want when the same serial belongs on several faces of a model. A value is rarely the same length as the text you authored, so each placeholder also carries a replacement sizing rule deciding whether it stretches, shrinks, or runs past the space. Values can be typed per print, bound to a SKU option, carried in on an order, or issued automatically by a sequence.
Terms used throughout this page:
- Placeholder (or slot) — a text object whose name begins with
PrintagoParam. - Slot key — the text object's full name; objects sharing a name are one placeholder.
- Parameter — what a placeholder becomes once the part is in Printago.
- Value — the text supplied for a placeholder on a given print.
- Replacement sizing — the per-placeholder rule for a value that isn't the authored length.
- Sequence — an auto-incrementing serial number bound to a placeholder in place of a typed value.
- Occurrence — one printable object on a plate carrying a placeholder; occurrences decide how many serials a plate consumes.
How It Works
- In Bambu Studio or OrcaSlicer, add 3D text to your model with the Text tool and type whatever you want as the display text (this is what prints if no value is supplied).
- In the object tree, rename the text object so its name starts with
PrintagoParam:PrintagoParam1,PrintagoParamSerial,PrintagoParam Name, and so on. - Save the project (
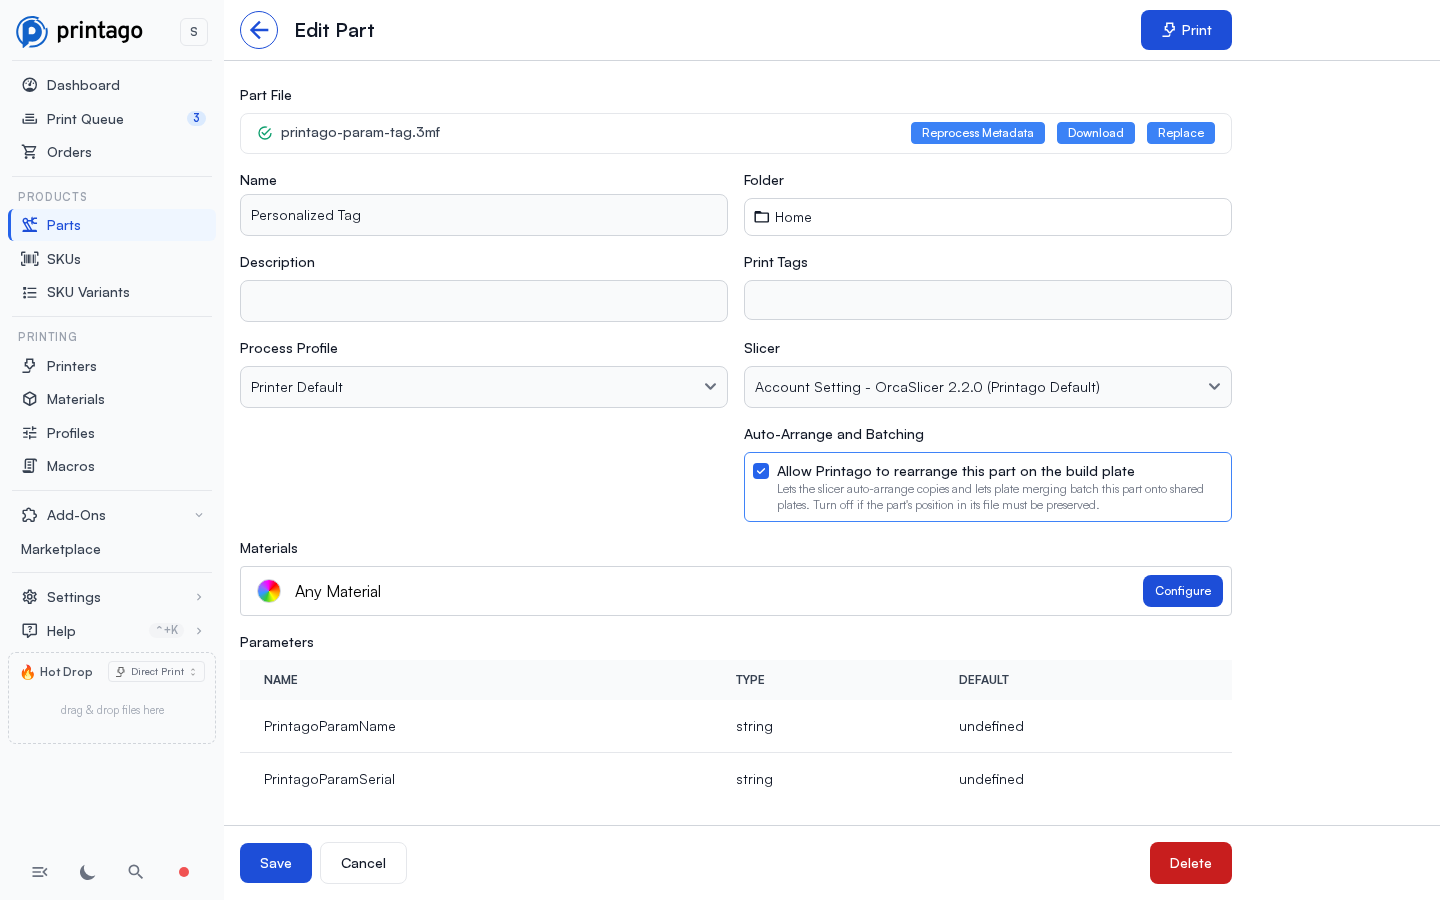
File → Save Project) and upload the 3MF as a part in Printago. - Printago detects each named slot and adds a matching string parameter to the part, listed alphabetically by name. They appear in the Parameters section as soon as you pick the file, before you save the part.
- Fill in a value for each parameter when you print. Printago regenerates the text geometry with your value before slicing, so the printed part carries the real text.
Nothing else about your project changes. Plates, modifiers, paint, supports, and print settings all carry through untouched, and the file stays editable in the slicer you authored it in. Reopen the project after a print and the text tool shows the value Printago used, not the placeholder you typed.
Naming the text object
The name is the whole contract. A text object becomes a placeholder when its entire name is PrintagoParam followed only by letters, numbers, spaces, underscores, or hyphens. PrintagoParam1, PrintagoParamSerial and PrintagoParam Name are all slots; My PrintagoParam is not, because the marker has to come first. The text content itself never matters; it is free-form display text.
Both standalone and attached text work, but you rename different things. For text you added onto an existing model, rename the text part inside the object tree. For a standalone text object (text added as its own object, with nothing grouped into it), rename the object itself. Renaming a multi-part object does not turn the text parts inside it into placeholders; rename each text part instead.
Because the full name is the key, objects sharing a name share a value. Three text volumes all named PrintagoParam1 are one placeholder, take one value, and all three receive it. Names that differ only in the punctuation after the marker are not the same slot: PrintagoParam Serial and PrintagoParamSerial are two separate placeholders, and since stripping the marker would label them both "Serial", Printago shows them under their full names instead. A text object named exactly PrintagoParam, with nothing after the marker to strip, is likewise shown under that name.
Replacing the part's file re-detects everything. Parameters for slots that no longer exist in the new file are removed, newly named slots are added, the list stays alphabetical, and any defaults you set on surviving parameters are kept.
Filling In Values
Placeholder values flow through the same parameter system as OpenSCAD and CadQuery parts, so there are three ways to supply one:
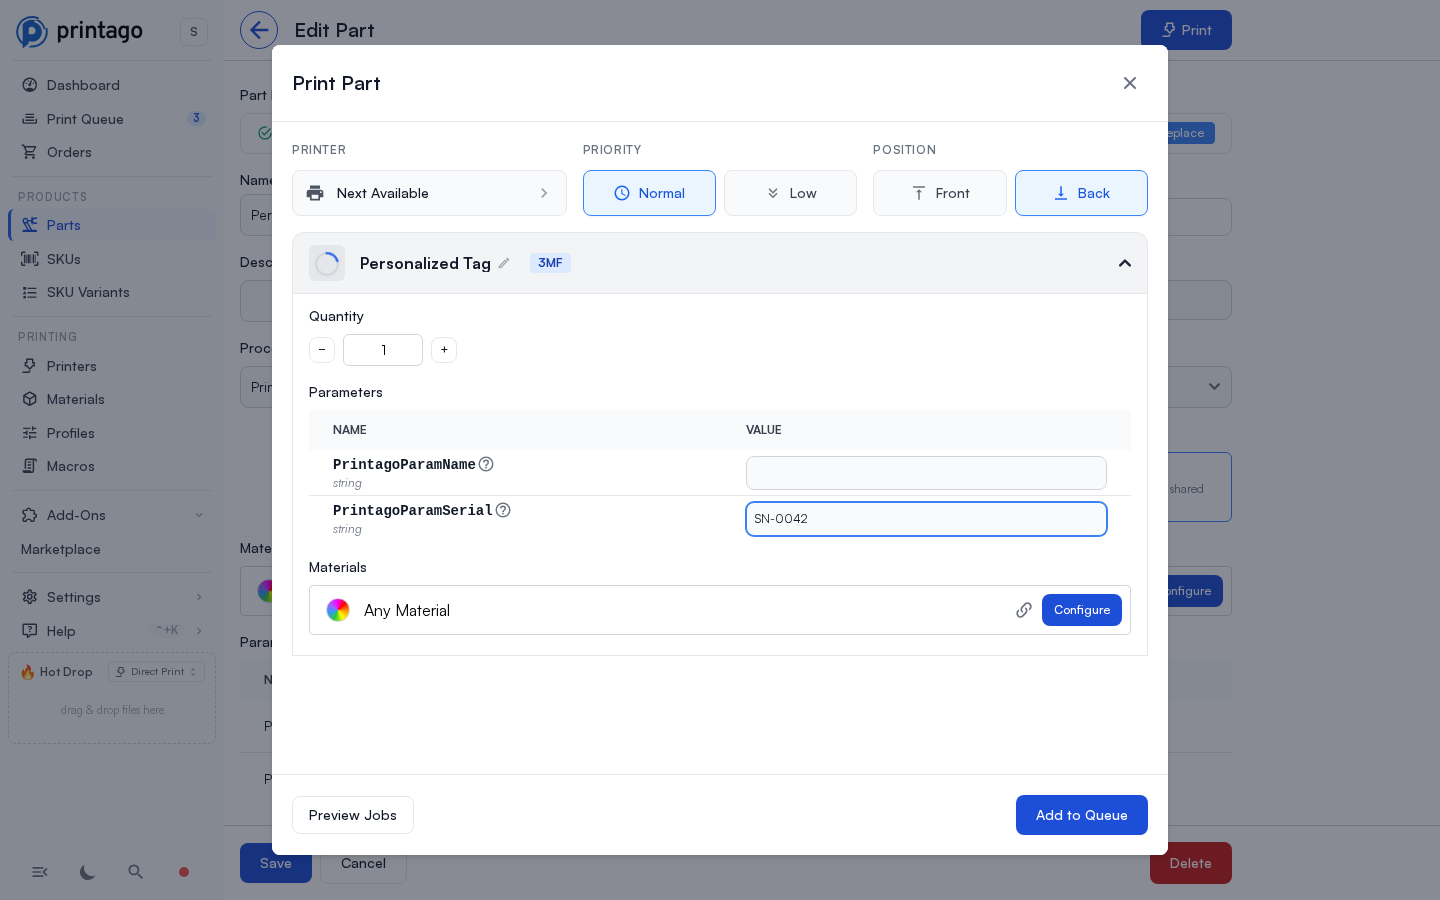
- Printing directly: the Print dialog shows an input for each placeholder, with its replacement sizing named underneath so you know what a long value will do. Type the value for this batch.
- SKUs: link the part to a SKU and bind placeholder parameters to SKU options, the same way you bind other part parameters. A placeholder can also be bound to a sequence to be numbered automatically.
- Orders: personalization values on an order item (for example, Shopify line item properties) whose names match a placeholder are applied automatically when the order builds.
Leaving a value empty is allowed, and prints the text you authored in your slicer: that authored text is the parameter's default. Change the default on the part if you want a different fallback.
Replacement Sizing
Your value is redrawn with everything you authored the original text with: the same font, weight, thickness and depth, on the same surface, re-centered on the same anchor point. The one thing that cannot always be preserved is the space it takes up, because a replacement value is rarely the same length as the text you authored.
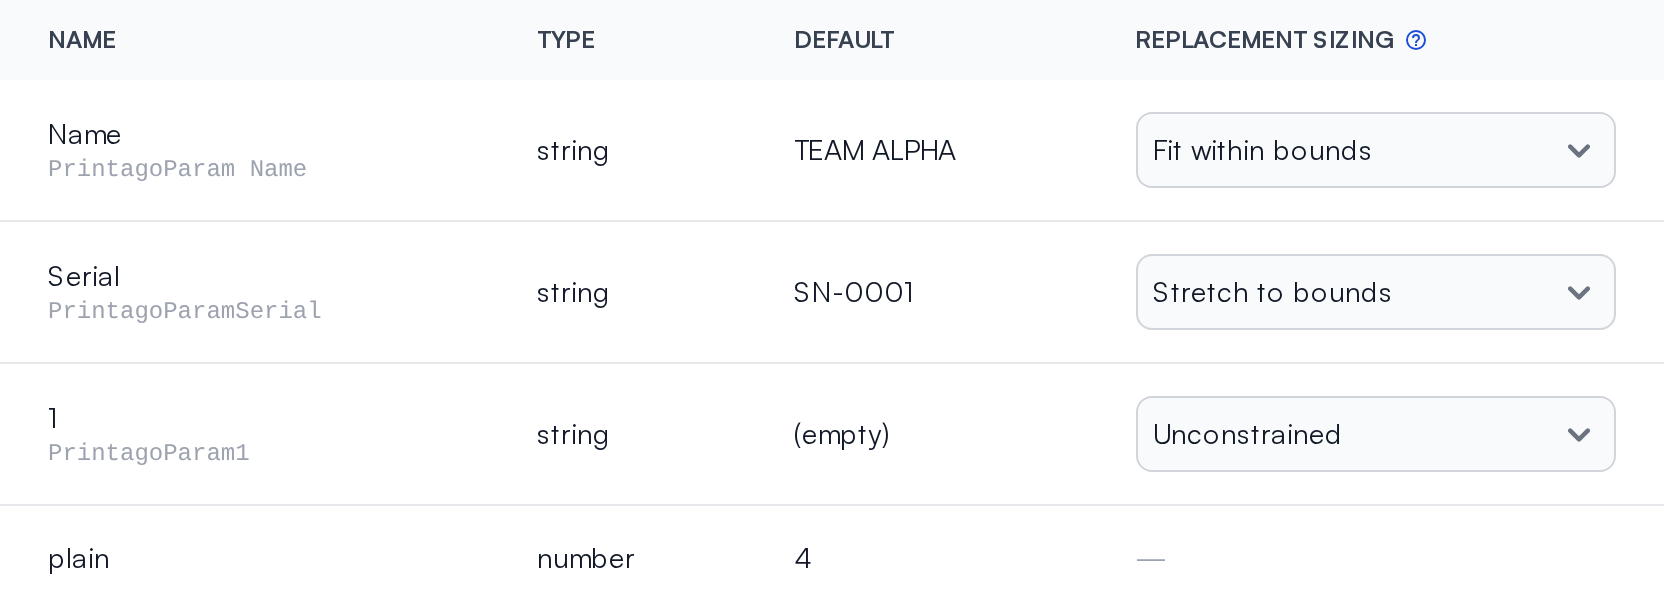
Each placeholder therefore carries a Replacement sizing setting that says what should happen when it isn't. Set it per placeholder in the Parameters table on the part's page. The column appears for a 3MF's text placeholders and only for those, since an OpenSCAD or CadQuery parameter has no authored text to be sized against.
- Stretch to bounds: the value fills the space the original text occupied, exactly, however long or short it is. The footprint never changes, which is what you want when the text sits in a recess or a panel that was sized for it. Long values come out narrow and squeezed, short ones wide and stretched.
- Fit within bounds (the default): the value keeps the proportions and the size you authored, and shrinks, evenly, only if it would otherwise run outside the space the original text occupied. Outside counts in any direction, not just too long. A value with a descender replacing text that had none reaches below the authored floor, and is brought back inside it. It never makes text larger. This is the safe choice: nothing overhangs, and a value that already fits is untouched.
- Unconstrained: the value is drawn at the size you authored with, and that is all. A longer value runs wider than the text it replaces, past whatever the design left room for, and can overflow or collide with neighboring geometry, so leave room in your design if you choose this.

How the bounds are measured
The bounds are the text you authored, not the object it sits on. Printago measures the space the original text volume occupied, flat in the plane the text lies in, and judges your value against that. Nothing else about the placement moves: the text stays anchored where it was, at the thickness and depth you gave it, on the surface you put it on.
A value is rarely the same length as the text it replaces, so the alignment you authored decides which way it grows. Centred text, which is what Bambu Studio always produces, grows evenly out of both ends. In OrcaSlicer you can also anchor text left or right, and then a longer value grows away from that edge and a shorter one shrinks back toward it, which is what keeps a serial lined up with the left edge of a label however many digits it reaches.
Curved placements are measured the same way. A placeholder placed with one of Studio's Surround modes, or with OrcaSlicer's Use surface or Per glyph options, wraps the body the way your slicer placed it: each character stands on the surface at the point the text reaches it, so a longer value simply keeps going around the curve, and text authored flat stays flat. For sizing purposes the bounds are still the flat box the characters were laid out in, so a constrained value walks a shorter stretch of the curve rather than being laid flat.
Each placeholder is judged on its own. Two placeholders in the same part can use different policies, and each is measured against its own authored text. This also means a value can come out at different sizes in different places: three volumes named PrintagoParam1 are one placeholder under one policy, but if you authored them at three different sizes, the same value is fitted to each of them separately.
Two things worth expecting:
- Substituted fonts can shift the fit. Printago resolves fonts on its own servers, and a face substituted for one it does not have can draw a little taller than the one you authored with. Under Fit within bounds that is enough to shrink the value slightly. Choose Unconstrained if you would rather keep the authored size exactly.
- The build log says when it acted. A value that had to be shrunk to fit, or that ran past its bounds, is named in the build's text step log, so you can see it without waiting for the part to come off the plate.
Parts you uploaded before this setting existed use Fit within bounds, which is also what a placeholder you never touch uses.
Limitations
- Text must be created with Bambu Studio 2.2 or newer, or with OrcaSlicer (any version with the Text tool). Text authored in older Bambu Studio versions uses a text engine Printago cannot read.
- OrcaSlicer's bold and italic sliders thicken and slant the letters you already have rather than switching typeface, and Printago draws the typeface unchanged. Pick a bold or italic font in the face list instead if the weight matters. The build log says when a value was affected.
- Use a font from Printago's supported set: Noto Sans, Noto Serif, DejaVu, or Liberation families. Fonts are resolved on Printago's servers, so a font that only exists on your computer cannot be reproduced. The common system faces map to metric-compatible equivalents (Courier New renders as Liberation Mono, Arial as Liberation Sans), so the text keeps the width and spacing you laid out.
- CJK text does not render. Chinese, Japanese and Korean values come out as empty boxes, because the Noto CJK fonts ship as collection files that Printago's text engine cannot currently read. Avoid CJK placeholder values until this is fixed.
- Complex scripts that require ligature shaping (Arabic, Indic) render per-character, matching the slicers' own text tools.
- Studio's Surround projection by character mode, and OrcaSlicer's Use surface, cut each letter out of the model's own surface. Printago approximates both by standing each letter upright on the surface instead, which on a strongly curved body leaves a tall character a fraction of a millimetre off the skin.