Virtual Printers
Virtual printers let you test your Printago workflow without needing physical hardware. They simulate real Bambu Lab printers, complete with temperature changes, print progress, and error states.
What You'll Learn
- What virtual printers are and why they're useful
- How to create and configure virtual printers
- Running test prints and simulating errors
What Are Virtual Printers?
Virtual printers are software-simulated printers that behave like real Bambu Lab printers. They're useful for:
- Learning Printago - Explore features without risking real prints
- Testing workflows - Verify your queue and automation settings work correctly
- Development - Test integrations and customizations
- Testing gcode output - Inspect generated gcode without needing to spin up real printers
Virtual printers run entirely in software. You don't need any physical printers connected to use them.
Creating a Virtual Printer
- Go to the Printers page in the Fuse client UI
- Click Add Printer
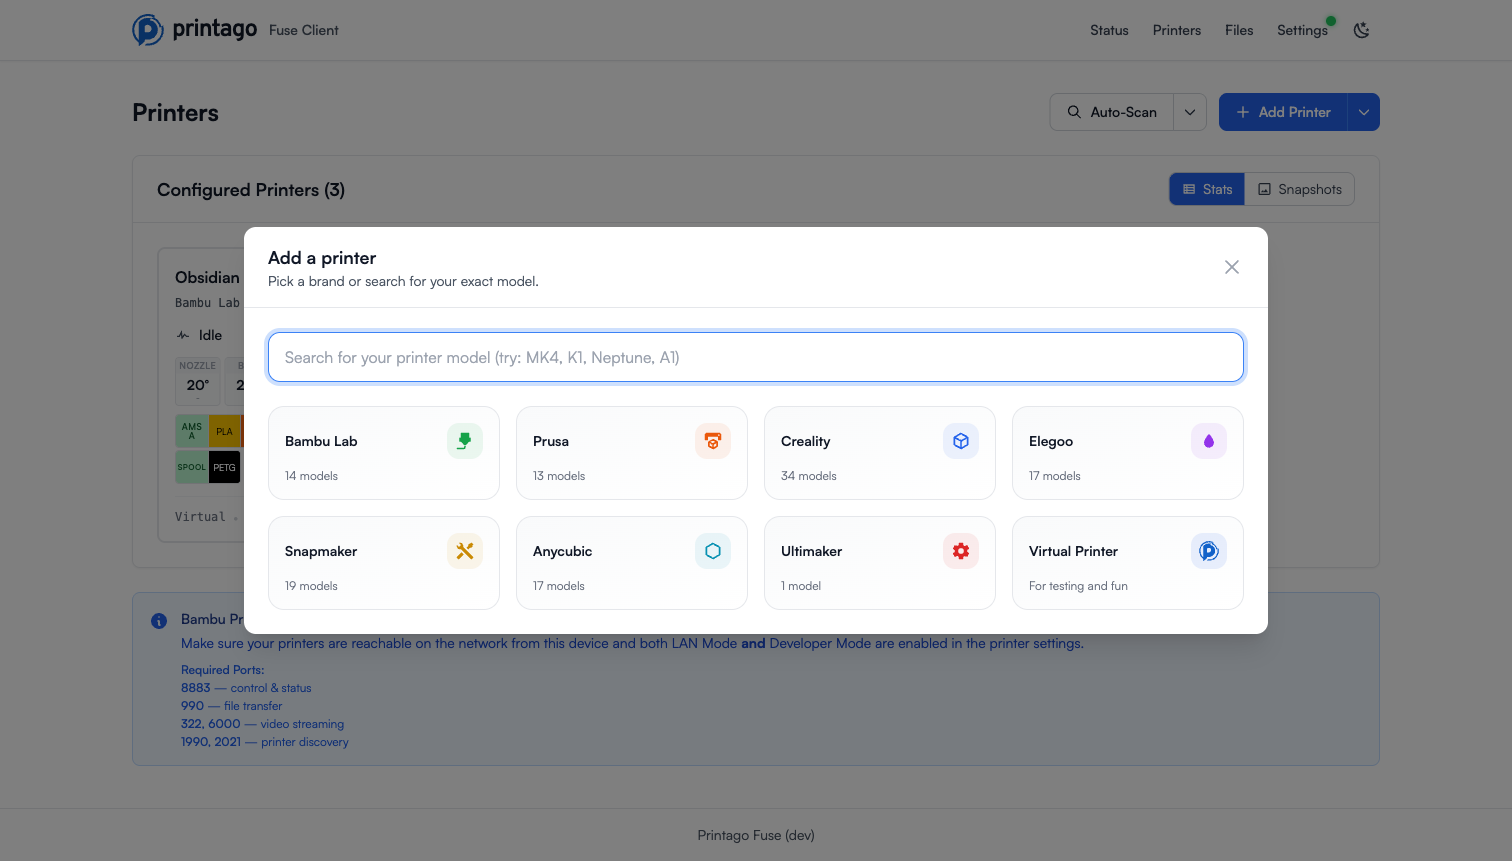
- In the Add a printer dialog, choose the Virtual Printer tile ("For testing and fun"), shown alongside the printer brands
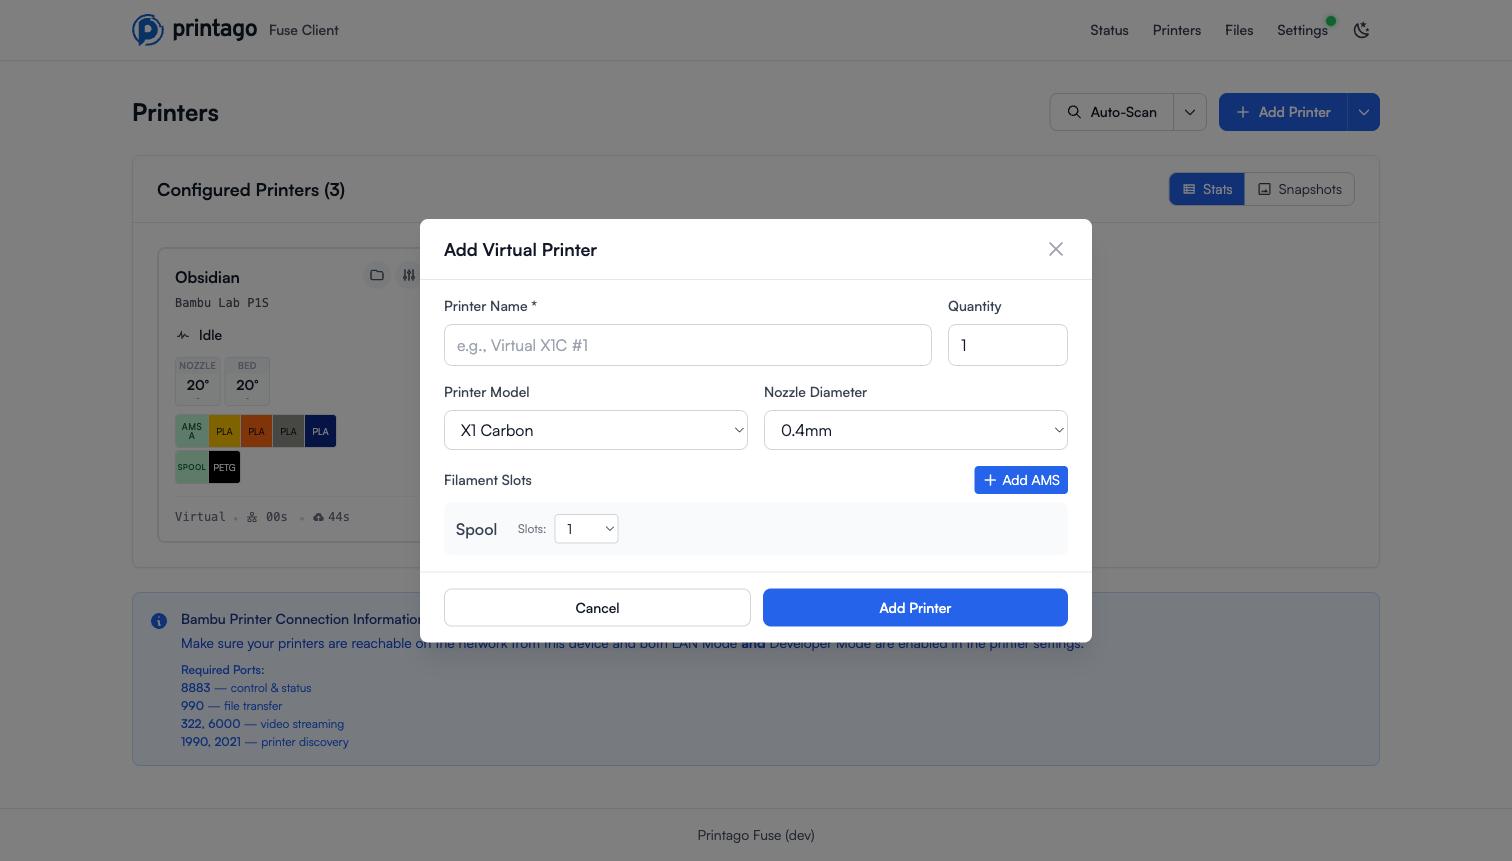
- Fill in the Add Virtual Printer form:
- Printer Name - Give it a descriptive name
- Quantity - Create several identical virtual printers at once
- Printer Model - Select from A1, A1 mini, P1P, P1S, P2S, X1 Carbon, X1, X1E, H2C, H2D, H2D Pro, or H2S
- Nozzle Diameter - Choose 0.2mm, 0.4mm, 0.6mm, or 0.8mm
- Filament Slots - Set the number of spool slots (0 to 6) and optionally click Add AMS to add AMS units
- Click Add Printer
Syncing to Printago
Newly created virtual printers show SYNC NEEDED on their card until they're registered with Printago. Open the Cloud Connections dialog and click Connect Selected to register them with your Printago account.
Once synced, the virtual printers appear in Printago like any other printer. They start out as Needs Configuration until you assign machine and process profiles in their slicer configuration.
Understanding the Virtual Printer
Once created, your virtual printer appears in the Fuse printers list just like a physical printer:
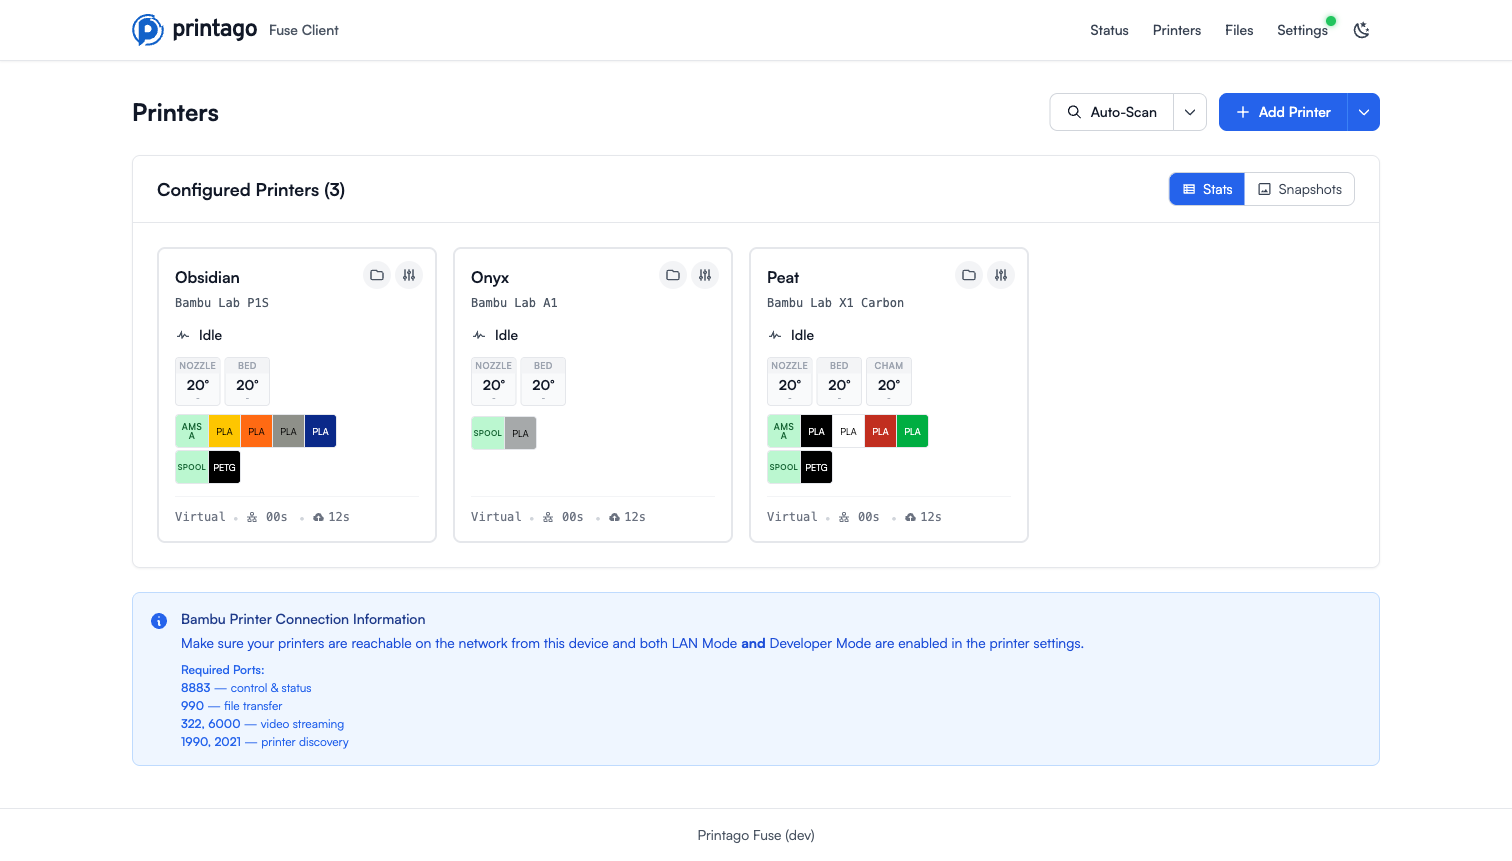
- Shows real-time status, temperatures, and AMS/spool slots
- The Virtual badge distinguishes it from physical printers
- Receives print jobs from your queue like any other printer
Virtual Printer Controls
Open Virtual Printer Controls from the printer card to access simulation controls:
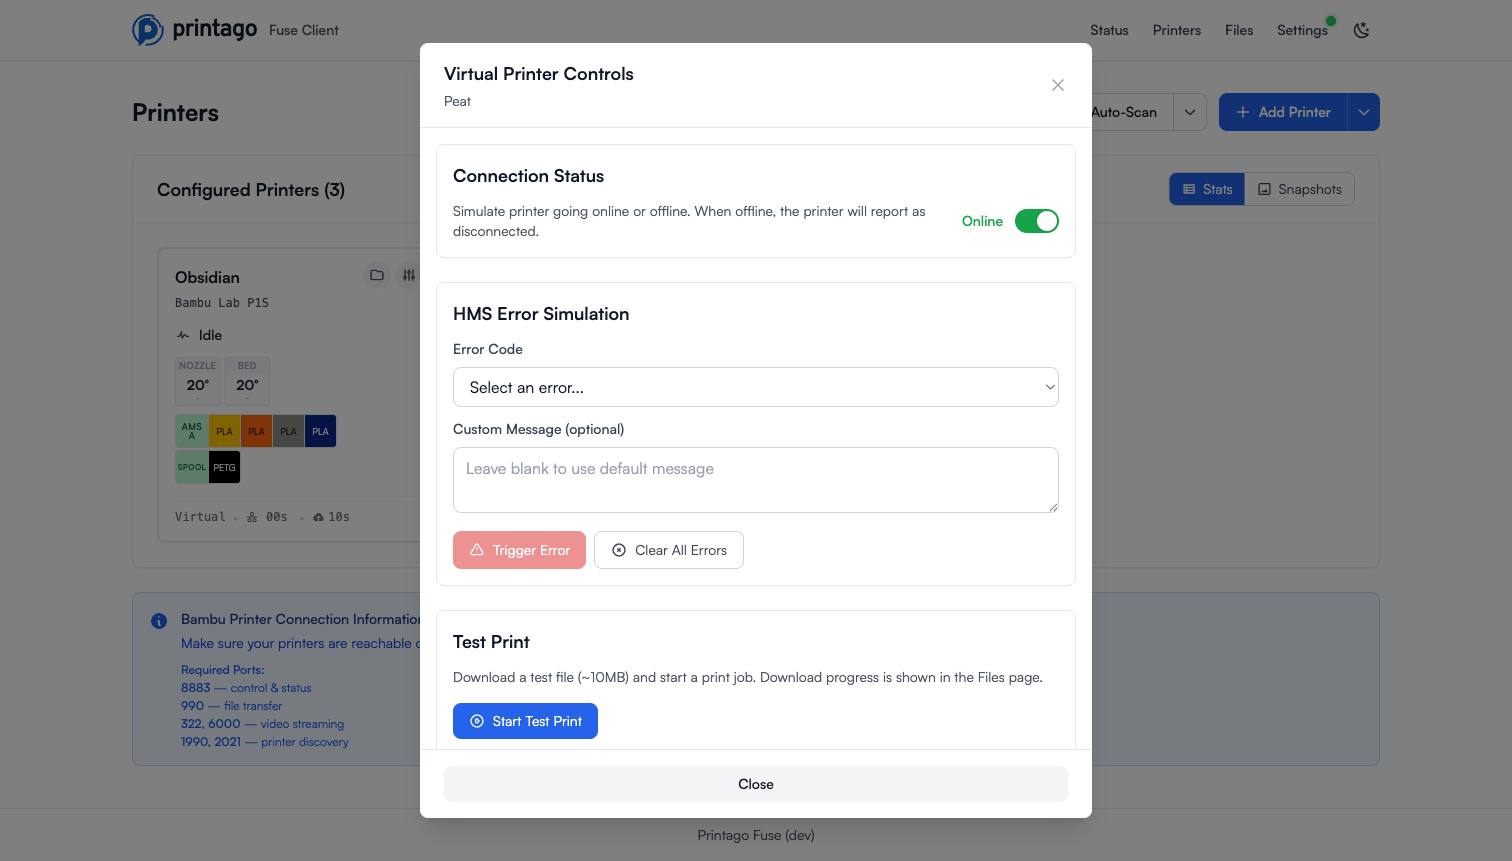
Connection Status
Toggle the printer online or offline. When offline, the printer reports as disconnected - useful for testing how your workflow handles printer disconnections.
HMS Error Simulation
Trigger printer errors to test error handling:
- Select an error type (nozzle temperature, filament runout, AMS connection, etc.)
- Optionally add a custom error message
- Click Trigger Error
- Click Clear All Errors when done testing
Test Print
Start a simulated print job to watch the full print lifecycle without needing to queue a real file. The printer downloads a small test file (about 10MB); download progress is shown on the Files page.
Reset Printer
Return the printer to its initial idle state, clearing any active print or error conditions.
Running a Test Print
- Open Virtual Printer Controls
- Click Start Test Print
- Watch the print lifecycle progress:
- Downloading - Simulates file transfer
- Heating bed - Bed temperature rises to target
- Heating nozzle - Nozzle temperature rises to target
- Printing - Progress percentage and layer count update
- Cooling - Temperatures return to ambient after completion
Virtual printers simulate realistic heating rates and print progress. Test prints complete in a few minutes rather than hours.
Simulating Errors
Test how your workflow handles printer errors:
- Open Virtual Printer Controls
- Select an error from the Error Code dropdown:
- Nozzle Temperature Error
- Bed Temperature Error
- Heatbreak Fan Error
- Filament Runout
- AMS Connection Lost
- Nozzle Clog Detected
- First Layer Inspection Failed
- Filament Tangle Detected
- Optionally enter a custom error message
- Click Trigger Error
The printer will enter an error state, allowing you to verify your alerts and recovery procedures work correctly. Click Clear All Errors to return to normal operation.