LAN Client (Fuse)
Printago Fuse is a lightweight client that runs on your local network, bridging Printago to printers that aren't reachable via cloud connections. Fuse handles the local communication so you get full Printago functionality regardless of how your printer connects.
LAN Connection in the Printago App
In the Printago app, Fuse appears as the LAN Connection option on the Connections page (app.printago.io/connections). It's marked Recommended: full control with real-time status, camera streaming, and support for all printers, requiring a small app running on your network. The other card, Bambu Cloud Connection, needs nothing installed but is limited to X1/P1/A1 models on older firmware.
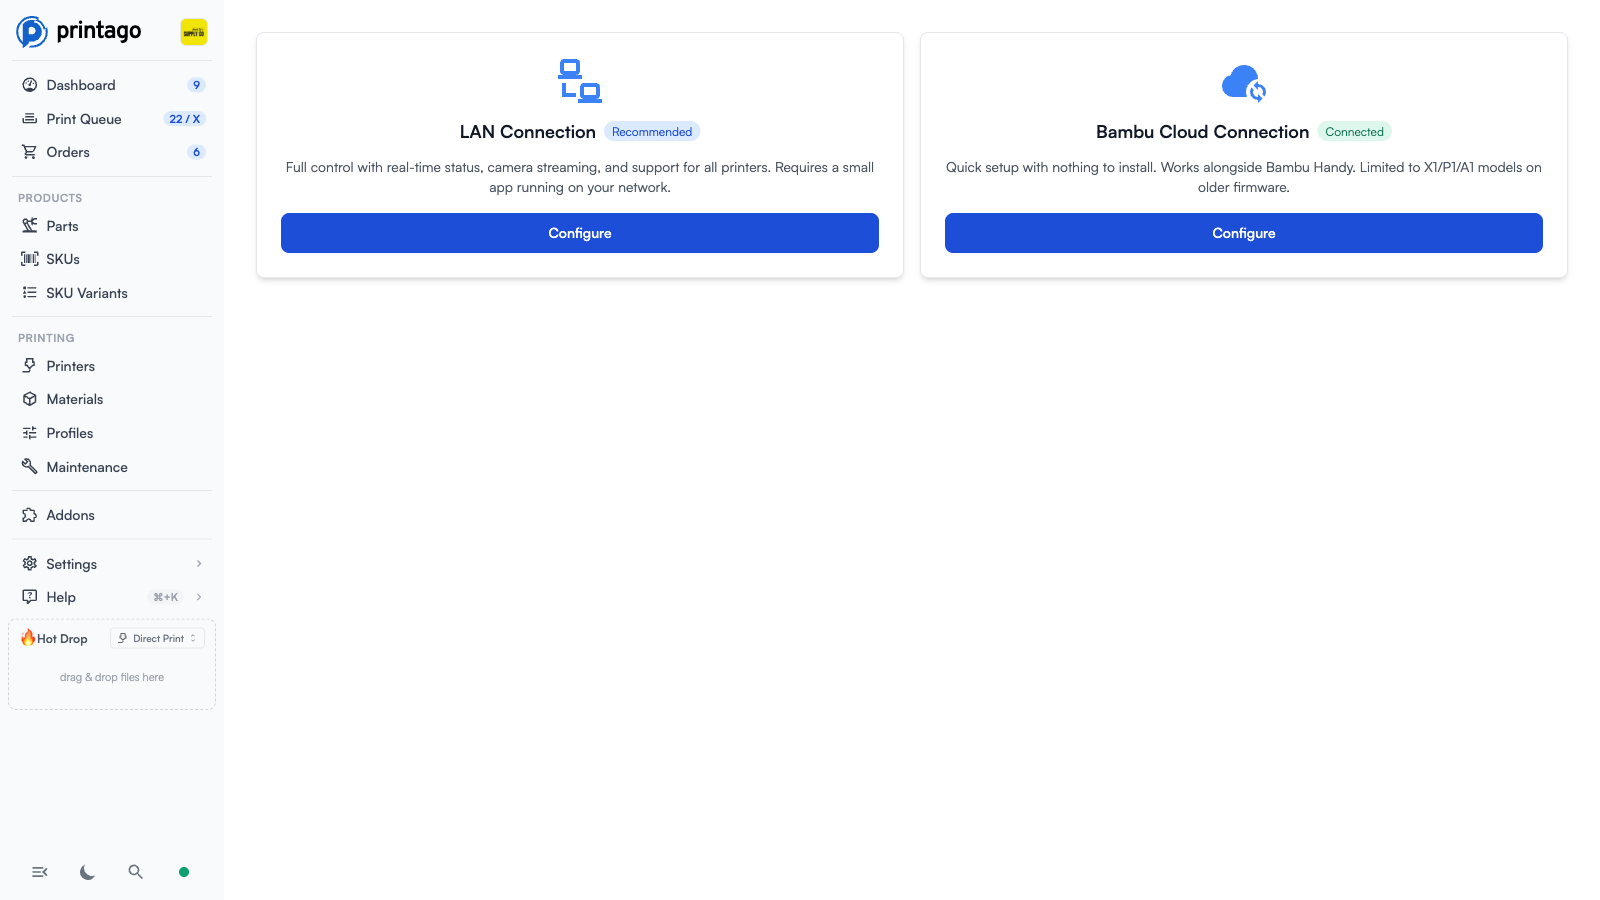
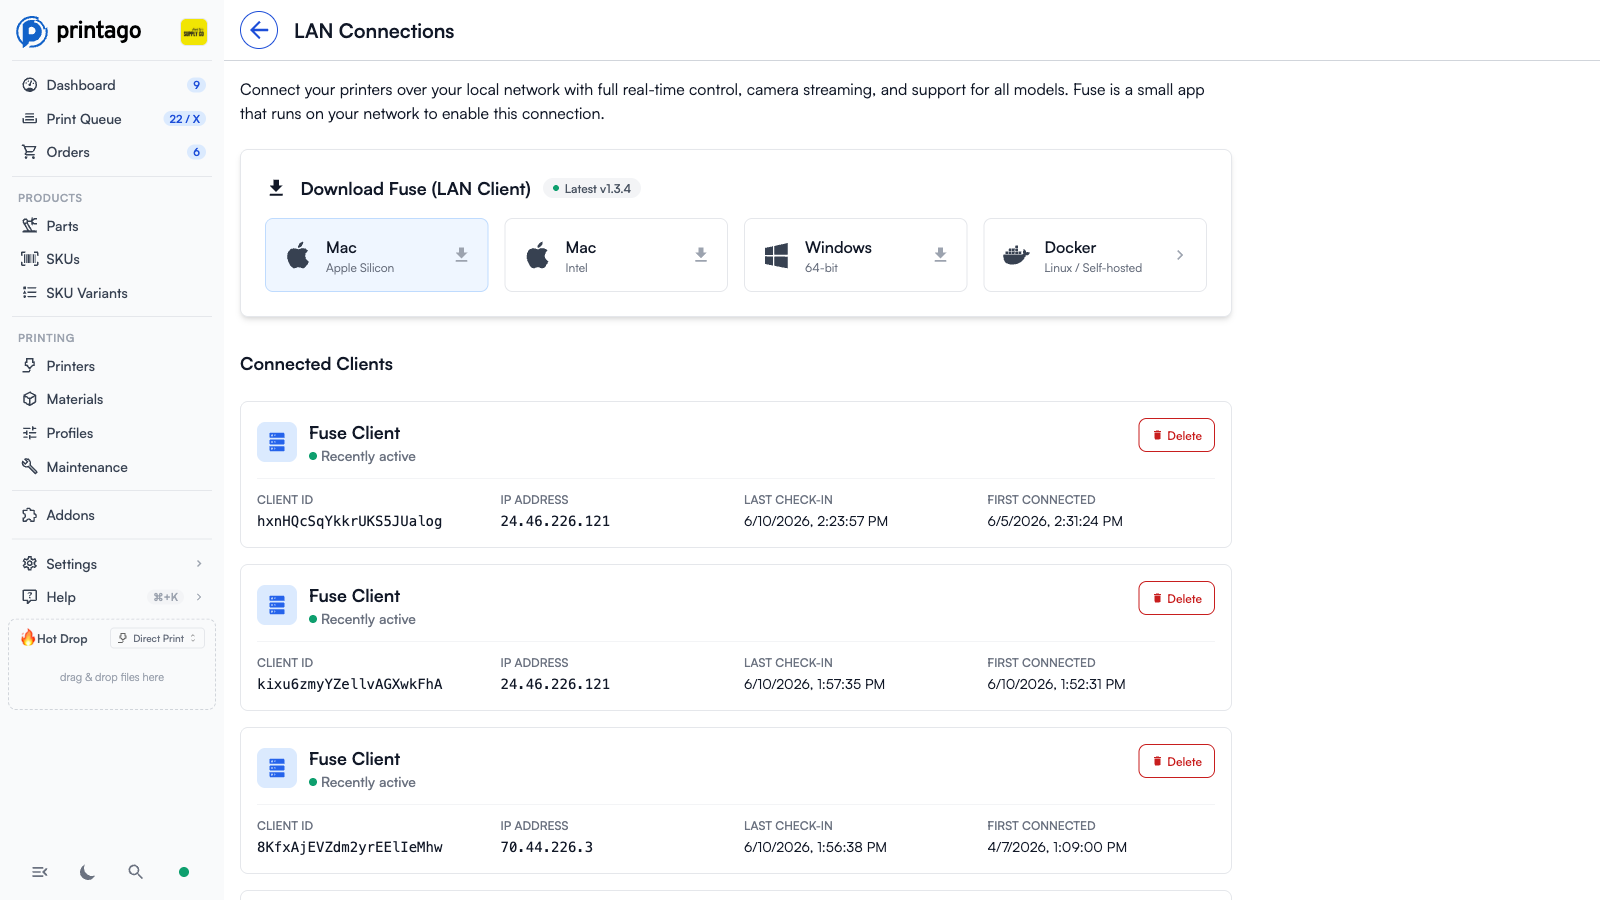
Click Configure on the LAN Connection card to open the LAN Connections page. From there you can download Fuse for your platform and manage the Fuse clients connected to your account:
- Download Fuse (LAN Client) buttons for Mac (Apple Silicon), Mac (Intel), Windows (64-bit), and Docker (Linux / Self-hosted), along with the latest version number
- Connected Clients listing each Fuse client's ID, IP address, last check-in, and first-connected time, with a Delete button to remove a client from your account
Download
The downloads below are also available in the app on the LAN Connections page.
Desktop Applications
| Platform | Download |
|---|---|
| Windows (10+, 64-bit) | Download |
| macOS Apple Silicon | Download |
| macOS Intel | Download |
Docker
Docker is a great option for headless servers, Raspberry Pi, or managed deployments.
Quick Start
docker volume create fuse_config
docker volume create fuse_data
docker pull ghcr.io/printago/fuse:latest
docker run -d \
  --name printago-fuse \
  --restart unless-stopped \
  -p 8888:8888 \
  -v fuse_config:/app/config \
  -v fuse_data:/app/data \
  ghcr.io/printago/fuse:latest
Docker Compose
Add this service to your docker-compose.yml. Configuration and print data persist across container restarts and updates.
services:
  fuse:
    image: ghcr.io/printago/fuse:latest
    container_name: printago-fuse
    restart: unless-stopped
    ports:
      - "8888:8888"
    volumes:
      - fuse_config:/app/config
      - fuse_data:/app/data

volumes:
  fuse_config:
  fuse_data:
After starting the container, access Fuse at http://localhost:8888 to complete setup.
Updating Fuse
How you update Fuse depends on how you installed it.
It's safe to update or restart Fuse while prints are running. Your printers keep printing on their own, and they'll reconnect to Fuse automatically once it's back up. The only thing affected is the brief window while Fuse is offline: live telemetry and printer status changes won't be propagated to Printago during that time, and they'll resume as soon as Fuse reconnects.
Desktop Applications (Windows & macOS)
The Windows and macOS apps update themselves automatically, so there's nothing to download or reinstall.
- Fuse checks for new versions shortly after launch and then periodically while it's running.
- When a newer version is found, it's downloaded quietly in the background.
- Once the download finishes, an Update Available banner appears at the top of the Settings page showing the new version number.
- Click Quit and Install Update to apply it. Fuse will close, install the update, and relaunch. You can also choose Quit and Install Update from the Fuse tray/menu-bar icon.
You can apply the update whenever it's convenient, including while prints are running (see the note above). If you'd rather wait, leave the update pending and it will be installed automatically the next time you quit Fuse.
Docker
Docker containers don't update themselves, but Fuse will tell you when a newer image is available. When an update is published, an Update Available banner appears on the Settings page with the new version number. Expand How to Update for the exact commands.
To pull and apply the latest image:
Using Docker Compose (from the directory containing your docker-compose.yml):
docker compose pull
docker compose up -d
Using Docker Run:
docker pull ghcr.io/printago/fuse:latest
docker stop printago-fuse
docker rm printago-fuse
docker run -d \
  --name printago-fuse \
  --restart unless-stopped \
  -p 8888:8888 \
  -v fuse_config:/app/config \
  -v fuse_data:/app/data \
  ghcr.io/printago/fuse:latest
Your printer configuration and cached print files persist across updates because they live in the fuse_config and fuse_data volumes, so pulling a new image won't lose your setup. The container is briefly stopped and recreated during the update, which is safe to do during active prints (see the note above).
Automatic updates with Watchtower: If you'd like Docker deployments to update on their own, run Watchtower alongside Fuse to check for and apply new images on a schedule:
docker run -d \
  --name watchtower \
  -v /var/run/docker.sock:/var/run/docker.sock \
  containrrr/watchtower \
  --interval 86400 \
  printago-fuse
This checks for and applies updates to the printago-fuse container once a day.
Pinning a specific version: To stay on a particular release instead of latest, open the Fuse Release Notes page: on the LAN Connections page in the Printago app, click the Latest version badge or View all release notes. It lists every Fuse release, newest first, with its notes. Click Docker under a release to copy the docker pull command for that version's image tag, then use the same tag in your docker run command or in the image: line of your docker-compose.yml. Watchtower and docker compose pull won't move a pinned tag forward, so check the release notes when you're ready to upgrade.
Prerequisites
Before setting up Fuse, ensure your Bambu Lab printers have:
- LAN Mode enabled
- Developer Mode enabled
These settings can be configured in your printer's settings menu.
Fuse sends print files to Bambu Lab printers over FTPS, which writes to the printer's storage. On models that use a USB flash drive (X2D, P2S, and the H2 series), a USB drive must be inserted or print jobs will fail to upload. These printers also have a small internal storage cache, but it is not accessible over FTPS, so Fuse cannot use it as a fallback.
Models with a microSD card slot (X1, P1, and A1 series) need their card inserted, which it normally is out of the box.
Network Requirements
Fuse requires the following network ports for printer communication:
| Port | Protocol | Purpose |
|---|---|---|
| 8883 | MQTTS | Printer control and status updates |
| 990 | FTPS | File transfer (print jobs) |
| 1900, 1990, 2021 | SSDP | Printer auto-discovery |
| 322, 6000 | RTSP | Live camera / video streaming |
Hardware Requirements
Fuse is light on resources — most farms run it on a spare desktop, a mini PC, or alongside other services on a NAS or Docker host.
All figures below are totals for the whole machine. Find the row matching your setup and read the numbers off directly.
"0.5 cores" means half of one CPU core, not half your machine. A 4-core mini PC has 4 cores to spend.
Printers without cameras
Every printer reports its full status about once per second, which is the always-on baseline cost. Measured over real MQTT/TLS connections:
| Printers | Total CPU | Total memory |
|---|---|---|
| 50 | 0.09 cores | 160 MB |
| 100 | 0.12 cores | 175 MB |
| 200 | 0.24 cores | 235 MB |
| 500 | 0.43 cores | 315 MB |
Cost per printer eases off as the fleet grows, so a larger fleet needs less than a straight multiplication suggests.
Printers with cameras (snapshots)
This is the default. Fuse does not hold camera streams open — it grabs one still image per printer on a timer, every 30 seconds while a printer is printing and every 10 minutes when idle, briefly opening the camera and closing it again.
These rows assume every printer has a camera and all of them are printing:
| Printers, all with cameras | Total CPU | Total memory |
|---|---|---|
| 5 | 0.04 cores | 185 MB |
| 10 | 0.08 cores | 200 MB |
| 20 | 0.14 cores | 210 MB |
| 25 | 0.18 cores | 230 MB |
| 30 | 0.22 cores | 245 MB |
| 35 | 0.25 cores | 255 MB |
| 40 | 0.28 cores | 255 MB |
| 45 | 0.32 cores | 265 MB |
| 50 | 0.35 cores | 270 MB |
Snapshots are brief — even with 50 printers all printing, only three or four are being taken at any given instant.
Printers with cameras, watched live
Each open live view runs a continuous video conversion for as long as it stays open. These rows assume every printer has a camera and every camera is being watched at once:
| Printers, all watched live | Total CPU | Total memory |
|---|---|---|
| 5 | 0.28 cores | 310 MB |
| 10 | 0.58 cores | 460 MB |
| 20 | 1.02 cores | 745 MB |
| 25 | 1.27 cores | 900 MB |
| 30 | 1.59 cores | 1050 MB |
| 35 | 1.67 cores | 1195 MB |
| 40 | 2.23 cores | 1335 MB |
| 45 | 2.48 cores | 1480 MB |
| 50 | 2.51 cores | 1625 MB |
Fifty cameras cost about 0.35 cores on snapshots but 2.5 cores when all watched at once — roughly 7 times the CPU and 6 times the memory. This applies only while a live view is actually open, and closing it releases the resources immediately. Size for this table only if you plan to leave many camera tiles open, such as on a wall display.
Other combinations
- Only some printers have cameras. Take the no-camera row for your fleet, then add about 0.005 cores and 2 MB per camera on snapshots. For example, 500 printers where 50 have cameras is roughly 0.7 cores and 425 MB.
- A few live views on a big fleet. Add about 0.05 cores and 30 MB per open live view to your fleet's row. That cost is flat per view, so ten open tiles is ten times one.
- More than 50 cameras. Both camera tables extend by the same per-camera figures above.
Recommended minimums
| Your setup | CPU | Memory |
|---|---|---|
| Up to 50 printers with cameras | 2 cores | 2 GB |
| Up to 200 printers, up to 50 with cameras | 2 cores | 4 GB |
| Up to 500 printers, up to 50 with cameras | 4 cores | 4 GB |
| Heavy live viewing (a wall display, many tiles open) | add 1 core per 20 live views | add 350 MB per 10 live views |
These leave room for the operating system and for short bursts when Fuse sends a print file or scans for printers. Fuse itself needs far less than these figures at rest.
About these numbers
- Measured on an Intel Core i9-9900K (a 2019 desktop CPU) running Linux, with every printer and camera active at full rate.
- Low-power hosts need more. A Raspberry Pi or an N100-class mini PC has a slower CPU core, so budget roughly 2 to 4 times the CPU figures above.
- Camera figures cover P1 and A1 series chamber cameras. X1, P2, and H2 series cameras use a different streaming protocol and are not covered here.
- These are steady-state figures. Sending a print file or scanning for printers causes brief spikes above them.
- Fuse handles printer status on a single thread, so that portion cannot exceed about one core regardless of how many cores the machine has.
Activation
When you first launch Fuse, you'll need to connect it to your Printago account.
Activation Process
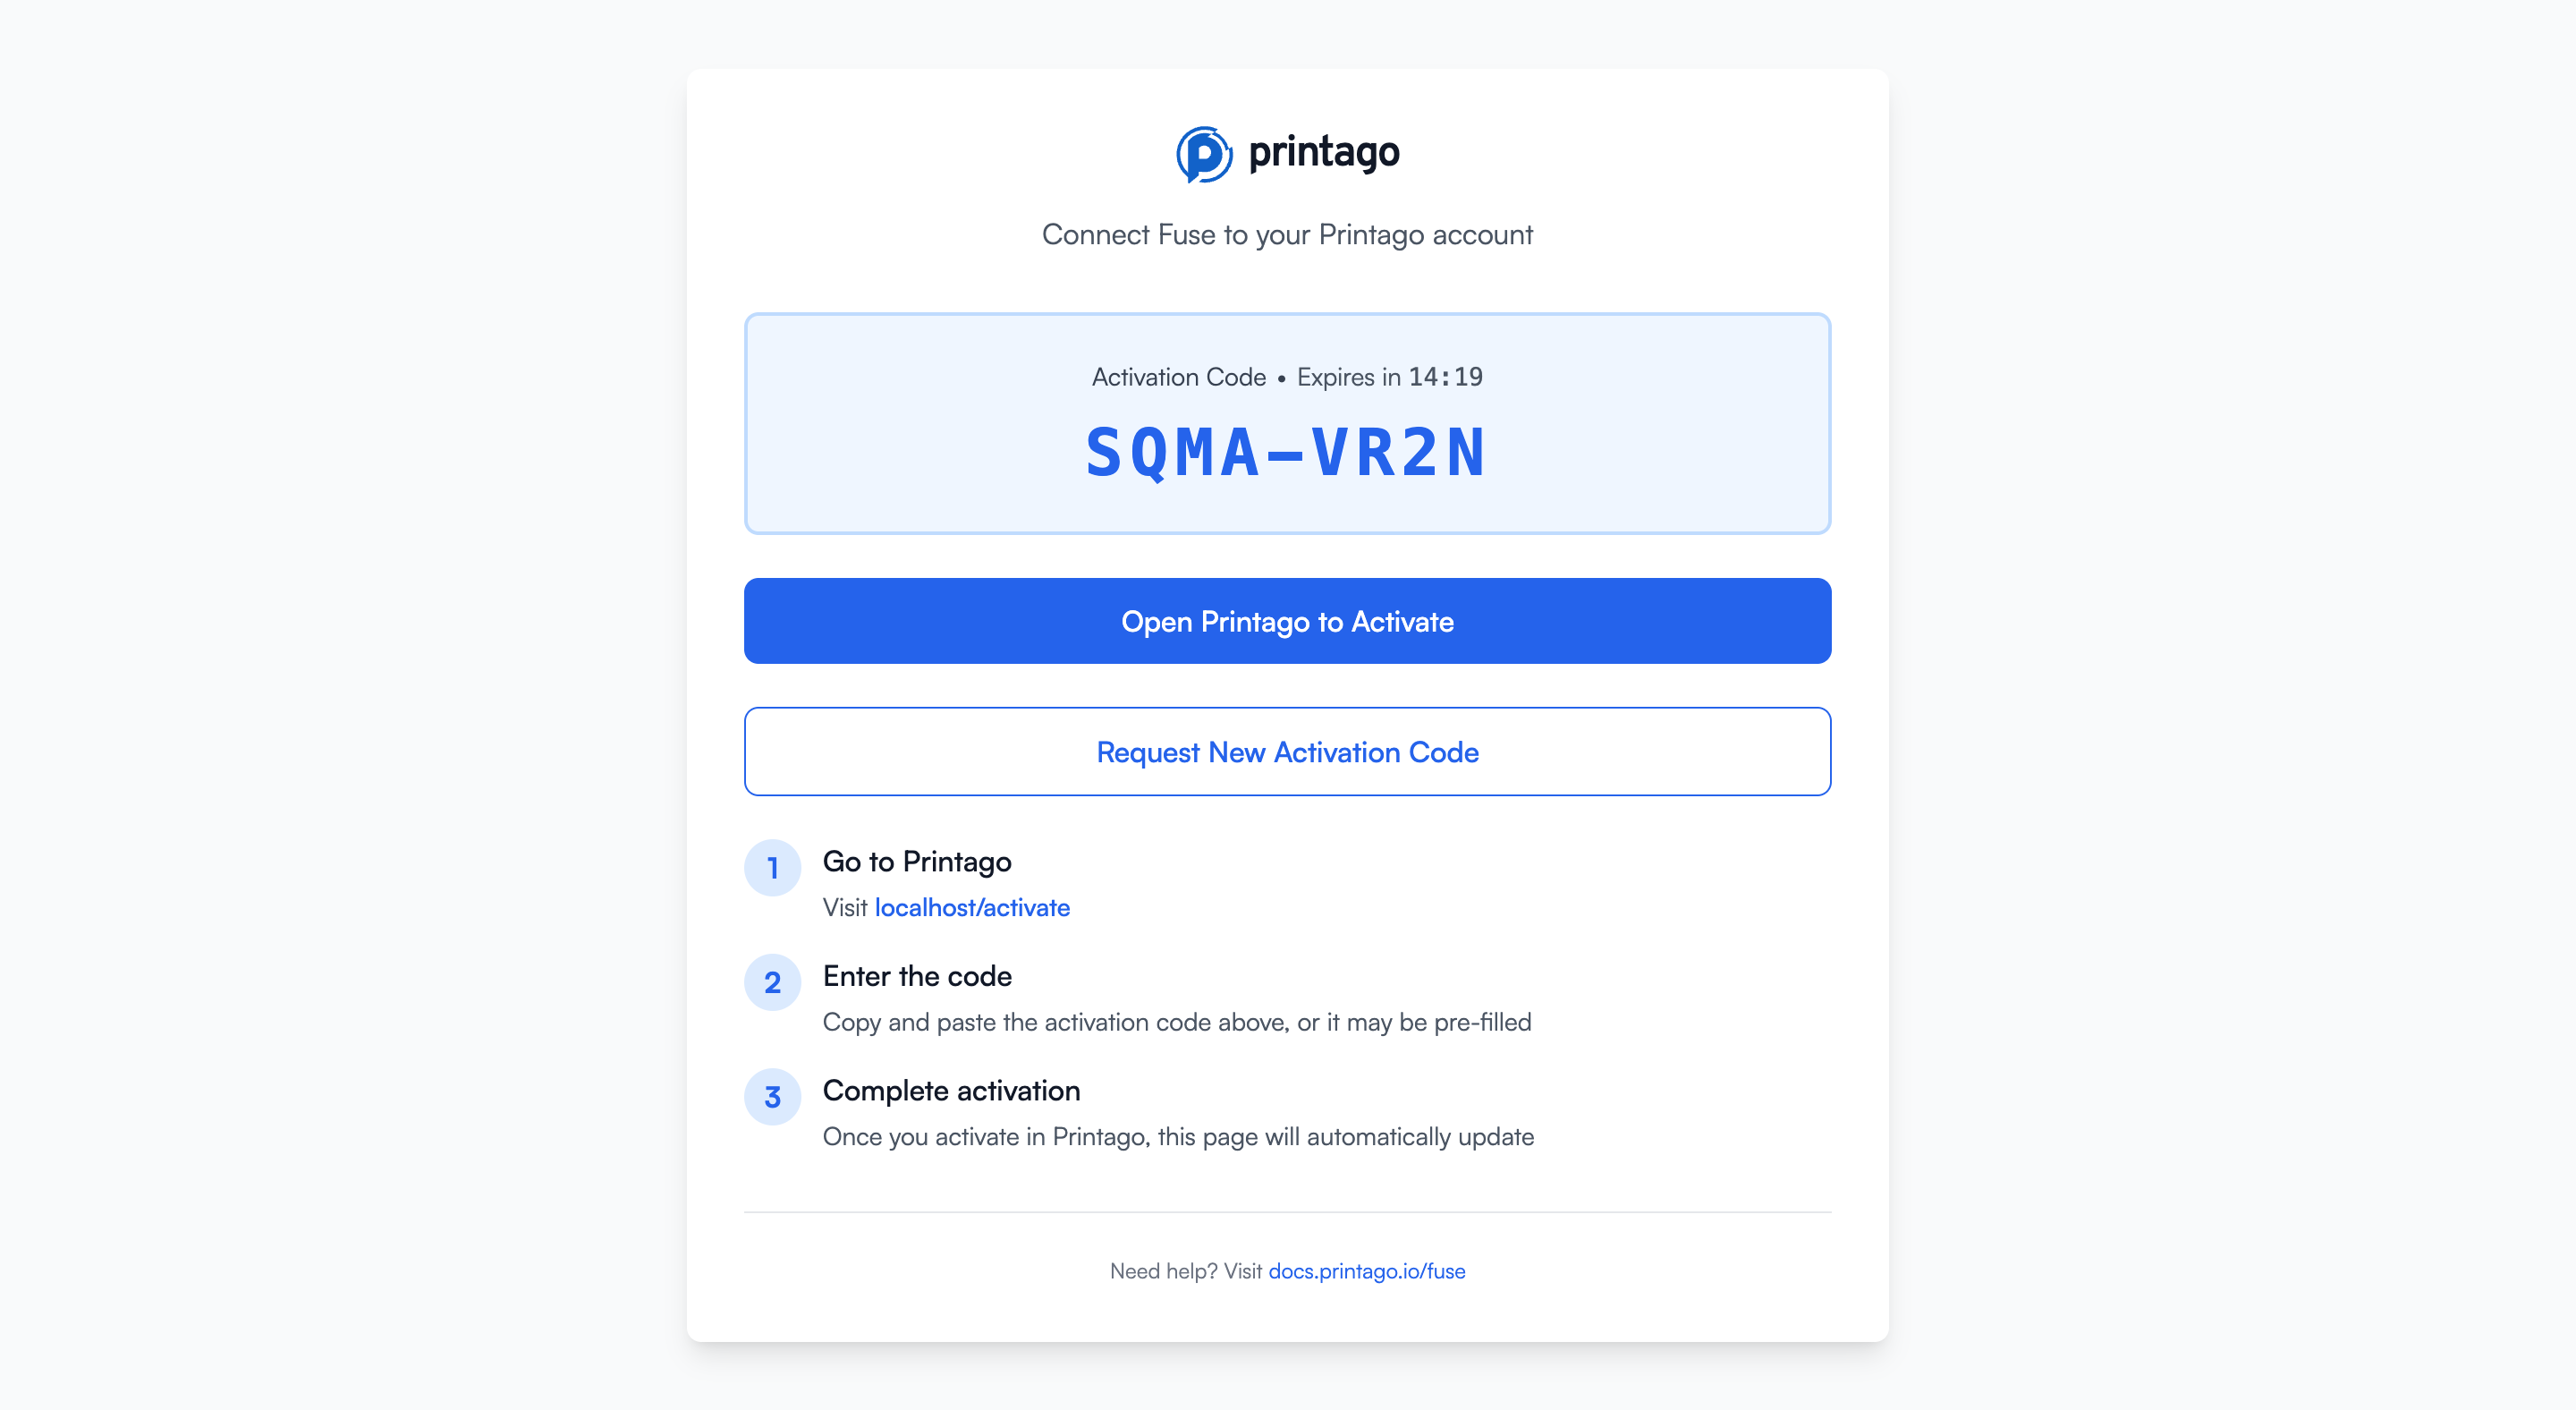
- Start Fuse Client: Launch the Fuse application. You'll see an activation screen displaying a unique activation code (e.g.,
SQMA-VR2N) and an expiration timer.
-
Activate in Printago: You have two options to complete activation:
Option A: Click the activation link
- Click the "Open Printago to Activate" button on the Fuse screen
- This will open your browser to
app.printago.io/activatewith the code pre-filled
Option B: Manual entry
- Navigate to
app.printago.io/activatein your browser - Enter the activation code displayed in Fuse
- Click activate
-
Confirmation: Once activated, both the Printago web interface and your Fuse client will display "Activation Successful!" The Fuse interface will automatically update to show the status dashboard.
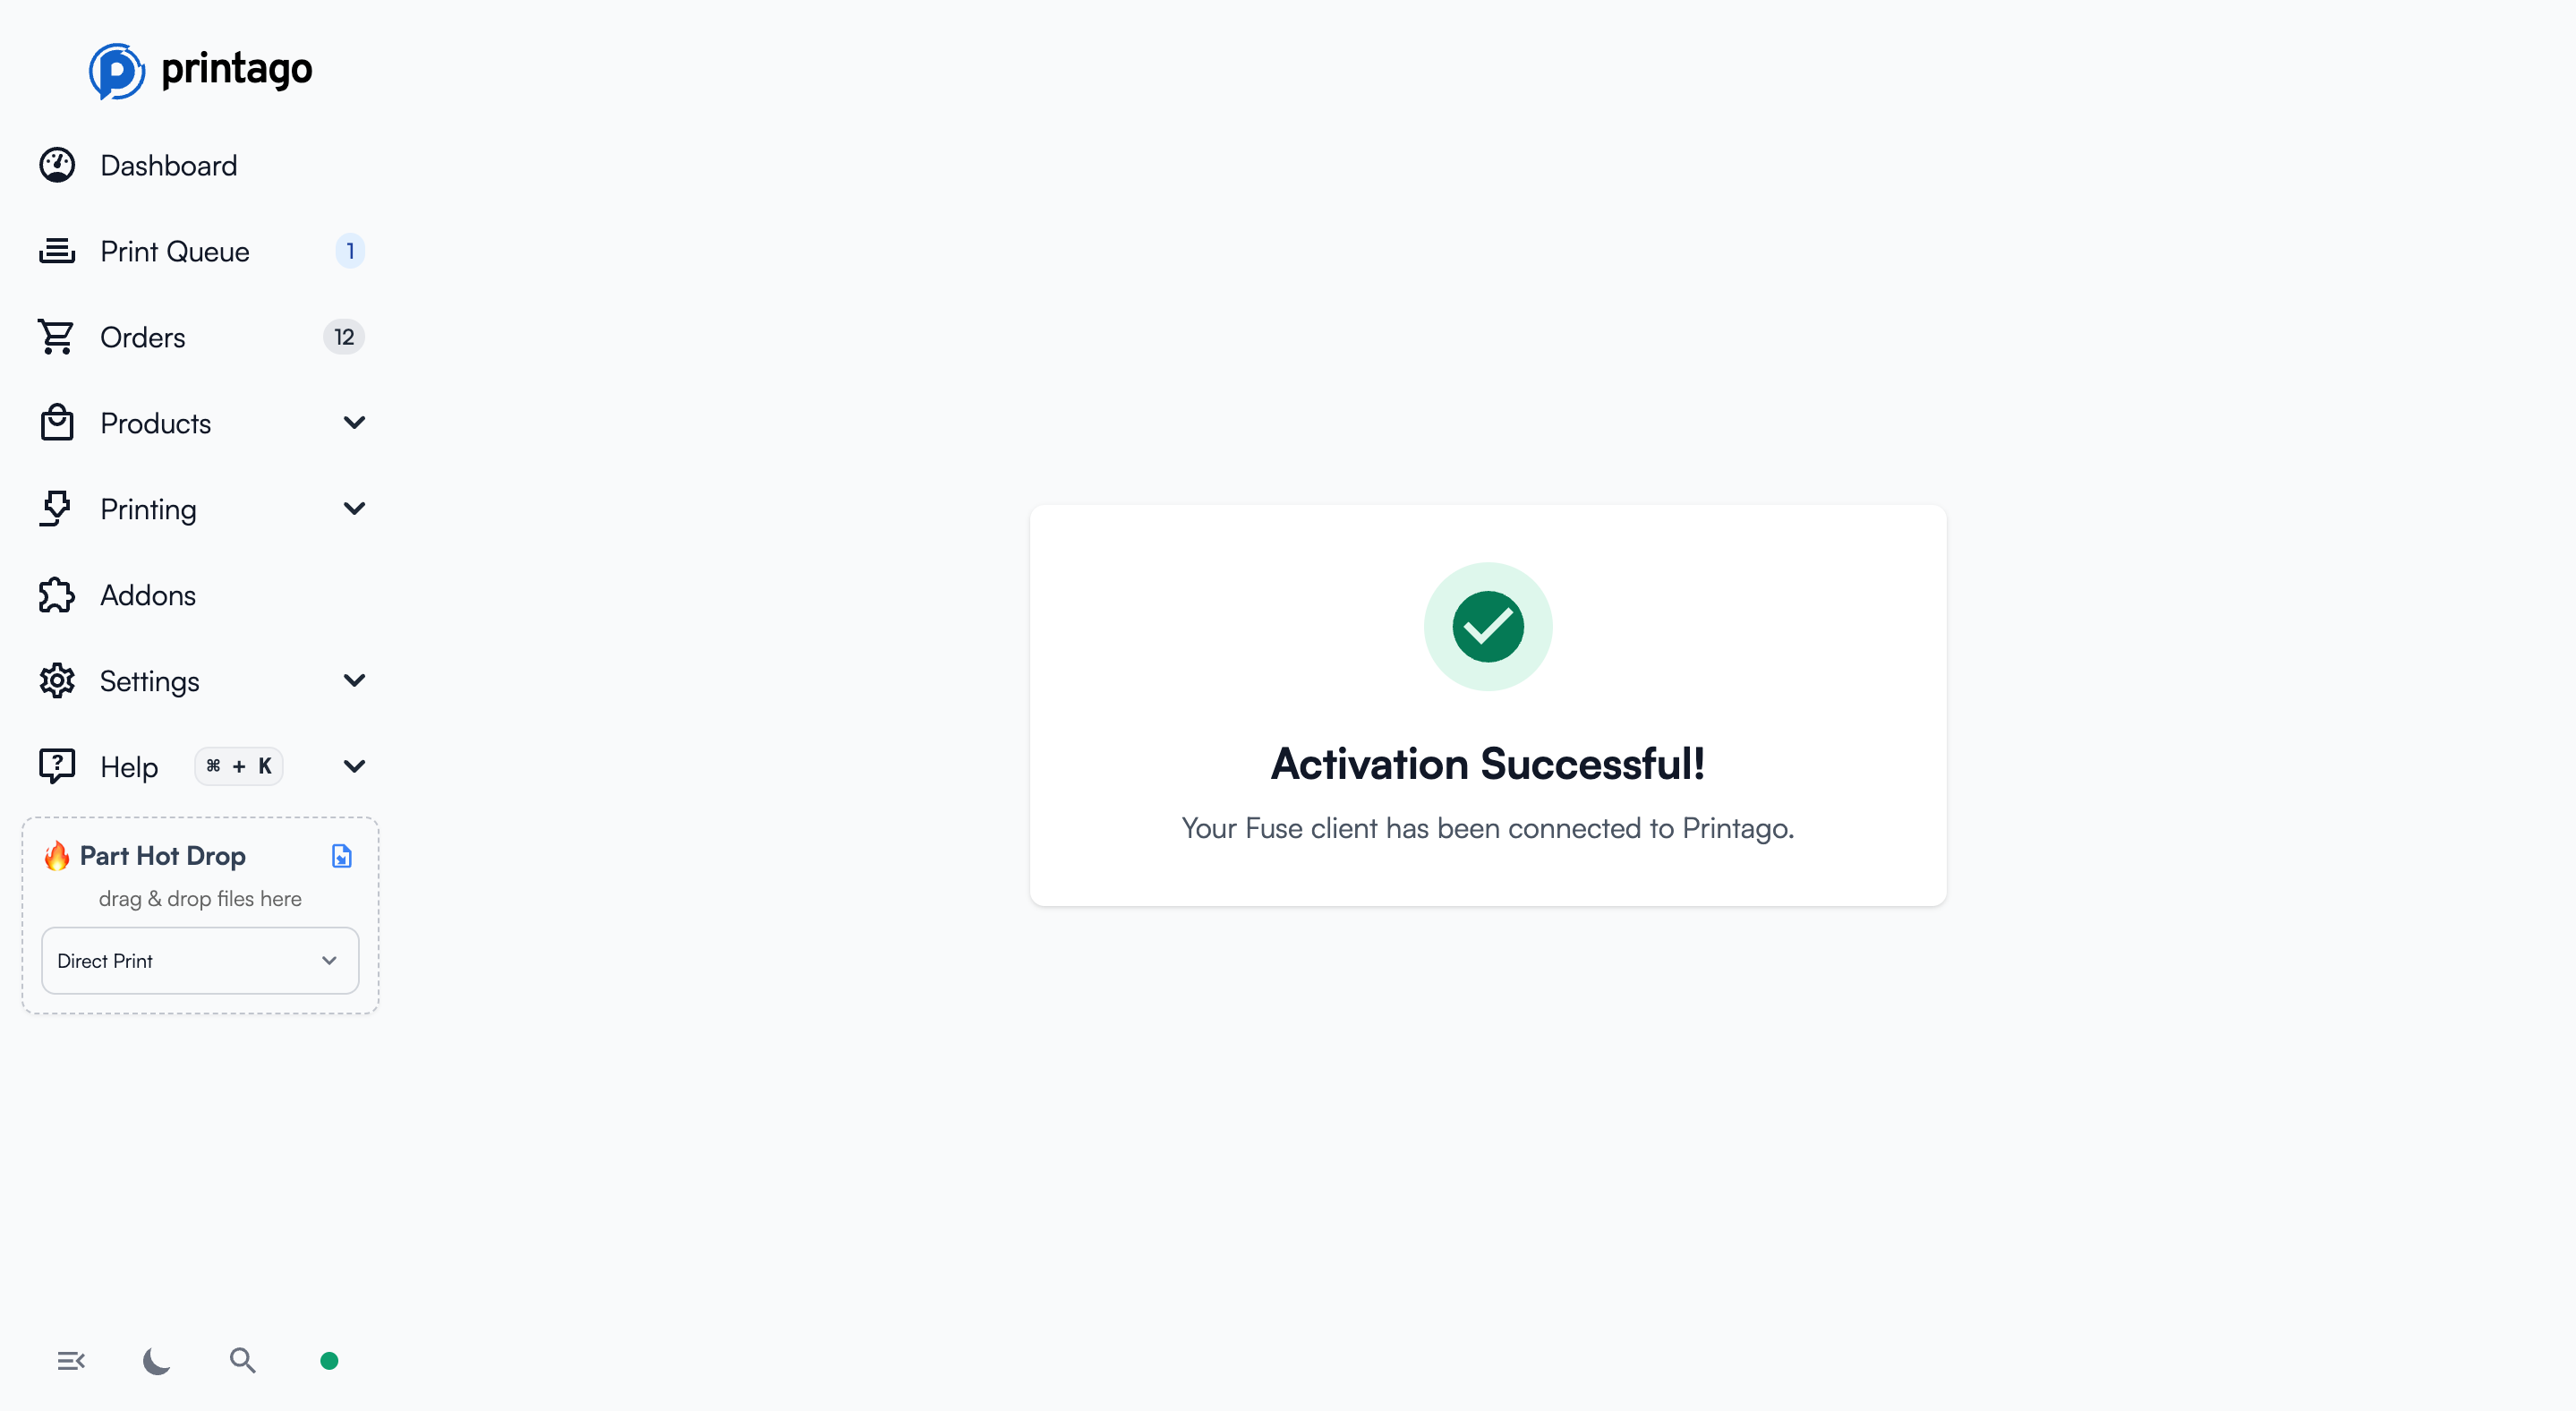
- Request New Code: If your activation code expires (codes are valid for 15 minutes), click "Request New Activation Code" to generate a fresh one.
Pairing Again After a Credential Failure
Fuse holds saved credentials for your store and renews them on its own. If Printago rejects those credentials and they cannot be renewed, Fuse signs itself out and returns to the activation screen with a notice explaining why.
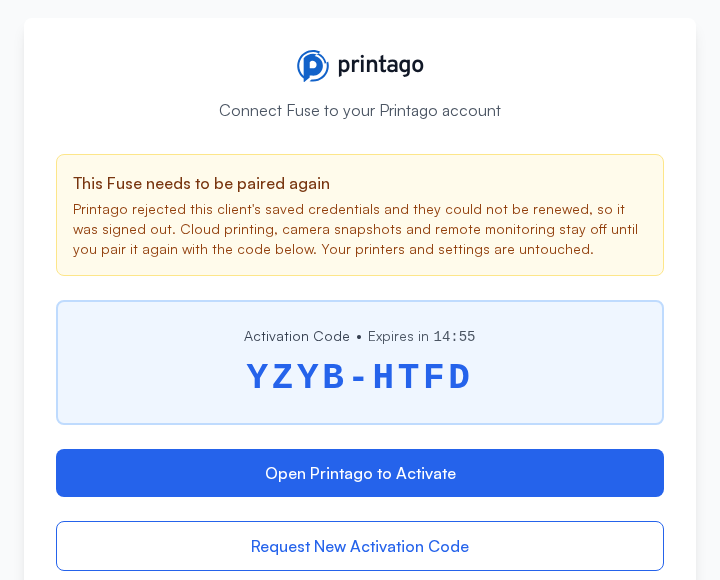
This happens when the credentials on disk are no longer usable: the client was revoked in Printago, or its renewal credential was lost (a data folder restored from an old backup, a partly wiped Fuse database). Restarting Fuse does not clear it, because the credentials it restarts with are the ones being rejected.
While Fuse is in this state:
- Printers stay configured. Connection settings, cameras, watched folders and cached files are untouched.
- Cloud printing, dashboard camera snapshots and remote monitoring stop, because all three go through Printago.
- Fuse stops calling Printago on its normal schedule. Once it has signed itself out it stops contacting the service altogether until you pair it again; while it is still trying to recover from a failure it retries slowly, backing off up to 30 minutes between attempts. Either way, a client left in this state does not keep hammering the service.
To recover, pair the client again with the code on the screen, exactly as you would a first-time activation. Printing, snapshots and monitoring resume on their own once pairing succeeds, usually within a minute, and nothing needs to be re-added.
Deactivating Fuse yourself from Settings → Danger Zone does not show this notice. That is a deliberate sign-out, not a failure.
Status Dashboard
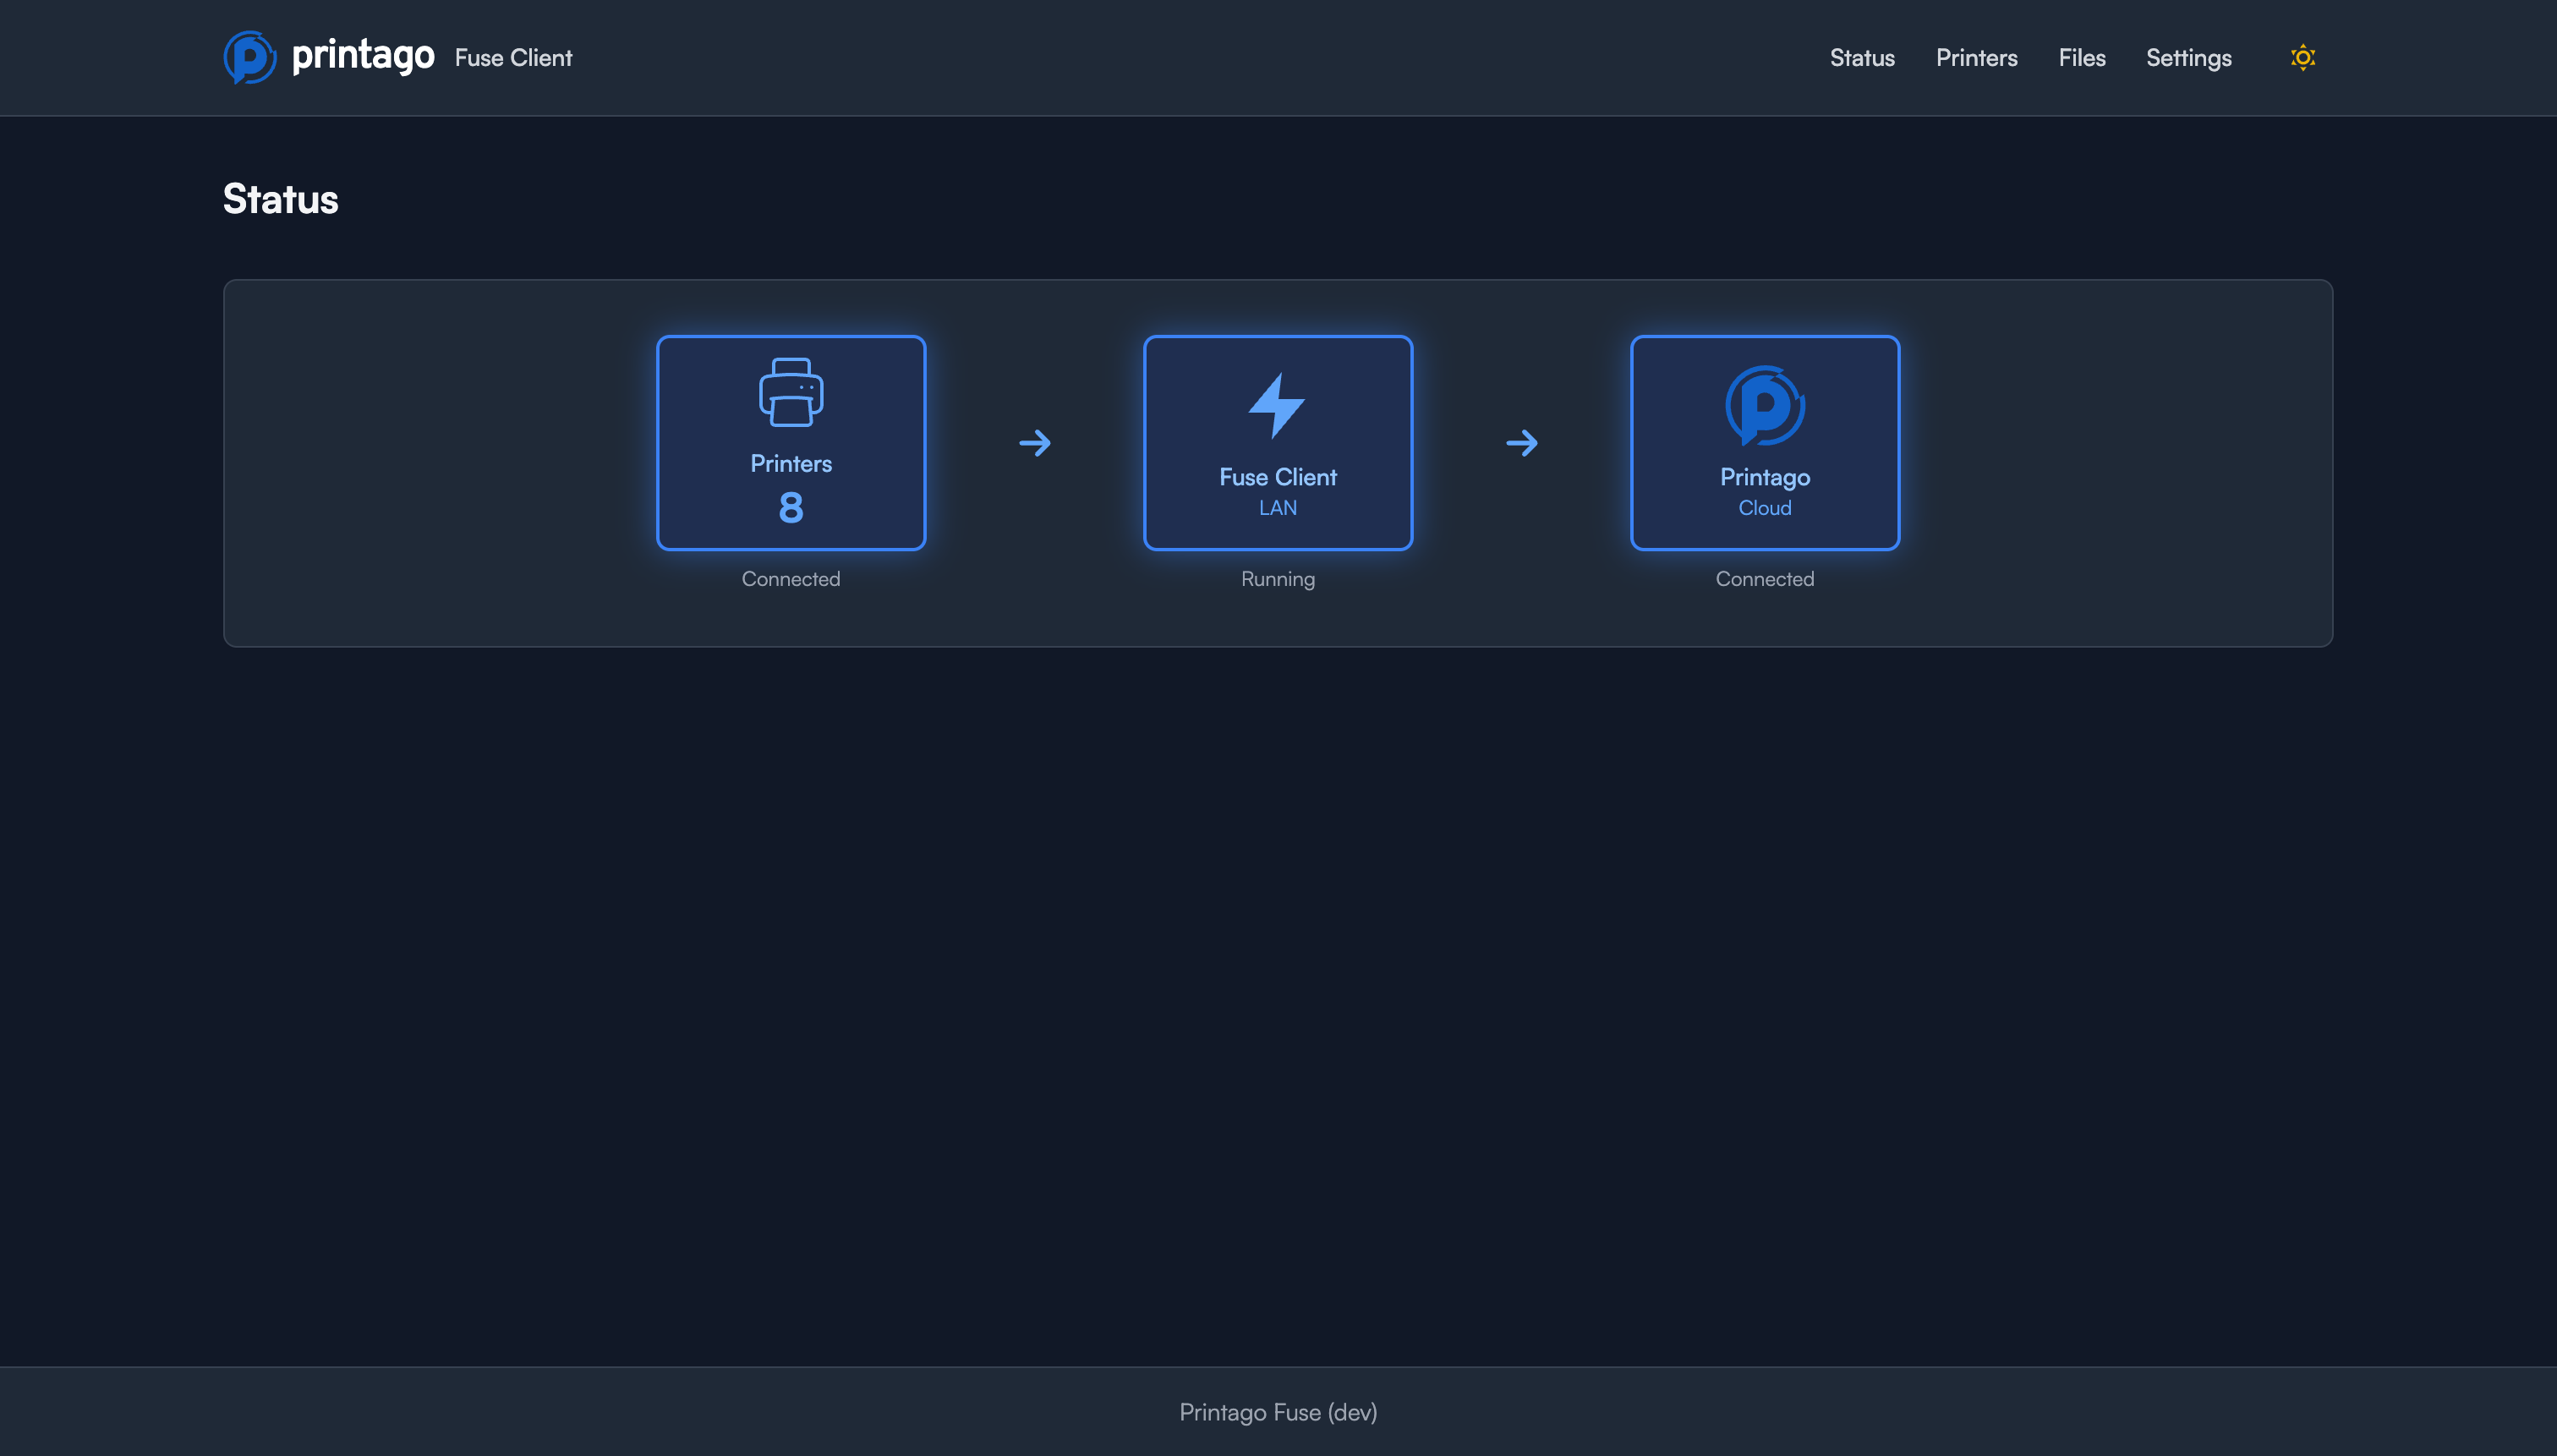
After activation, the Fuse Status page displays three key indicators:
- Printers: Shows the count of connected printers (e.g., "8 connected")
- Fuse Client (LAN): Indicates whether the local Fuse service is running
- Printago (Cloud): Shows connection status to the Printago cloud gateway
All three indicators should show positive status (Connected/Running) for full functionality.
Adding Printers
Fuse supports multiple methods to add printers. Navigate to the Printers page using the top navigation menu.
Adding Physical Printers
Method 1: Auto-Scan (Recommended)
The fastest way to discover Bambu Lab printers on your local network using SSDP discovery.
- Click the Auto-Scan button in the top right
- Fuse will scan your local network for compatible Bambu Lab printers
- Discovered printers will be displayed with their IP address, model, and serial number
- Select the printers you want to add and provide their access codes
- Click "Add Selected Printers" to complete the setup
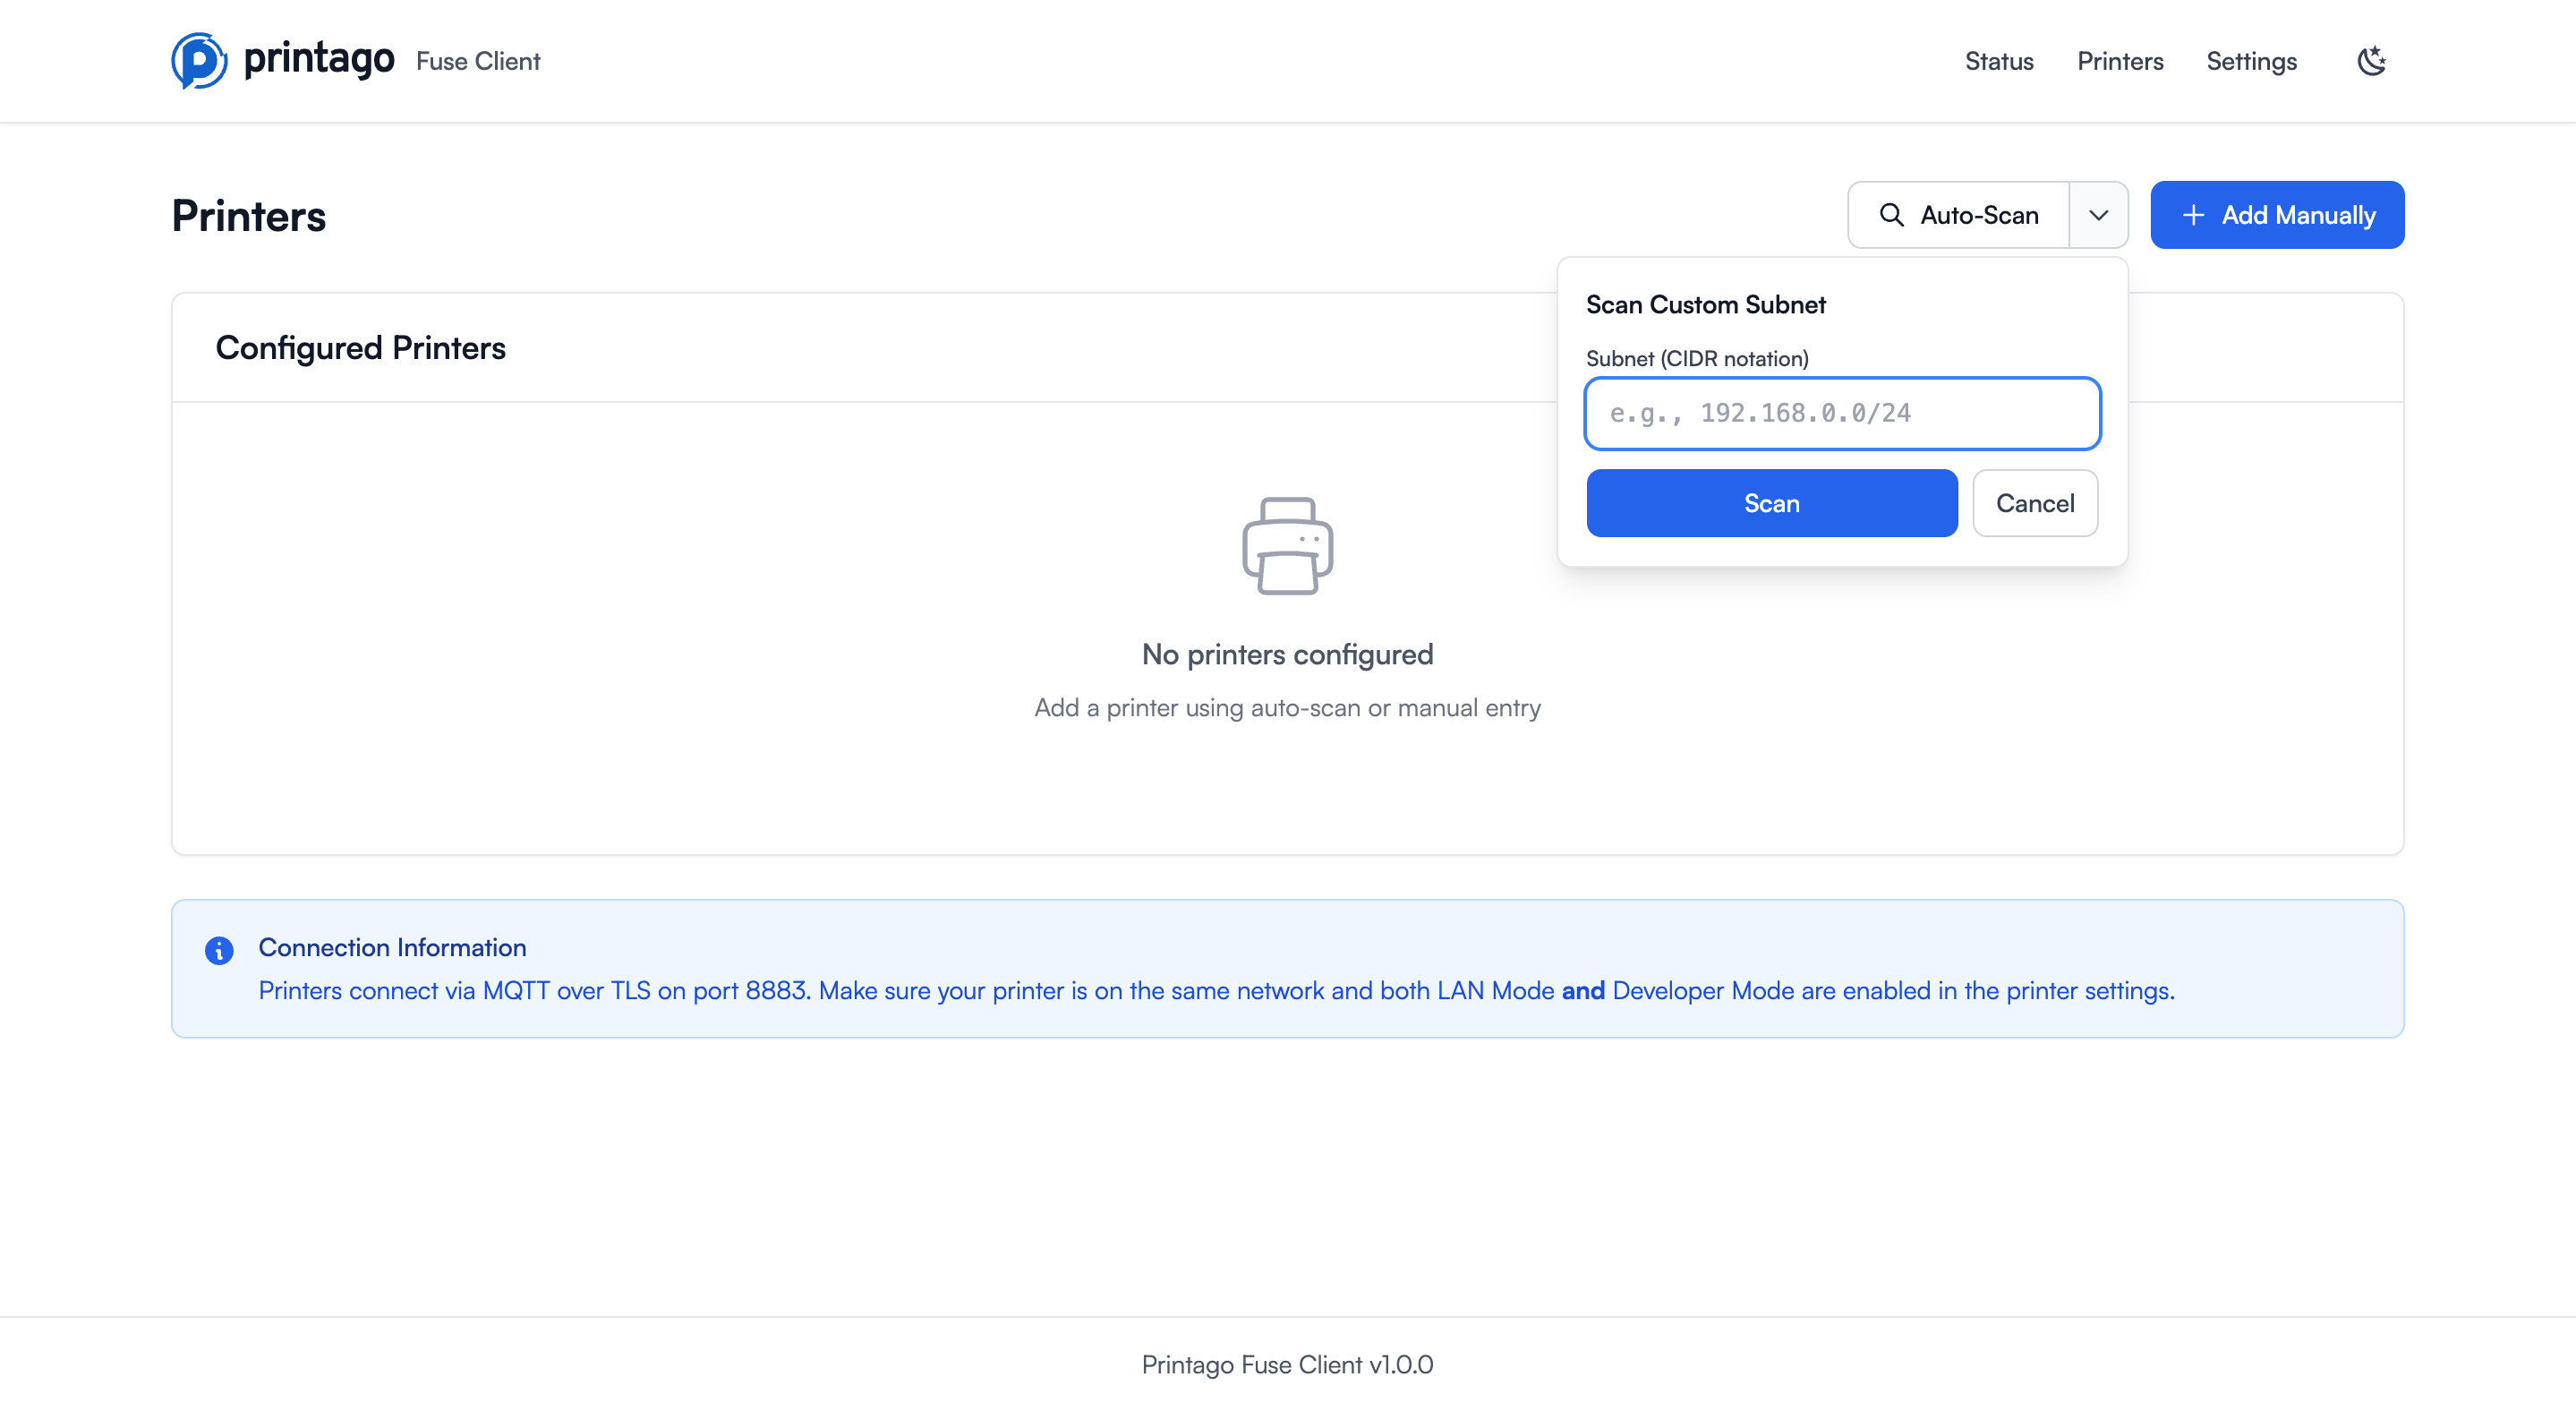
Method 2: Subnet Search
If auto-scan doesn't find your printers (e.g., they're on a different subnet), use a custom subnet scan.
- Click the dropdown arrow next to Auto-Scan
- Select Scan Custom Subnet
- Enter your subnet in CIDR notation (e.g.,
192.168.0.0/24) - Click Scan
- Fuse will probe each IP address on port 8883 for Bambu Lab printers
- Follow the same selection process as auto-scan
Common subnet examples:
192.168.0.0/24- Scans 192.168.0.1 through 192.168.0.254192.168.1.0/24- Scans 192.168.1.1 through 192.168.1.25410.0.1.0/24- Scans 10.0.1.1 through 10.0.1.254
Method 3: Add Manually
For printers that aren't discovered automatically, or when you prefer manual configuration.
- Click Add Printer in the top right.
- In the Add a printer dialog, pick your printer's brand (Bambu Lab, Prusa, Creality, Elegoo, Snapmaker, Anycubic, or Sovol), or type your model into the search box (for example "MK4", "K1", "Neptune", or "A1"). The search also offers two catch-all entries for printers that aren't in the list:
- OctoPrint: any Marlin or RepRap printer running behind OctoPrint. Type "OctoPrint" to find it. See the OctoPrint guide.
- Generic Klipper: any Klipper printer, through its Moonraker API. Type "Klipper" to find it. See the Klipper guide.
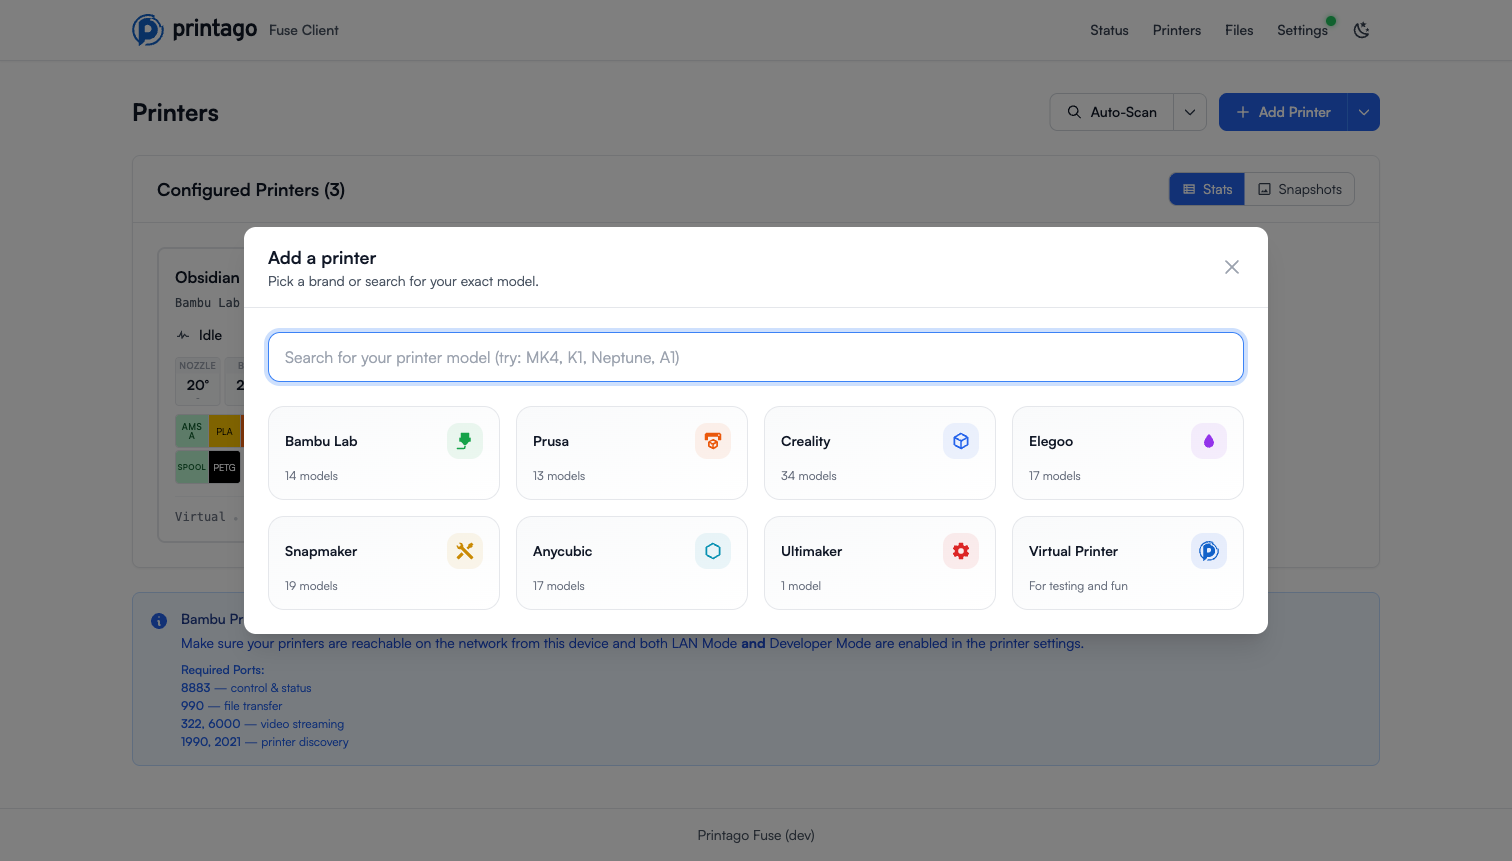
- Select your specific model from the list.
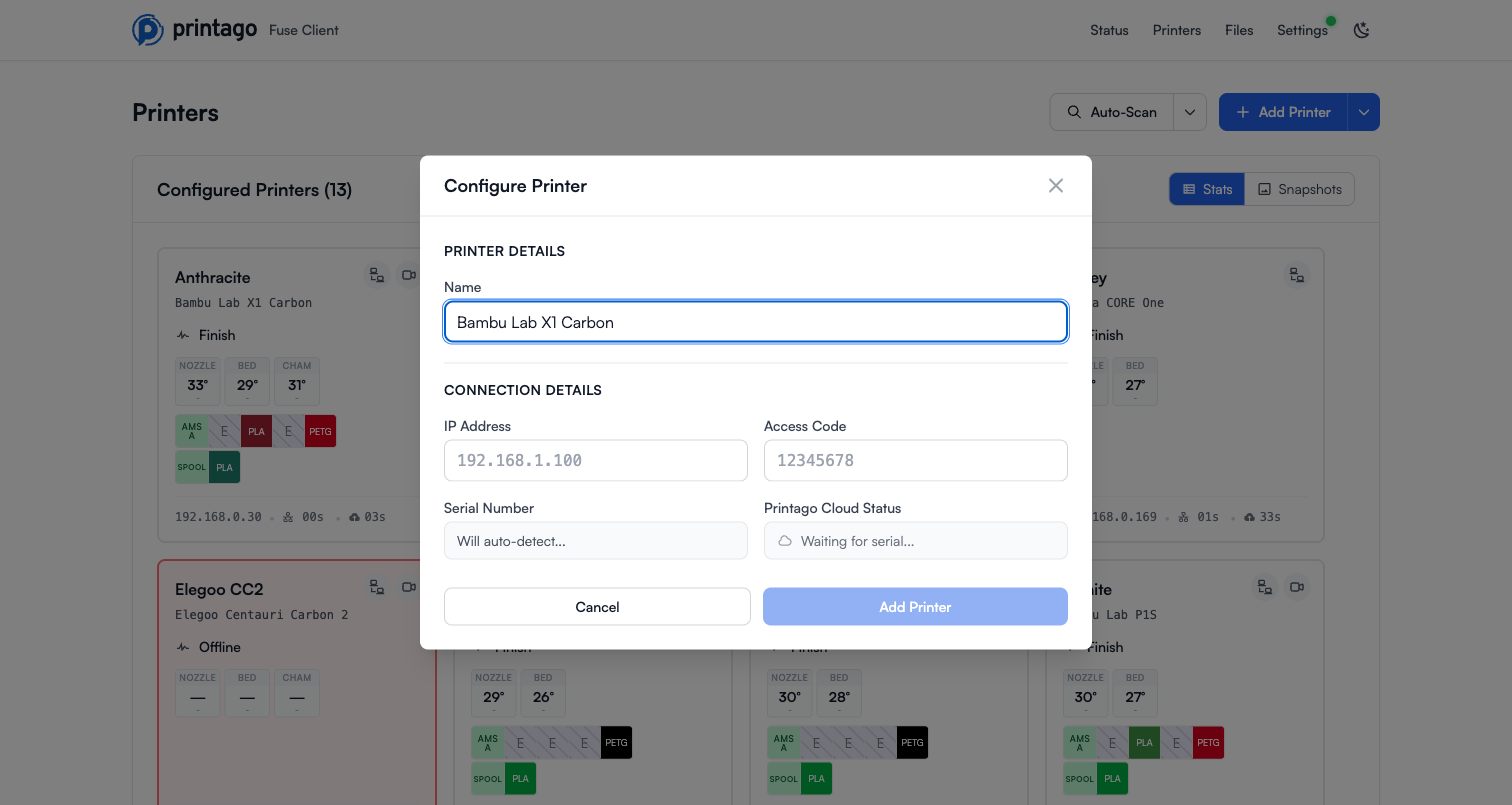
- In the Configure Printer dialog, fill in the connection details:
- Name: A friendly name for your printer (e.g., "Workshop X1 Carbon"). This defaults to the model name.
- IP Address: The local network IP address of your printer (e.g.,
192.168.0.30). - Access Code: Your printer's access code. See Finding Your Access Code below for where to find it on each brand.
- Serial Number: Detected automatically once the IP address and access code are valid, so there's no need to enter it by hand.
- Printago Cloud Status: Confirms whether the printer is recognized by your Printago account once the serial number is detected.
- Click Add Printer to save the configuration.
Finding Your Access Code
Most networked printers require an access code (also called a LAN access code or password) so Fuse can connect locally. Where you find it depends on the brand:
- Bambu Lab: On the printer's touchscreen, open Settings (gear icon) and go to the network/WLAN screen. The Access Code is listed alongside the IP address. LAN Mode and Developer Mode must be enabled. See the Bambu Lab integration guide for step-by-step instructions per model.
- Creality / Klipper: Use the LAN/Moonraker access details from the printer's screen or web interface. See the Creality guide.
- Elegoo: Use the LAN access code shown in the printer's network settings. See the Elegoo guide.
- Snapmaker: Use the access code from the printer's network settings. See the Snapmaker guide.
- Prusa: Use the connection details from PrusaLink. See the Prusa guide.
Adding Virtual Printers
Virtual printers are simulated printers useful for testing and demonstration purposes. You can create up to 20 virtual printers per Fuse client.
- Click Add Printer in the top right.
- In the Add a printer dialog, choose the Virtual Printer tile ("For testing and fun", listed alongside the printer brands).
- In the Add Virtual Printer form, set the printer name, quantity, printer model, nozzle diameter, and filament slots.
- Click Add Printer.
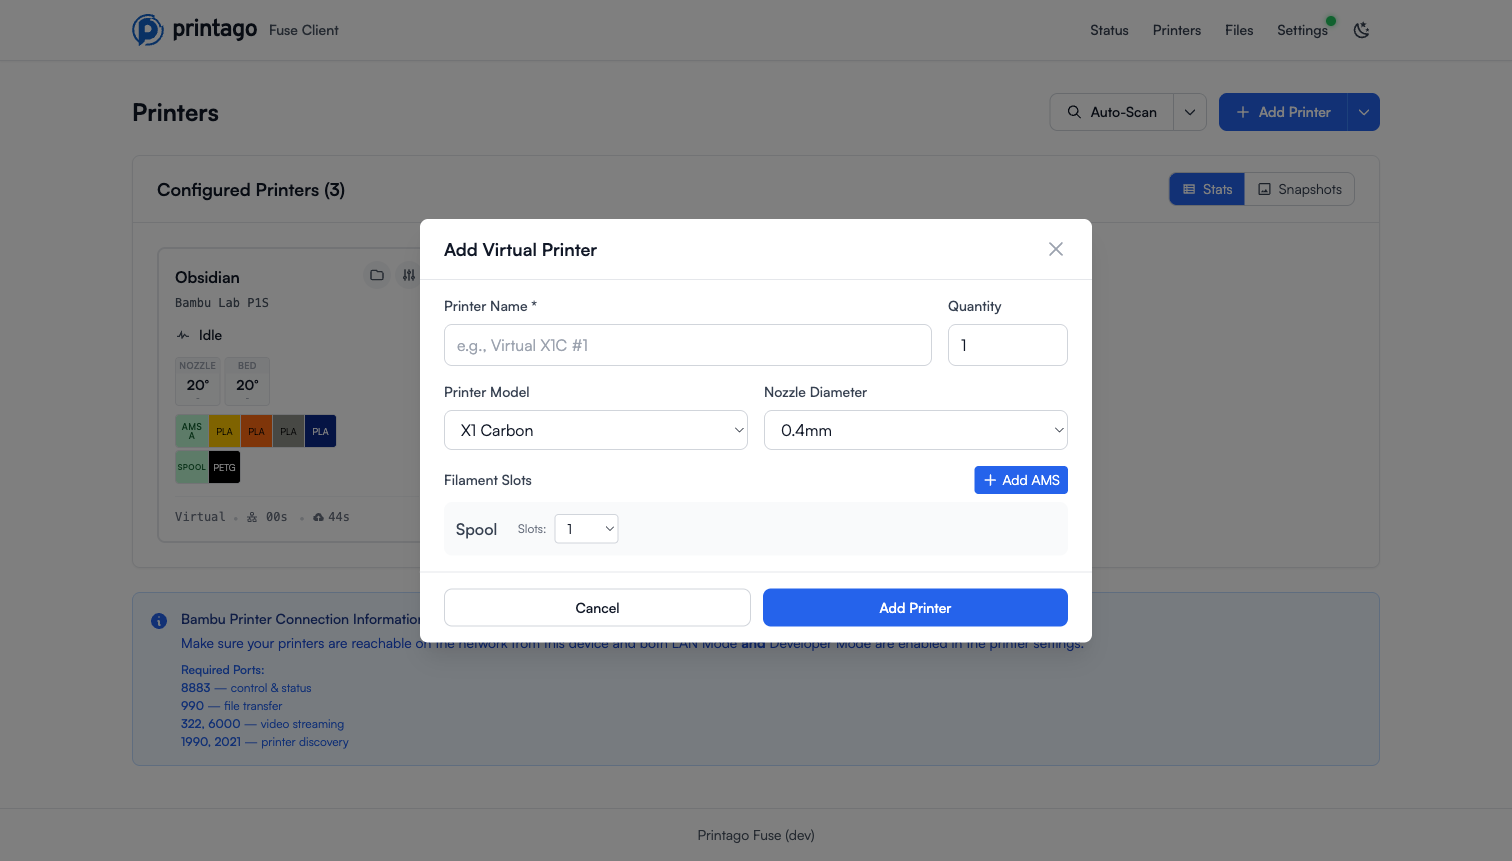
Virtual printers appear in your printer list just like physical printers and can be used to test workflows without affecting real equipment. See the Virtual Printers guide for the full walkthrough, including syncing them to Printago and using the simulation controls.
Importing Configuration
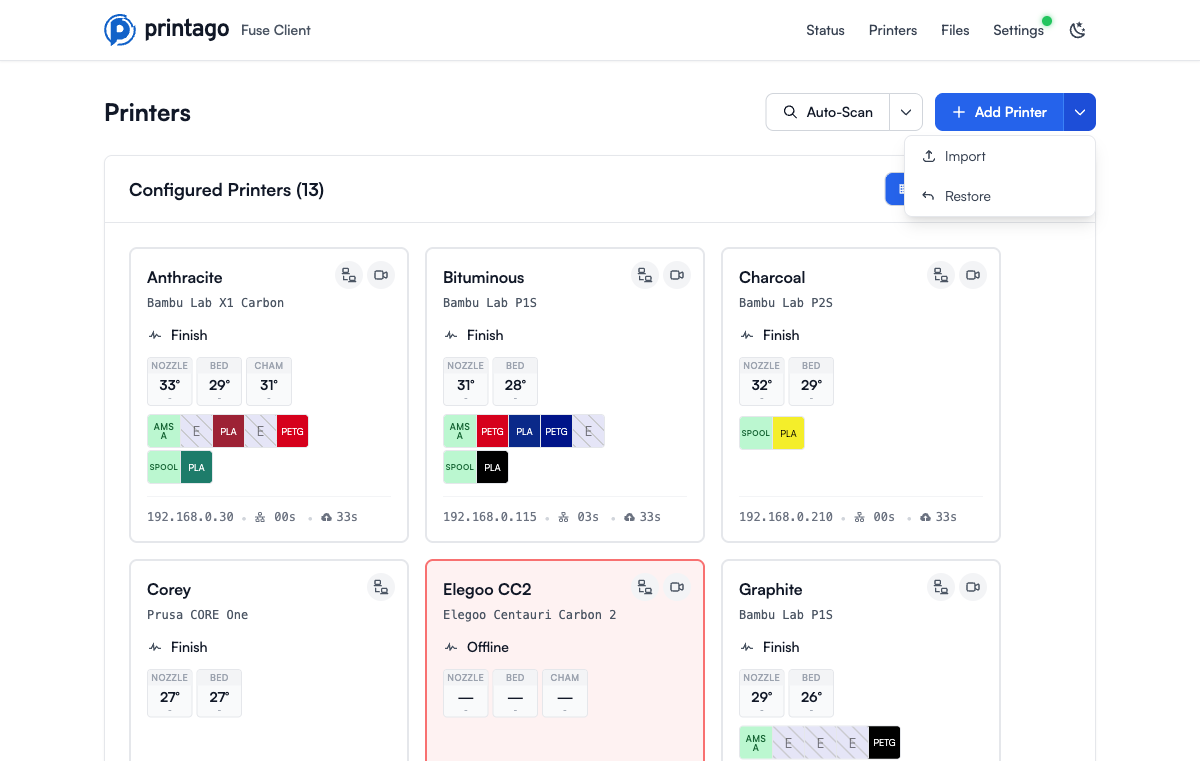
To import printer configurations from a backup or another Fuse instance:
- Click the dropdown arrow next to Add Printer in the top right.
- Select Import from the menu.
- Select your configuration file.
- Review and confirm the imported printers.
The same dropdown also includes Restore, which opens the Configuration Snapshots restore dialog.
Managing Printers
Printer Cards
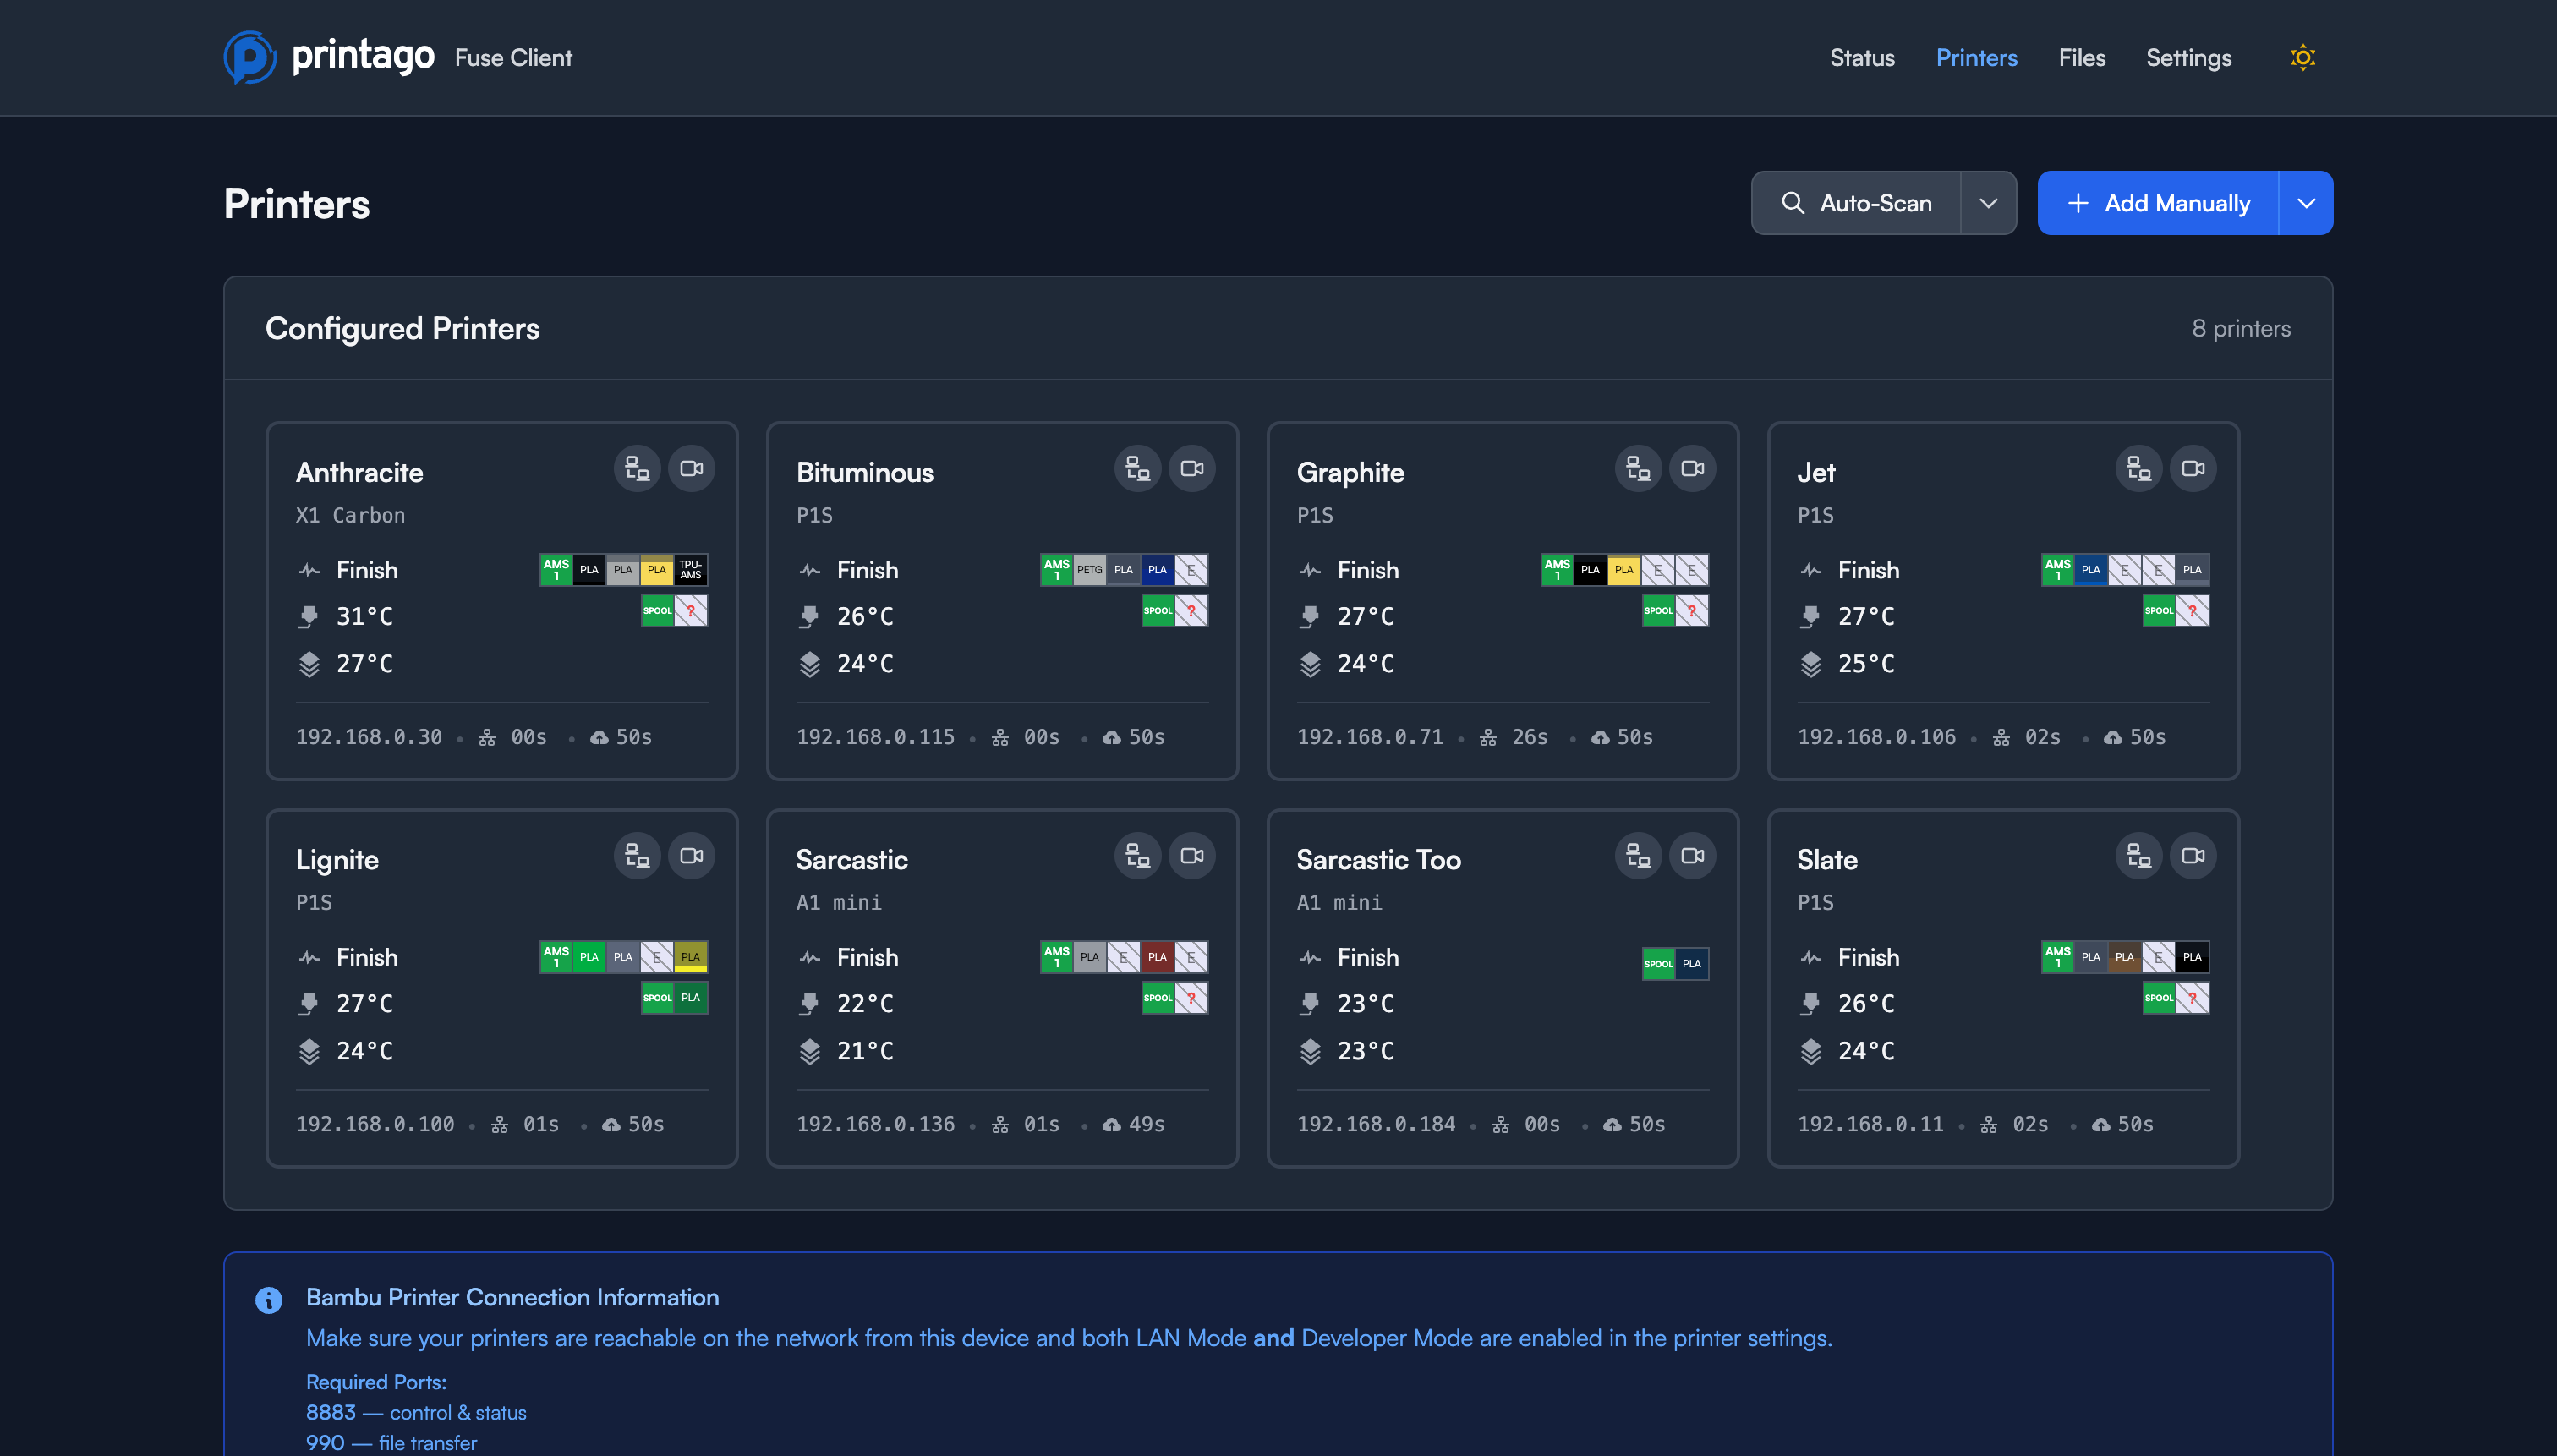
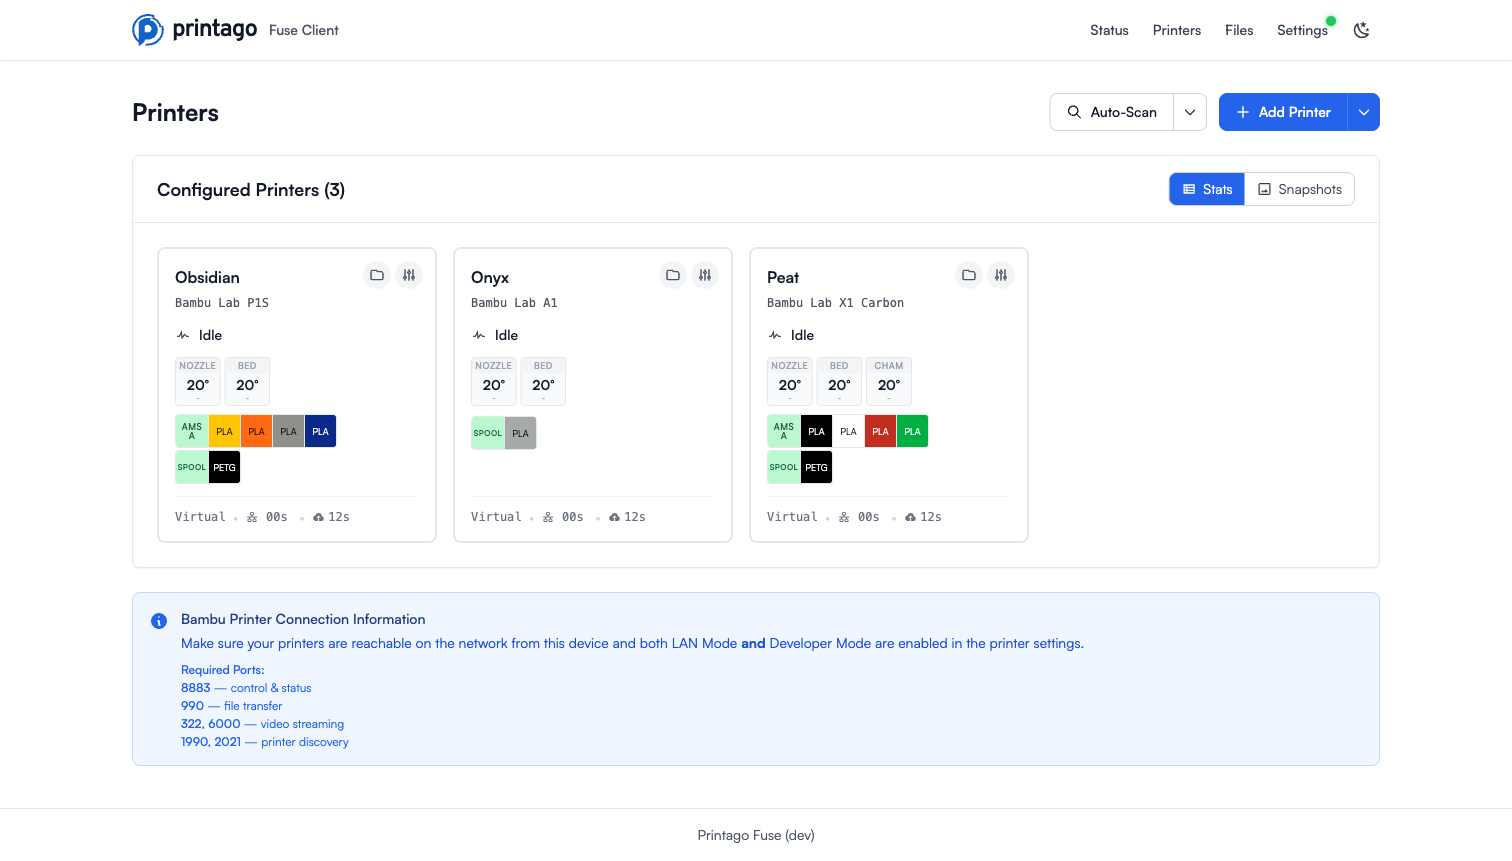
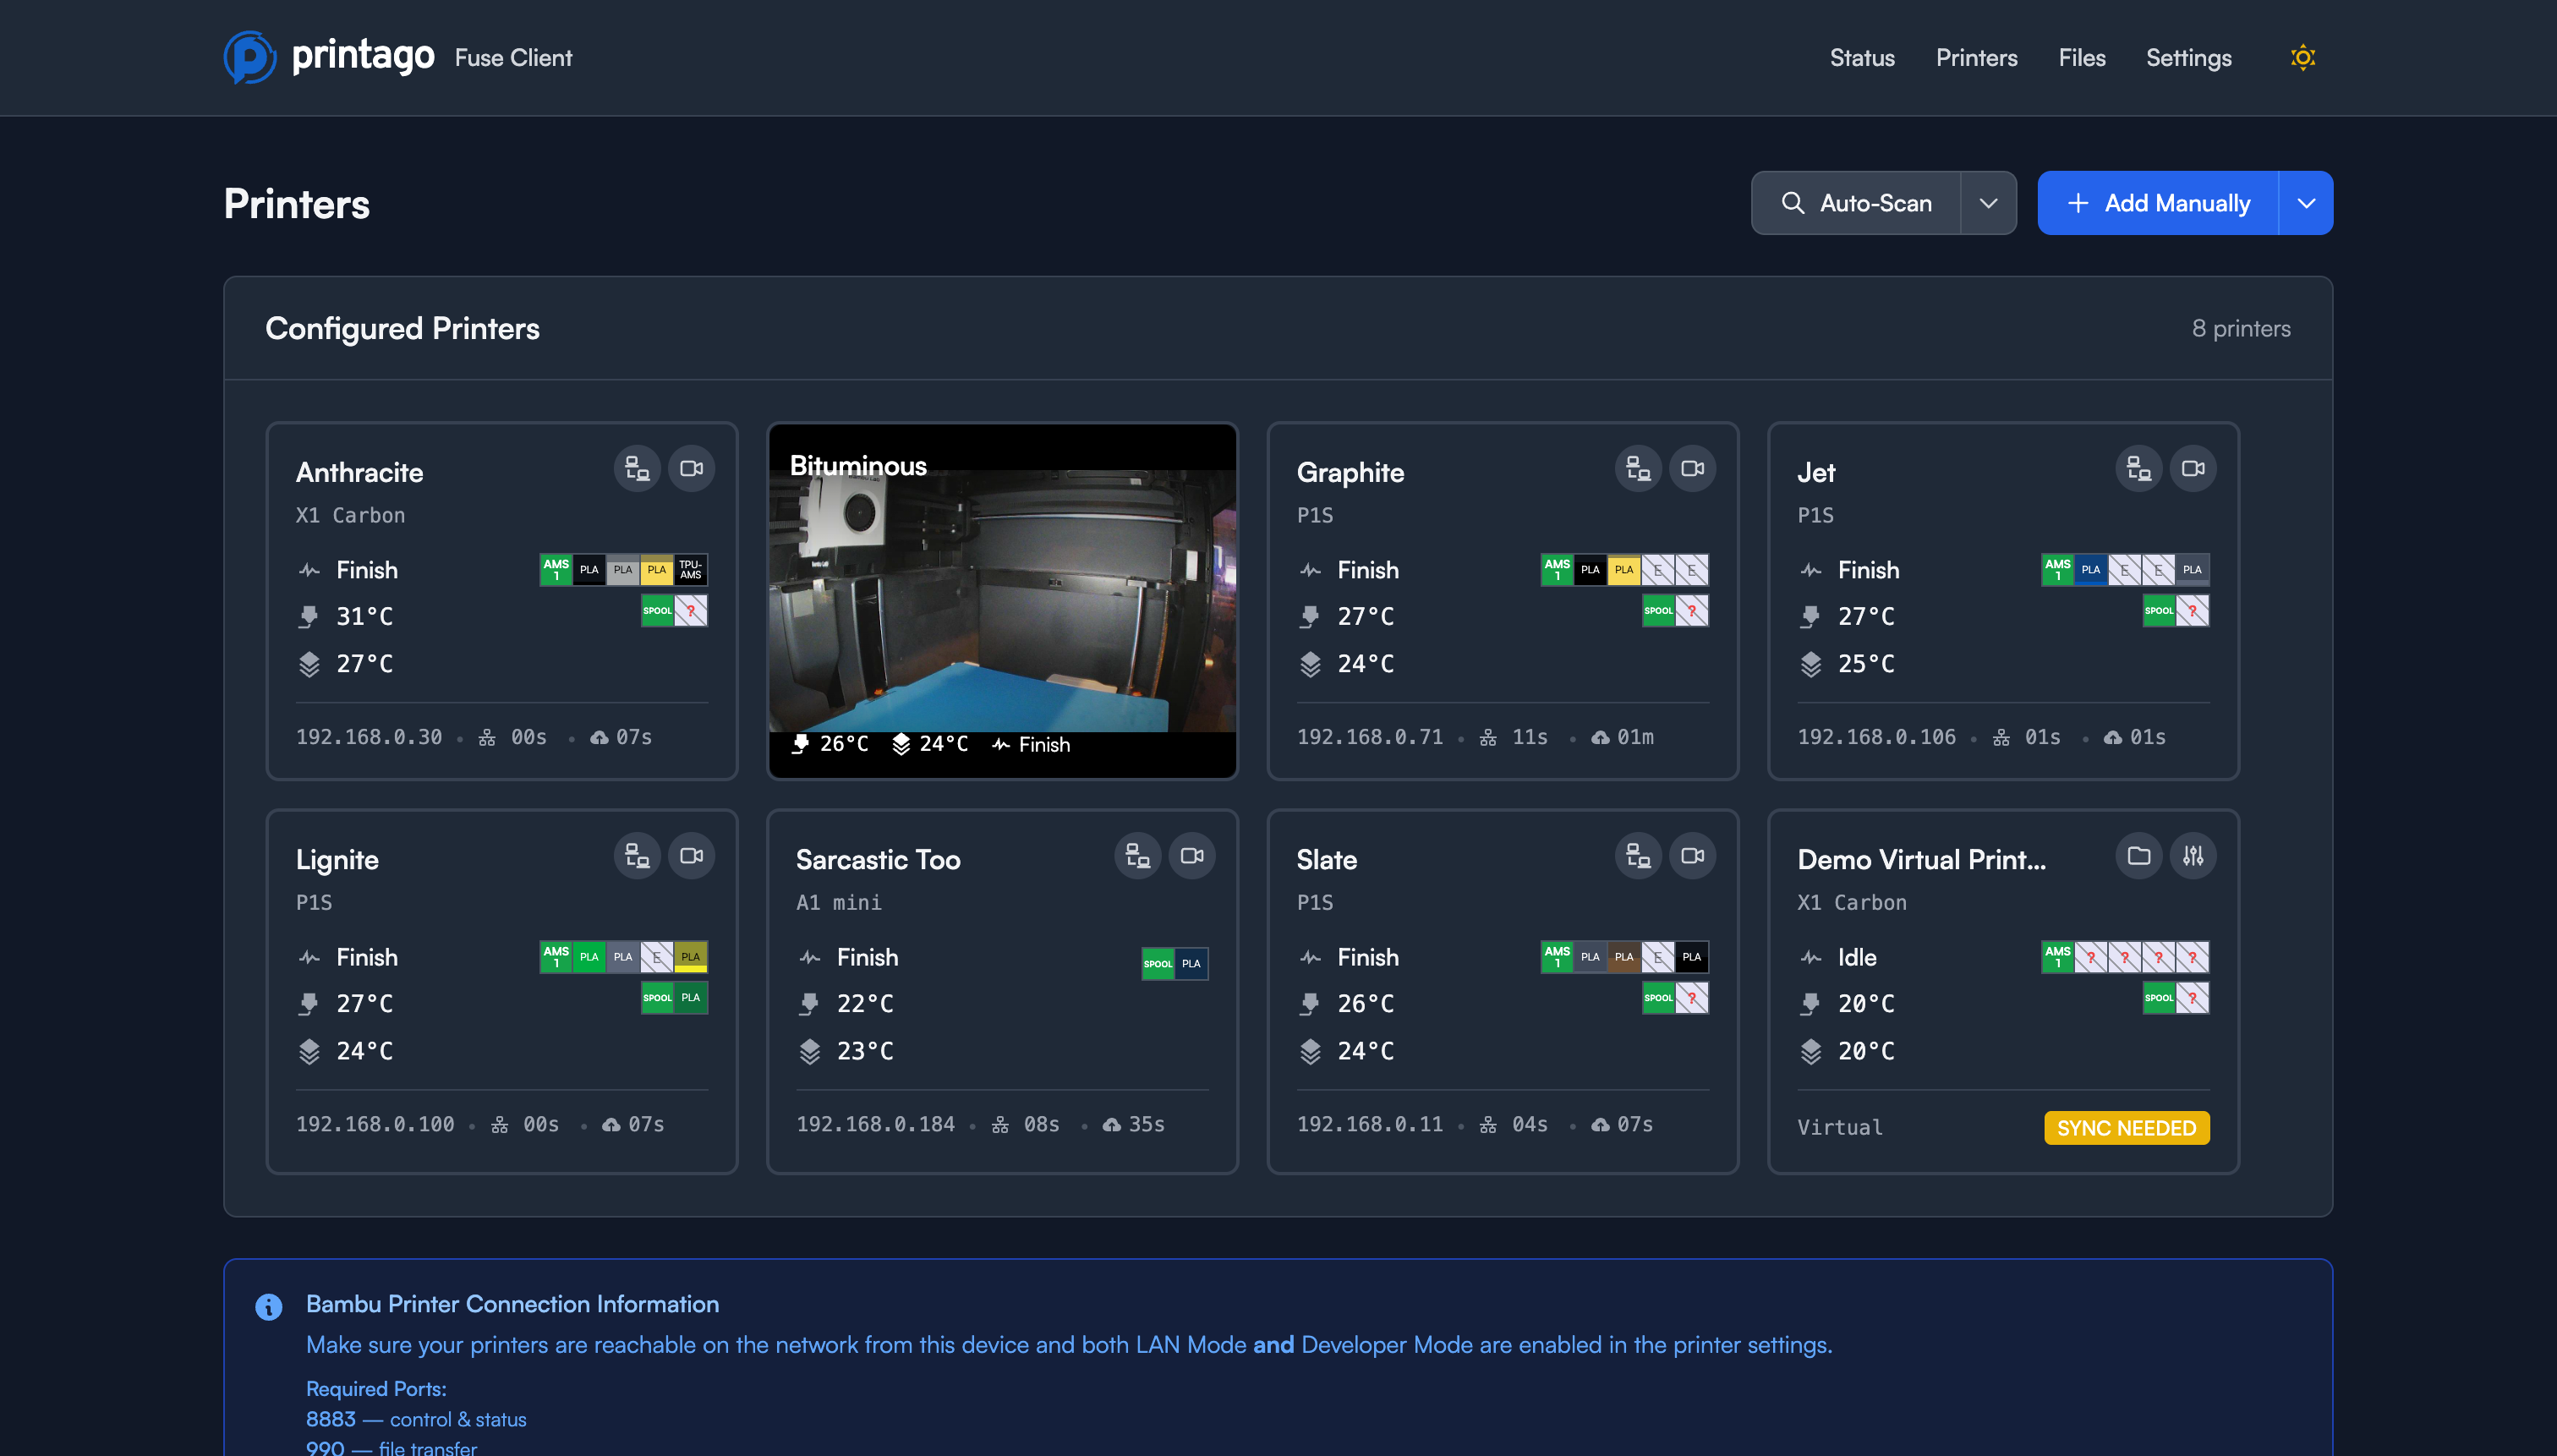
The Printers page displays all your configured printers as cards showing:
- Header: Printer name, model icon, and connection status indicator
- Status: Current printer state (Idle, Printing, etc.)
- IP Address: Network address of the printer
- Serial Number: Unique device identifier
- Temperatures: Real-time nozzle, bed, and chamber temperatures
- AMS Status: Filament slots with colors and material types
- MQTT Timing: Connection statistics (Connected At, Last Received, Reconnects)
The Stats / Snapshots toggle at the top right of the Configured Printers panel switches what the printer cards display.
Printer Actions
Each printer card includes action buttons:
- Camera: View the printer's live camera feed directly in the card
- Communications: Access MQTT message logs for debugging
- Edit: Modify printer configuration
- Delete: Remove the printer from Fuse
Live Camera View
Click the camera icon on any printer card to view the live camera feed. The video stream is embedded directly in the printer card.
MQTT Communications
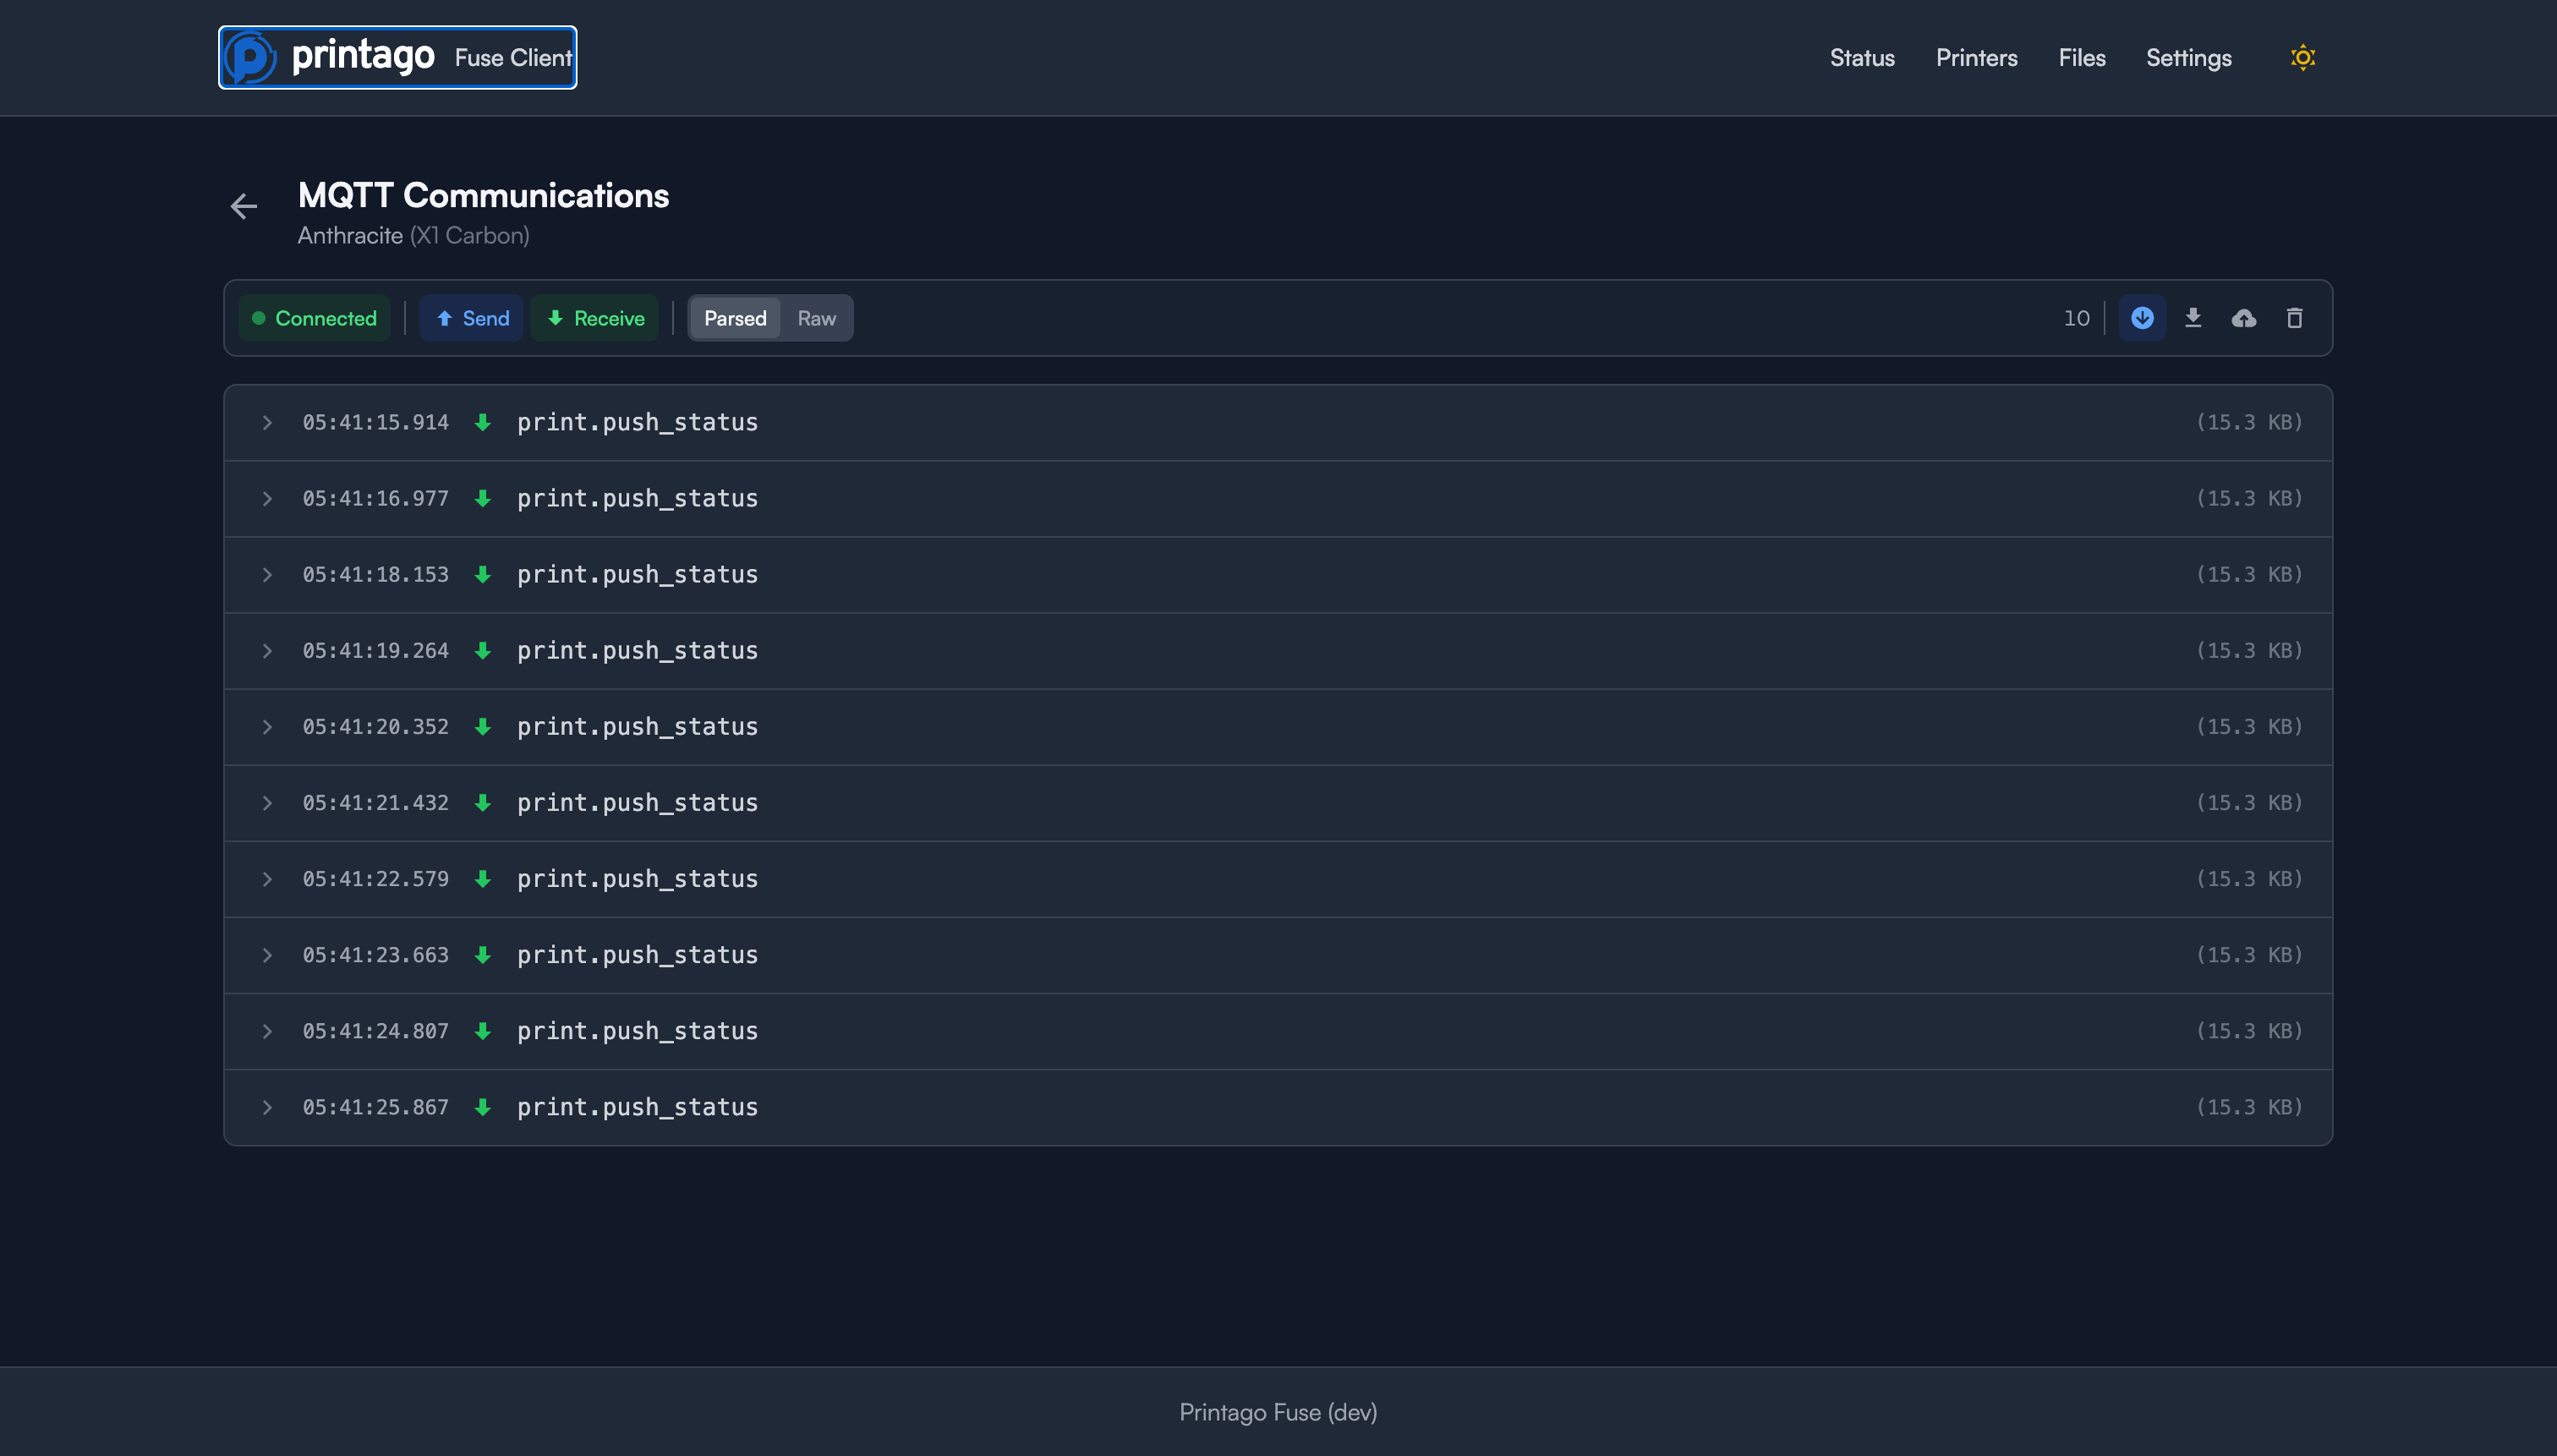
The Communications view shows real-time MQTT messages between Fuse and the printer. This is useful for troubleshooting and understanding printer behavior.
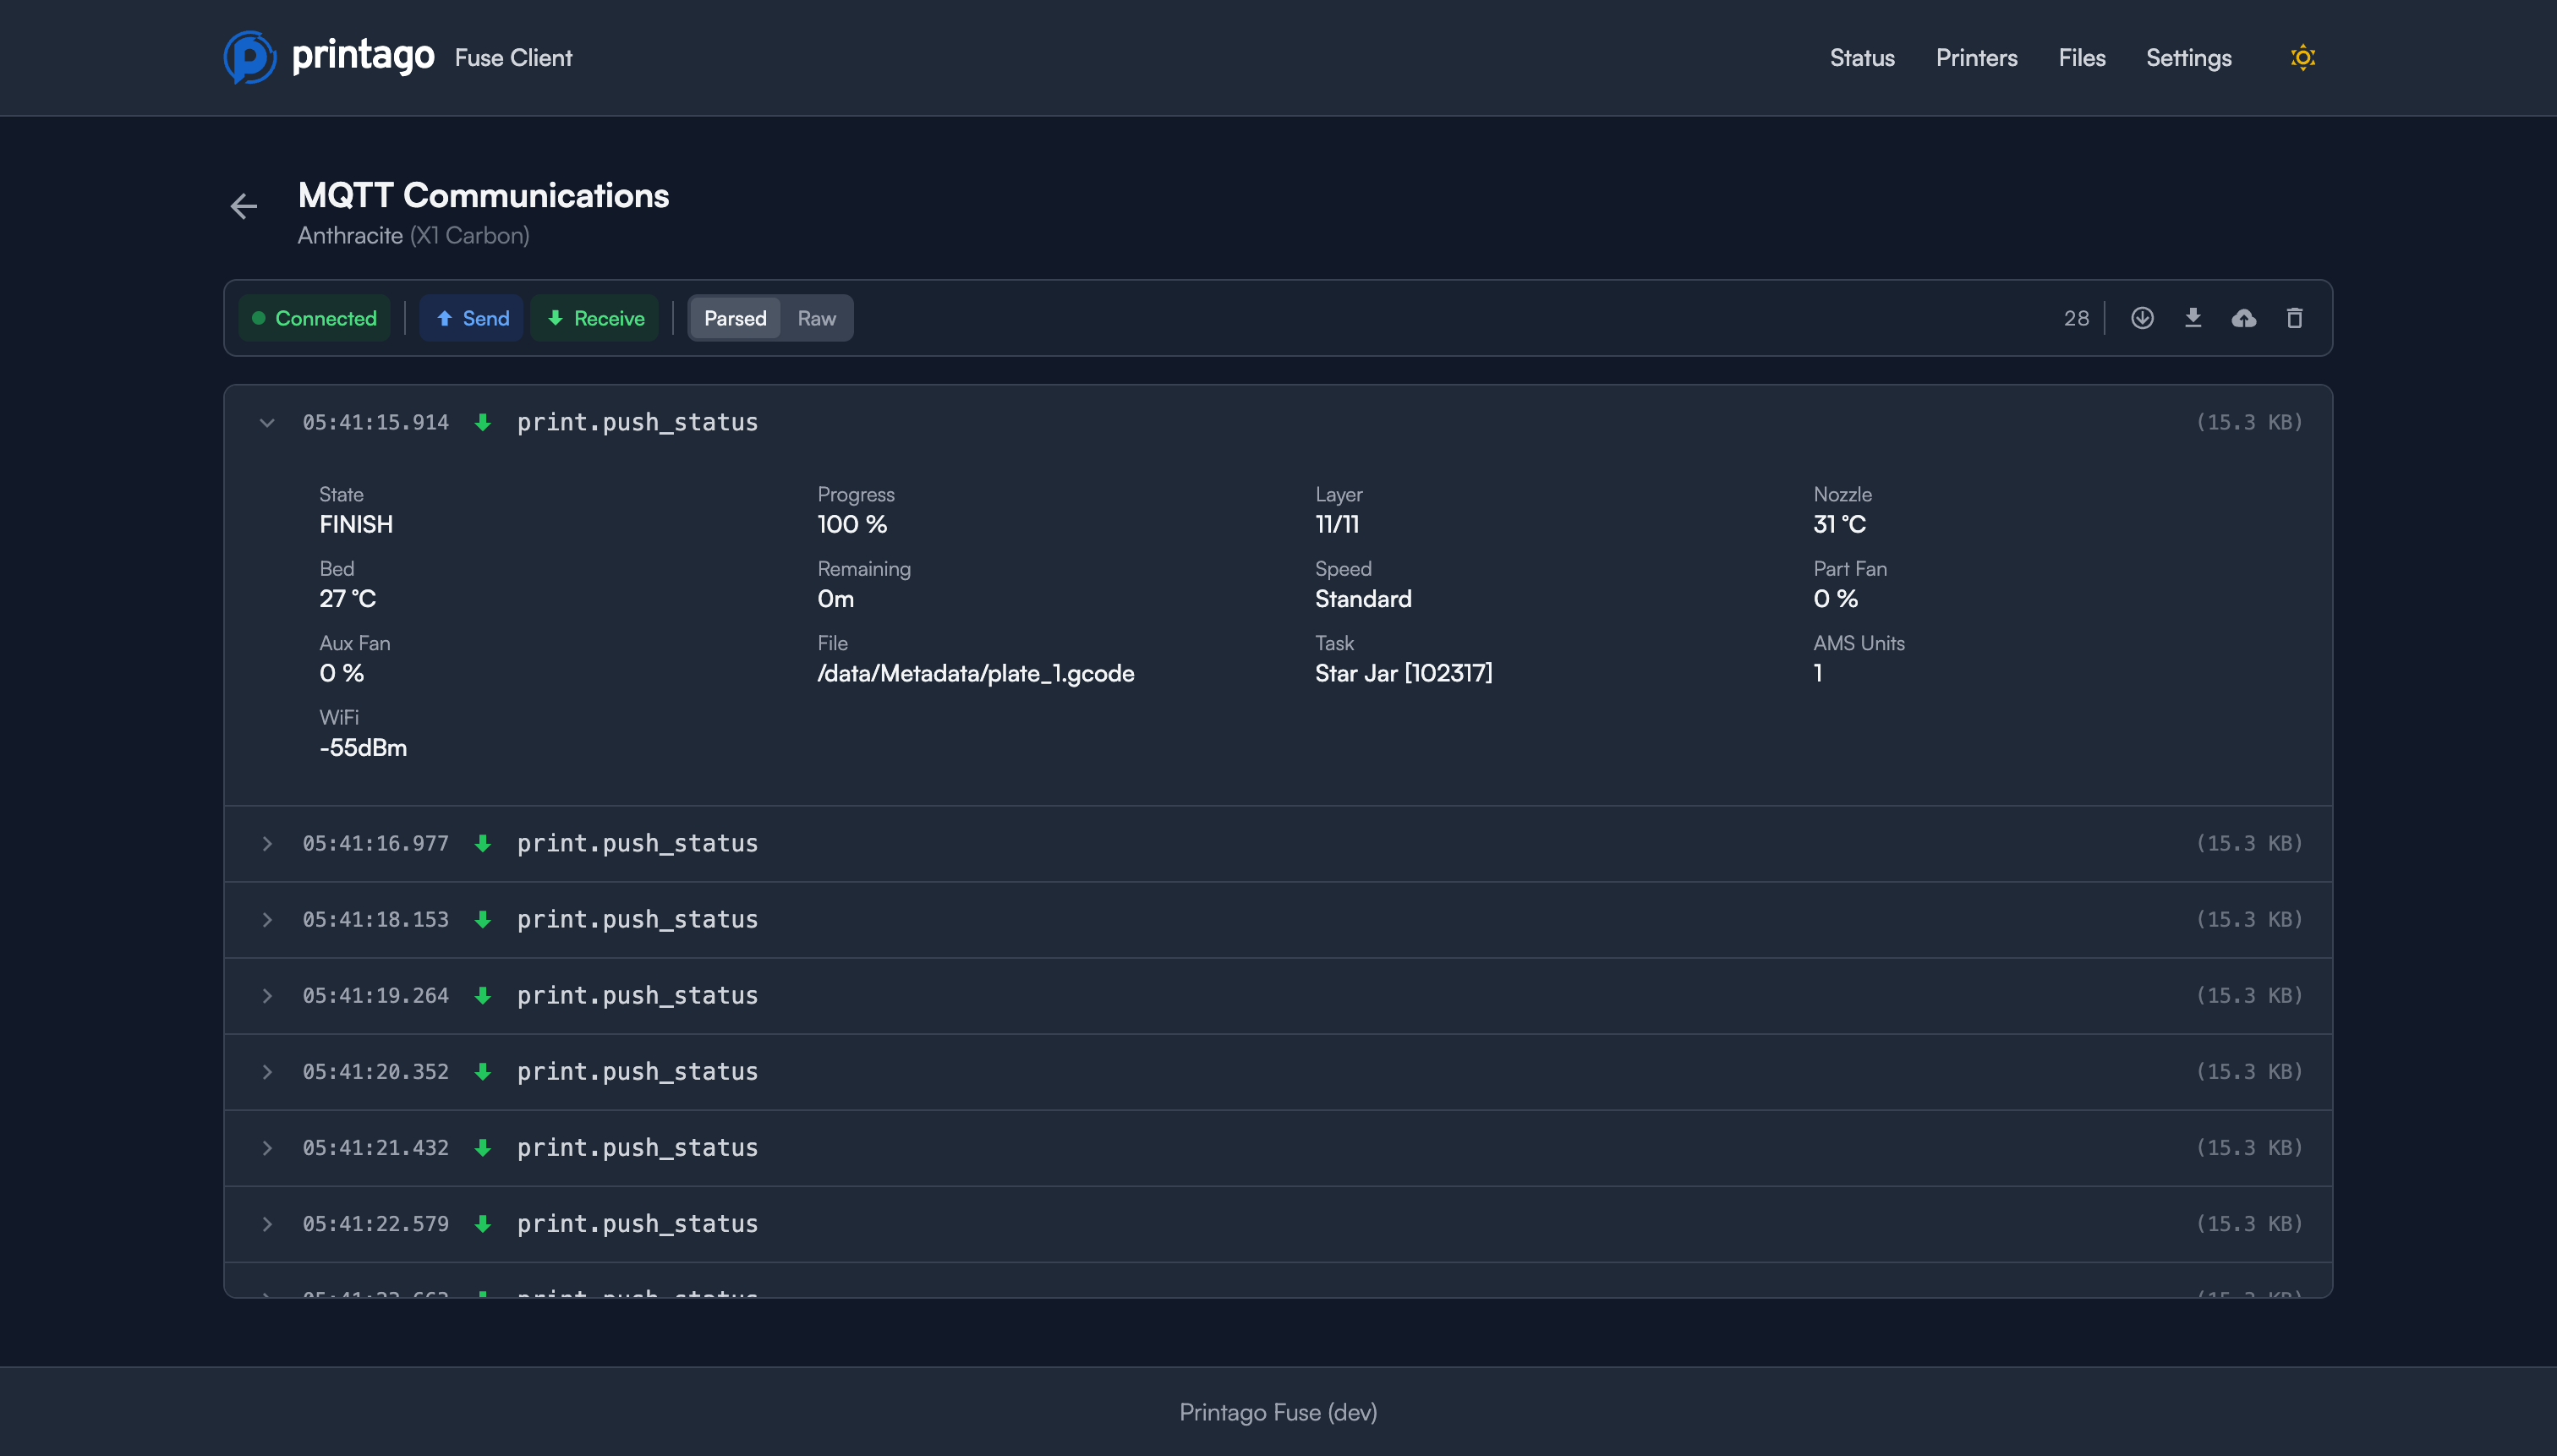
Click on any message to see the parsed JSON data with full printer state information including:
- Print stage and progress
- Temperature readings
- Fan speeds
- AMS configuration
- Error states
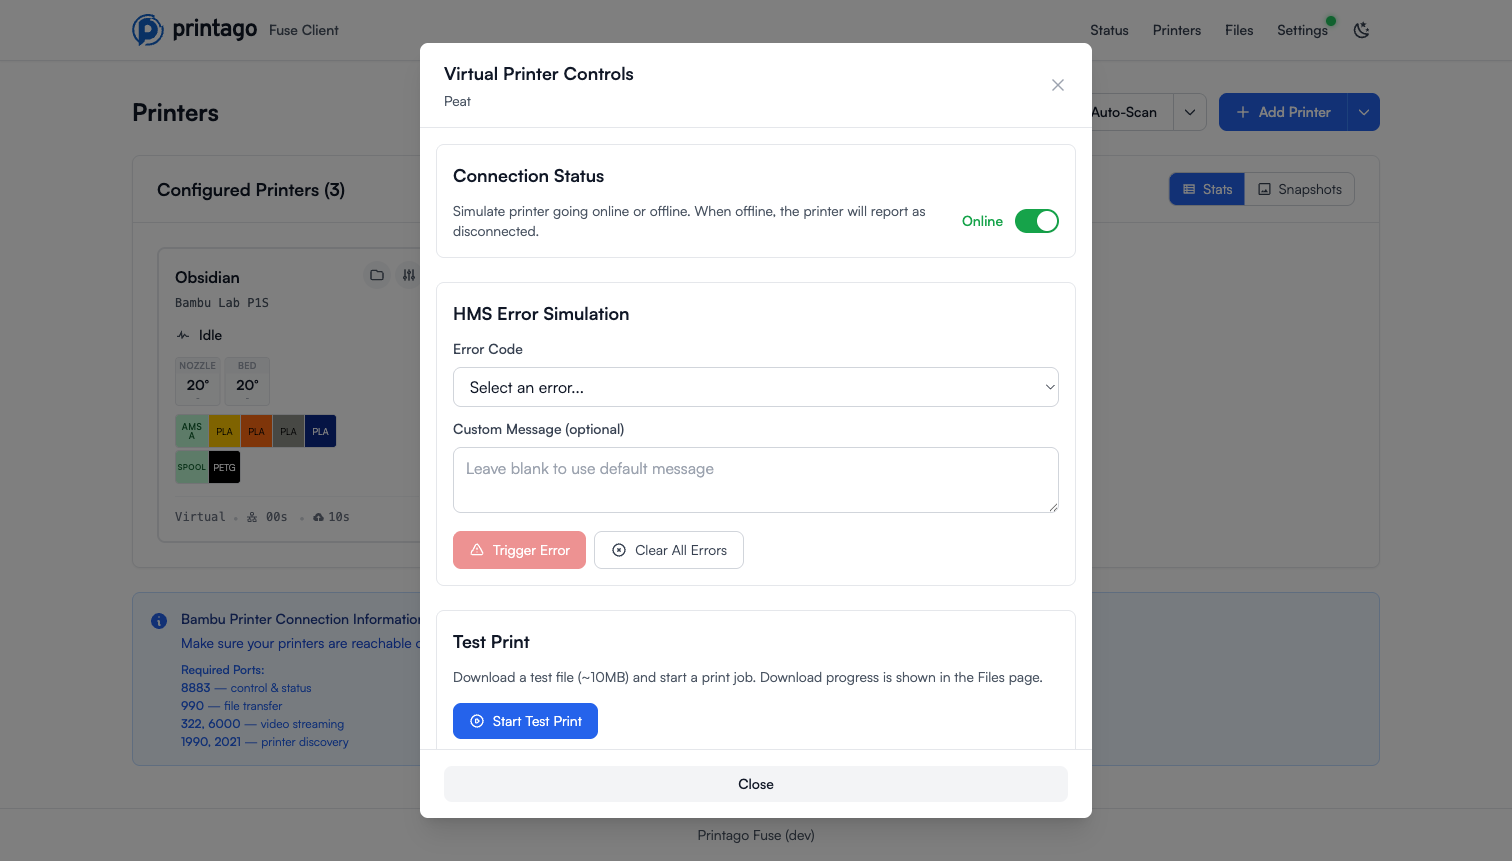
Virtual Printer Controls
Virtual printers include additional simulation controls, opened from the printer card:
- Connection Status: Toggle the printer online or offline to simulate connectivity
- HMS Error Simulation: Pick an error code (with an optional custom message) and click Trigger Error; Clear All Errors removes simulated errors
- Test Print: Click Start Test Print to download a test file and begin a simulated print job
Editing Printer Settings
Click the edit icon next to any printer to modify its configuration. You can update:
- Printer name
- IP address (if the printer's network address changes)
- Access code
Removing Printers
Click the delete icon to remove a printer from your Fuse configuration. This only removes the printer from Fuse; it doesn't affect the physical printer or any data in Printago.
Configuration Snapshots
Fuse keeps a history of your printer configuration so you can roll back if something goes wrong. Each snapshot captures the full set of configured printers (names, IP addresses, models, access codes, and slot setup) at a point in time.
Automatic Snapshots
Fuse saves a snapshot automatically whenever your configuration changes, such as when you add, edit, rename, or delete a printer, or when printers are synced to the cloud. These appear with an AUTO tag and a short description of what changed (for example, "Added Snapmaker U1" or "Synced 1 printer(s) to cloud").
Fuse keeps the 20 most recent automatic snapshots. Once that limit is reached, the oldest automatic snapshot is removed as new ones are taken.
Manual Snapshots (Named Checkpoints)
You can also save a named checkpoint at any time, which is handy before making a big change like a firmware update or reorganizing your printers. In Settings, under Printer Management → Save Configuration, click Save, give the checkpoint a descriptive name (for example, "Before firmware update"), and click Save.

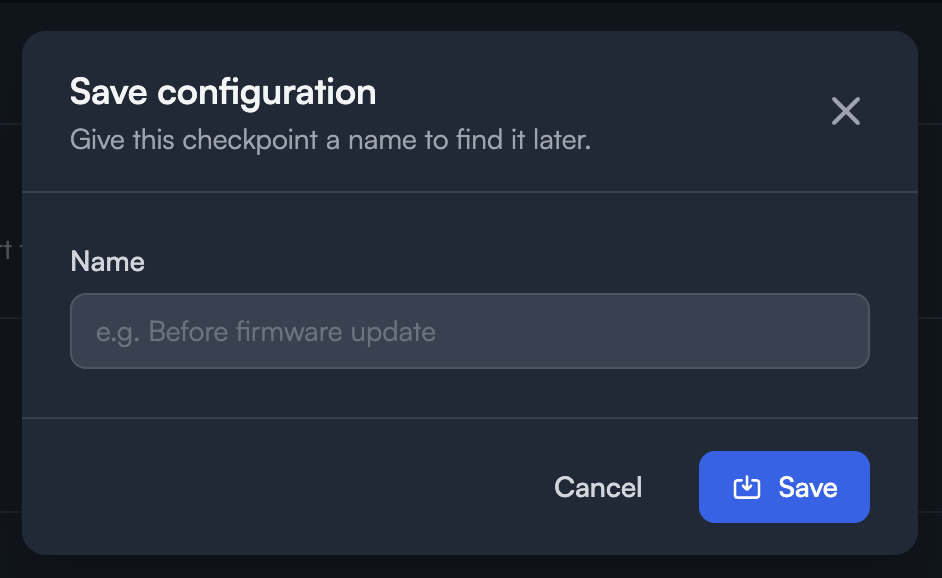
Manual checkpoints are kept separately from automatic snapshots so routine autosaves can't crowd them out. Fuse keeps your 10 most recent manual checkpoints; beyond that, the oldest is removed when you save a new one.
Restoring a Configuration
To roll back to an earlier configuration, open the Restore configuration dialog and choose the revision you want. Each entry shows its name, an AUTO tag for automatic snapshots, the number of printers it contained, and when it was saved.
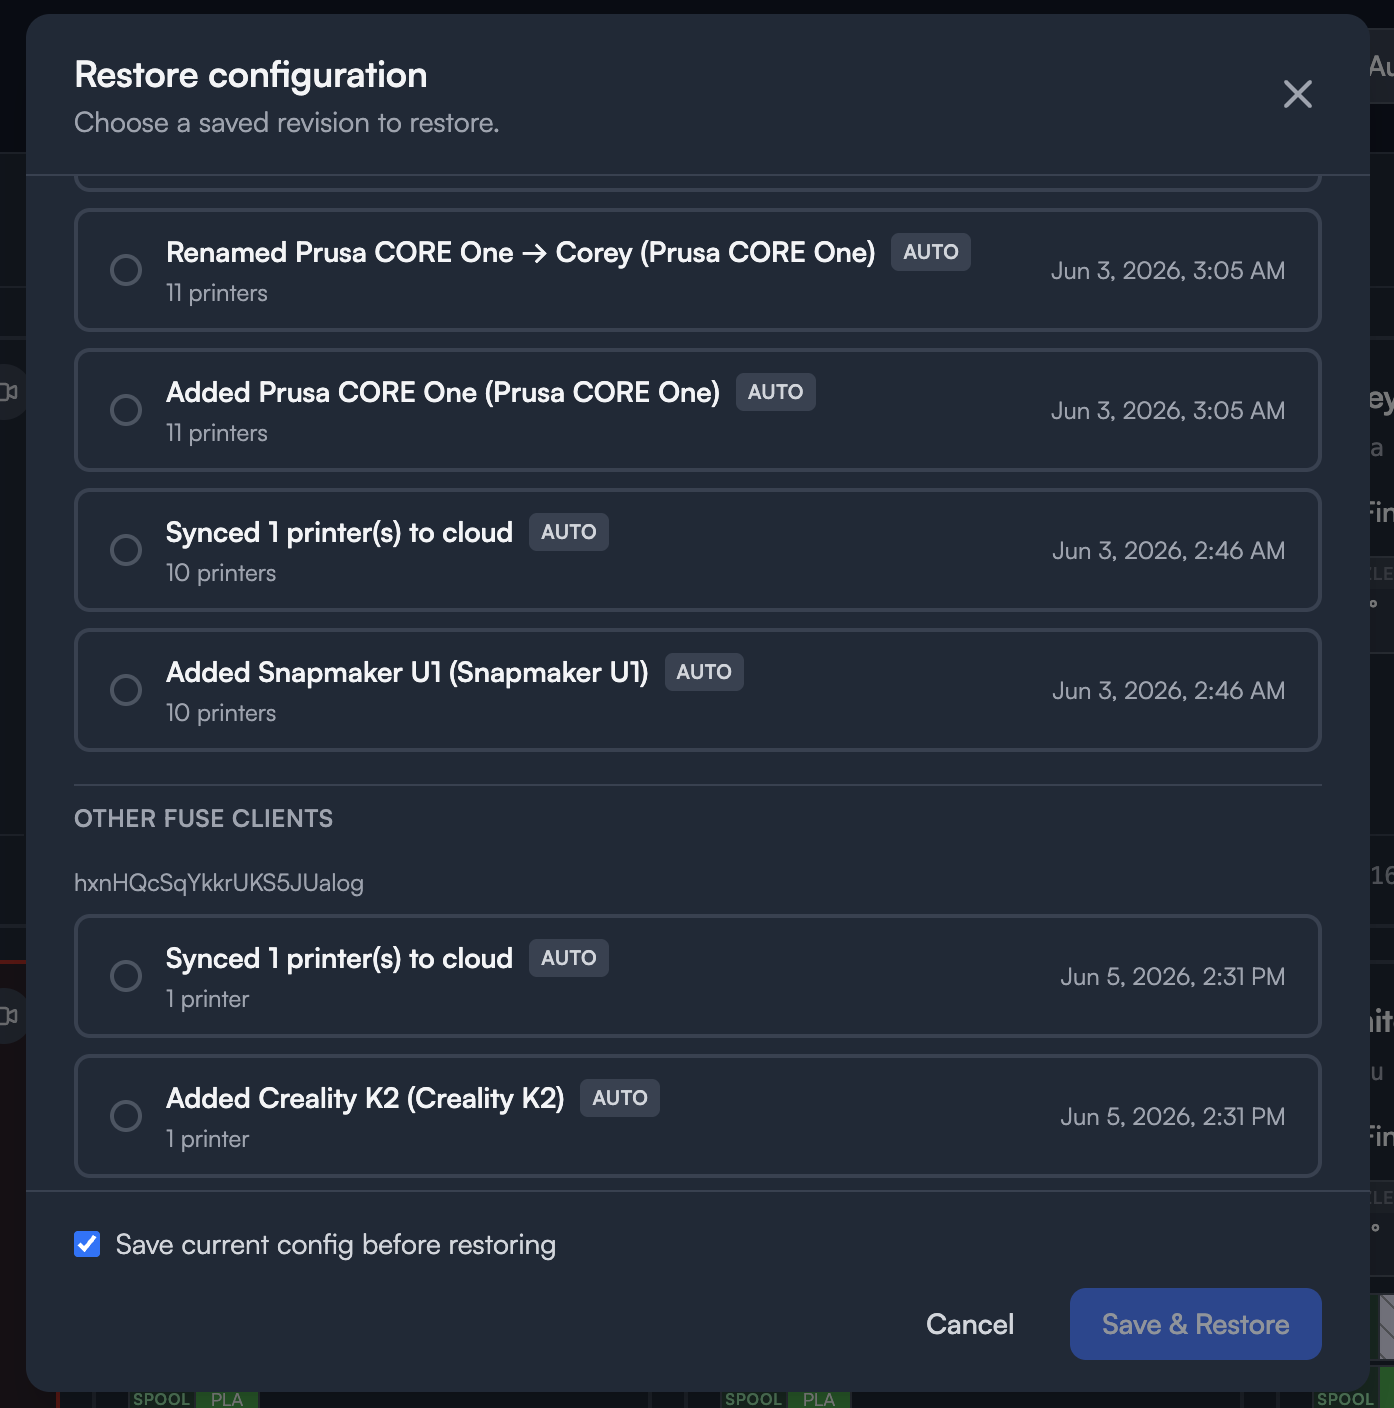
- Save current config before restoring: Leave this checked (the default) to automatically save a snapshot of your current setup before the restore, so you can undo the restore if needed.
- Select a revision and click Save & Restore to apply it.
Restoring From Other Fuse Clients
If you run more than one Fuse client on the same Printago account, the Other Fuse Clients section of the Restore dialog lists snapshots saved by your other clients. This lets you copy a configuration from one machine to another, for example to migrate your setup to a new computer or replicate it across multiple Fuse instances. Select one of those revisions and click Save & Restore to apply it to the current client.
Exporting and Importing
In addition to in-app snapshots, you can Export your configuration to a JSON file (in Settings → Printer Management → Save Configuration) and import it later or into another Fuse client. See Importing Configuration for the import steps.
Files
The Files page shows all cached print files on your Fuse client.
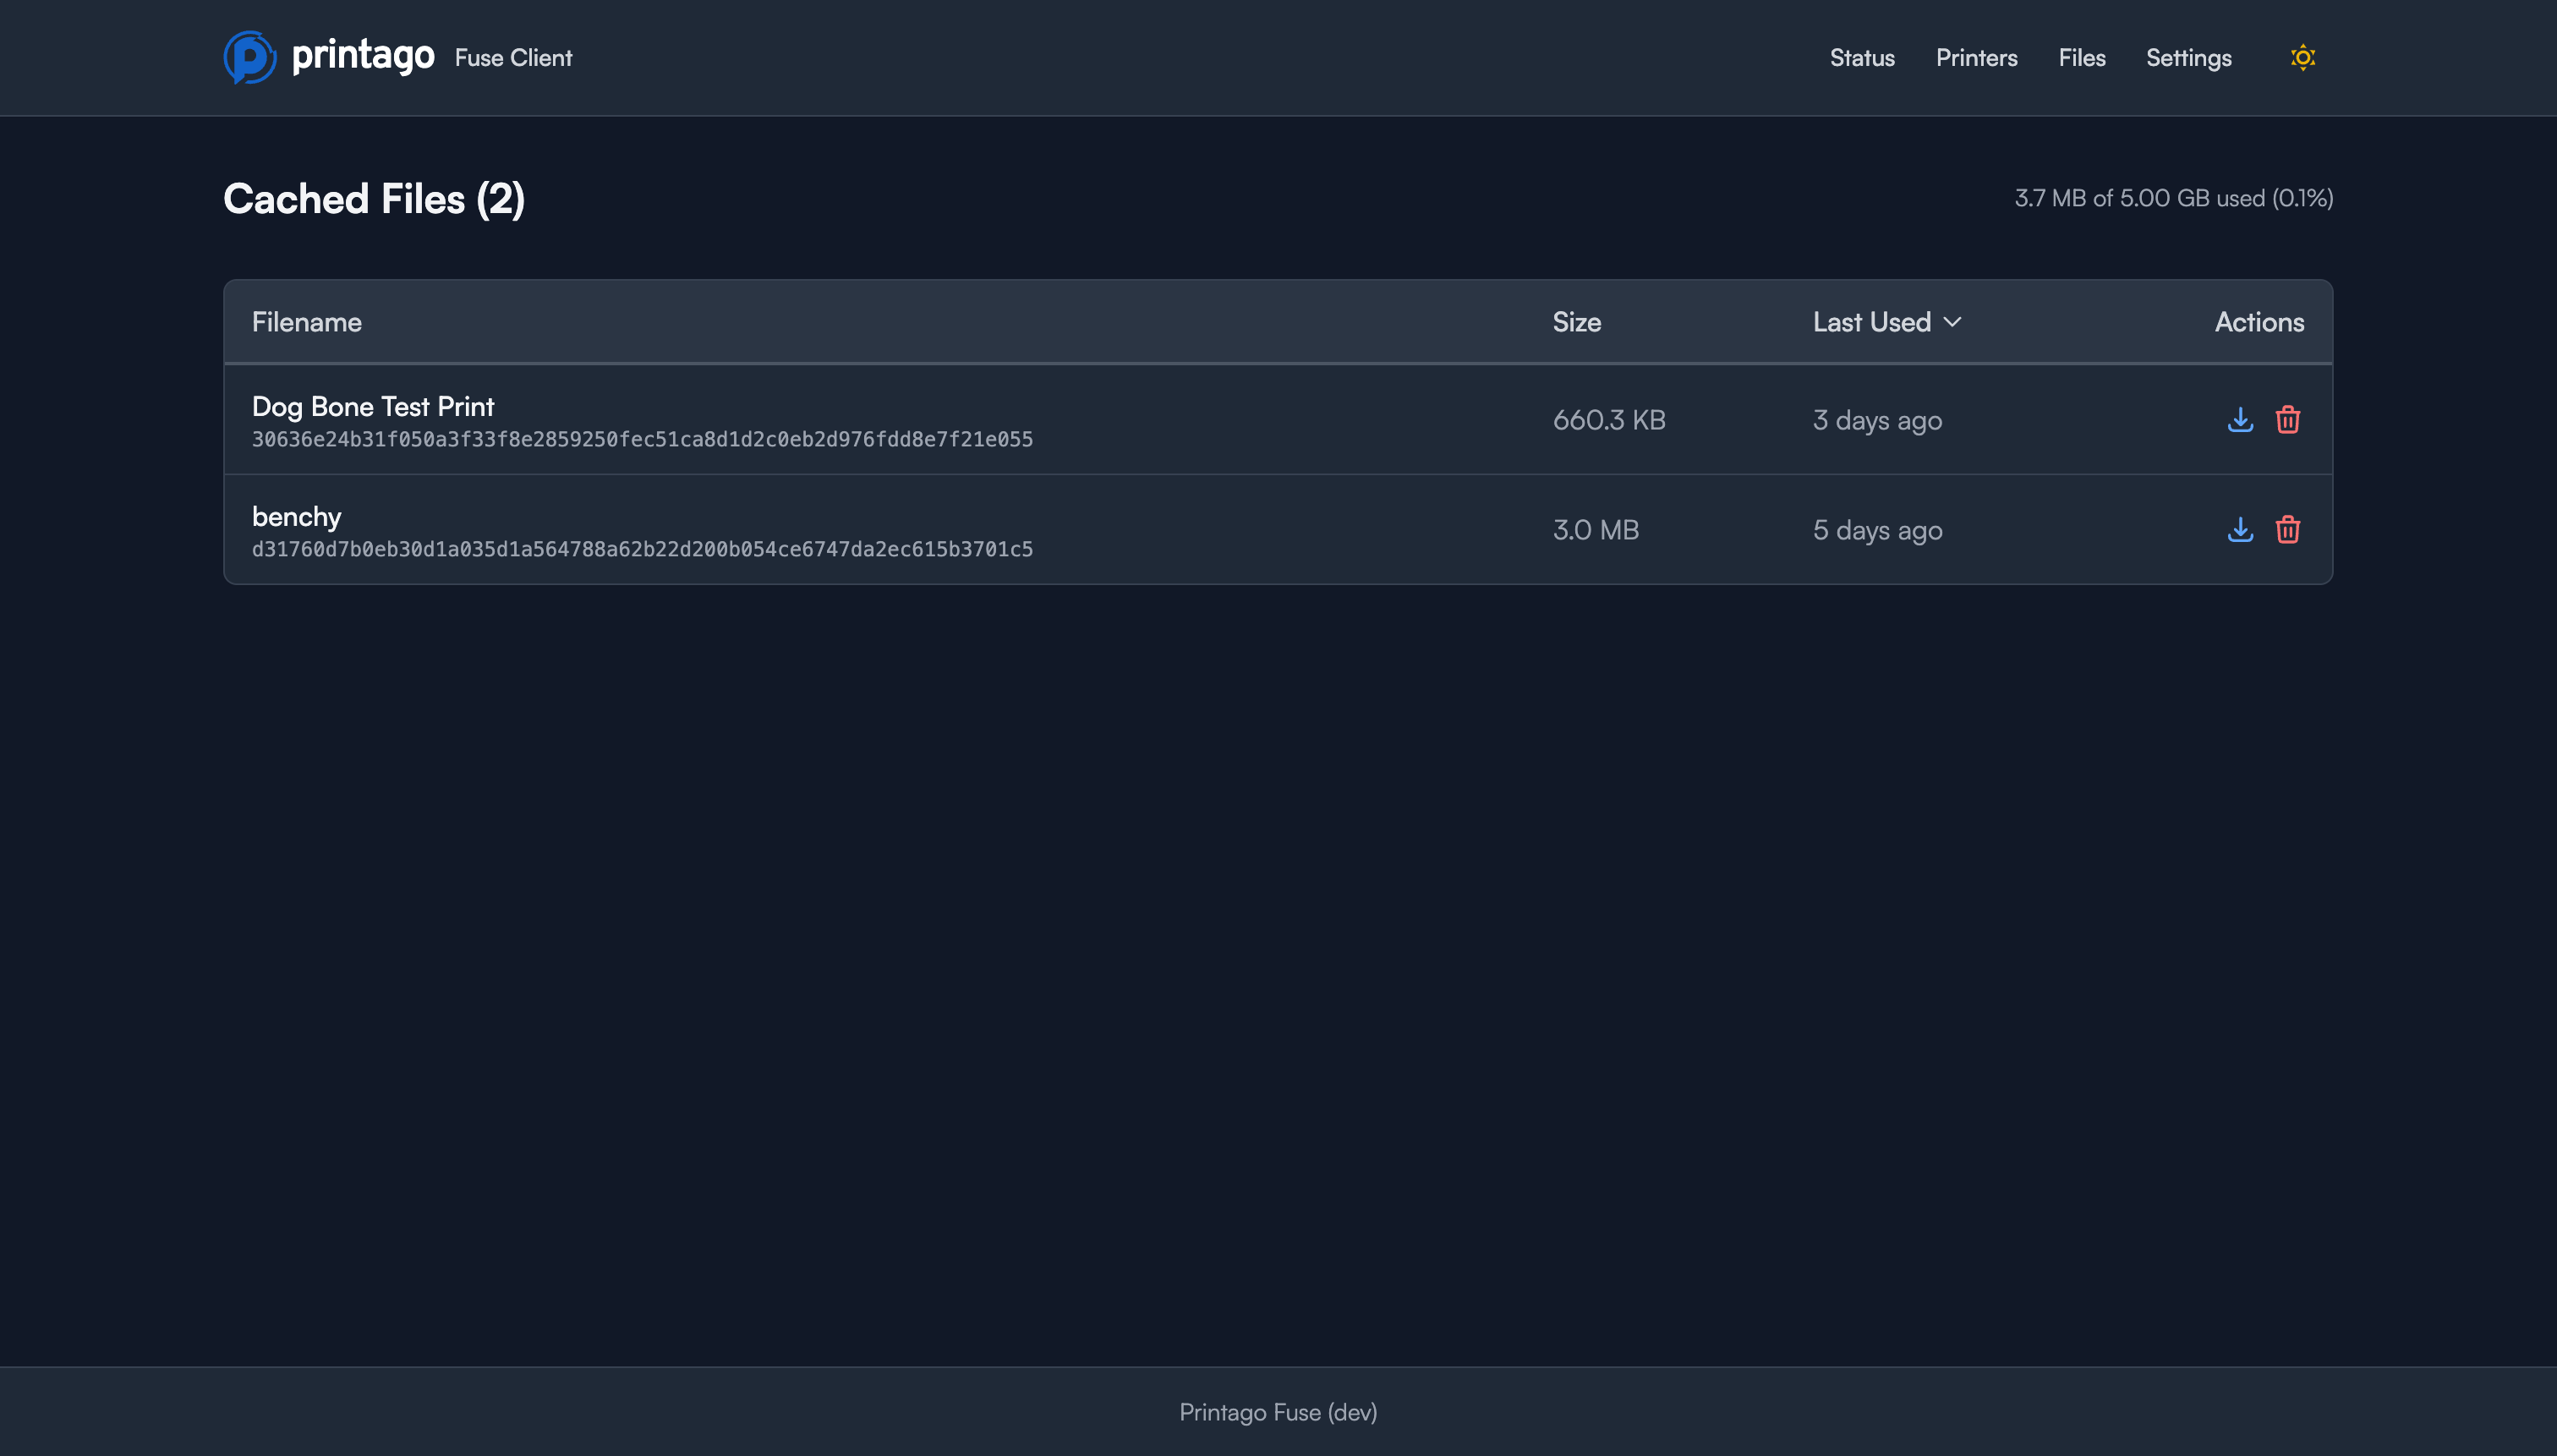
For each file, you can see:
- Filename: The original print file name
- Size: File size on disk
- Created: When the file was cached
Actions available:
- Download: Save the file to your computer
- Delete: Remove the file from the cache
Cache settings can be adjusted in the Settings page.
Settings
Access the Settings page from the top navigation menu to manage your Fuse client.
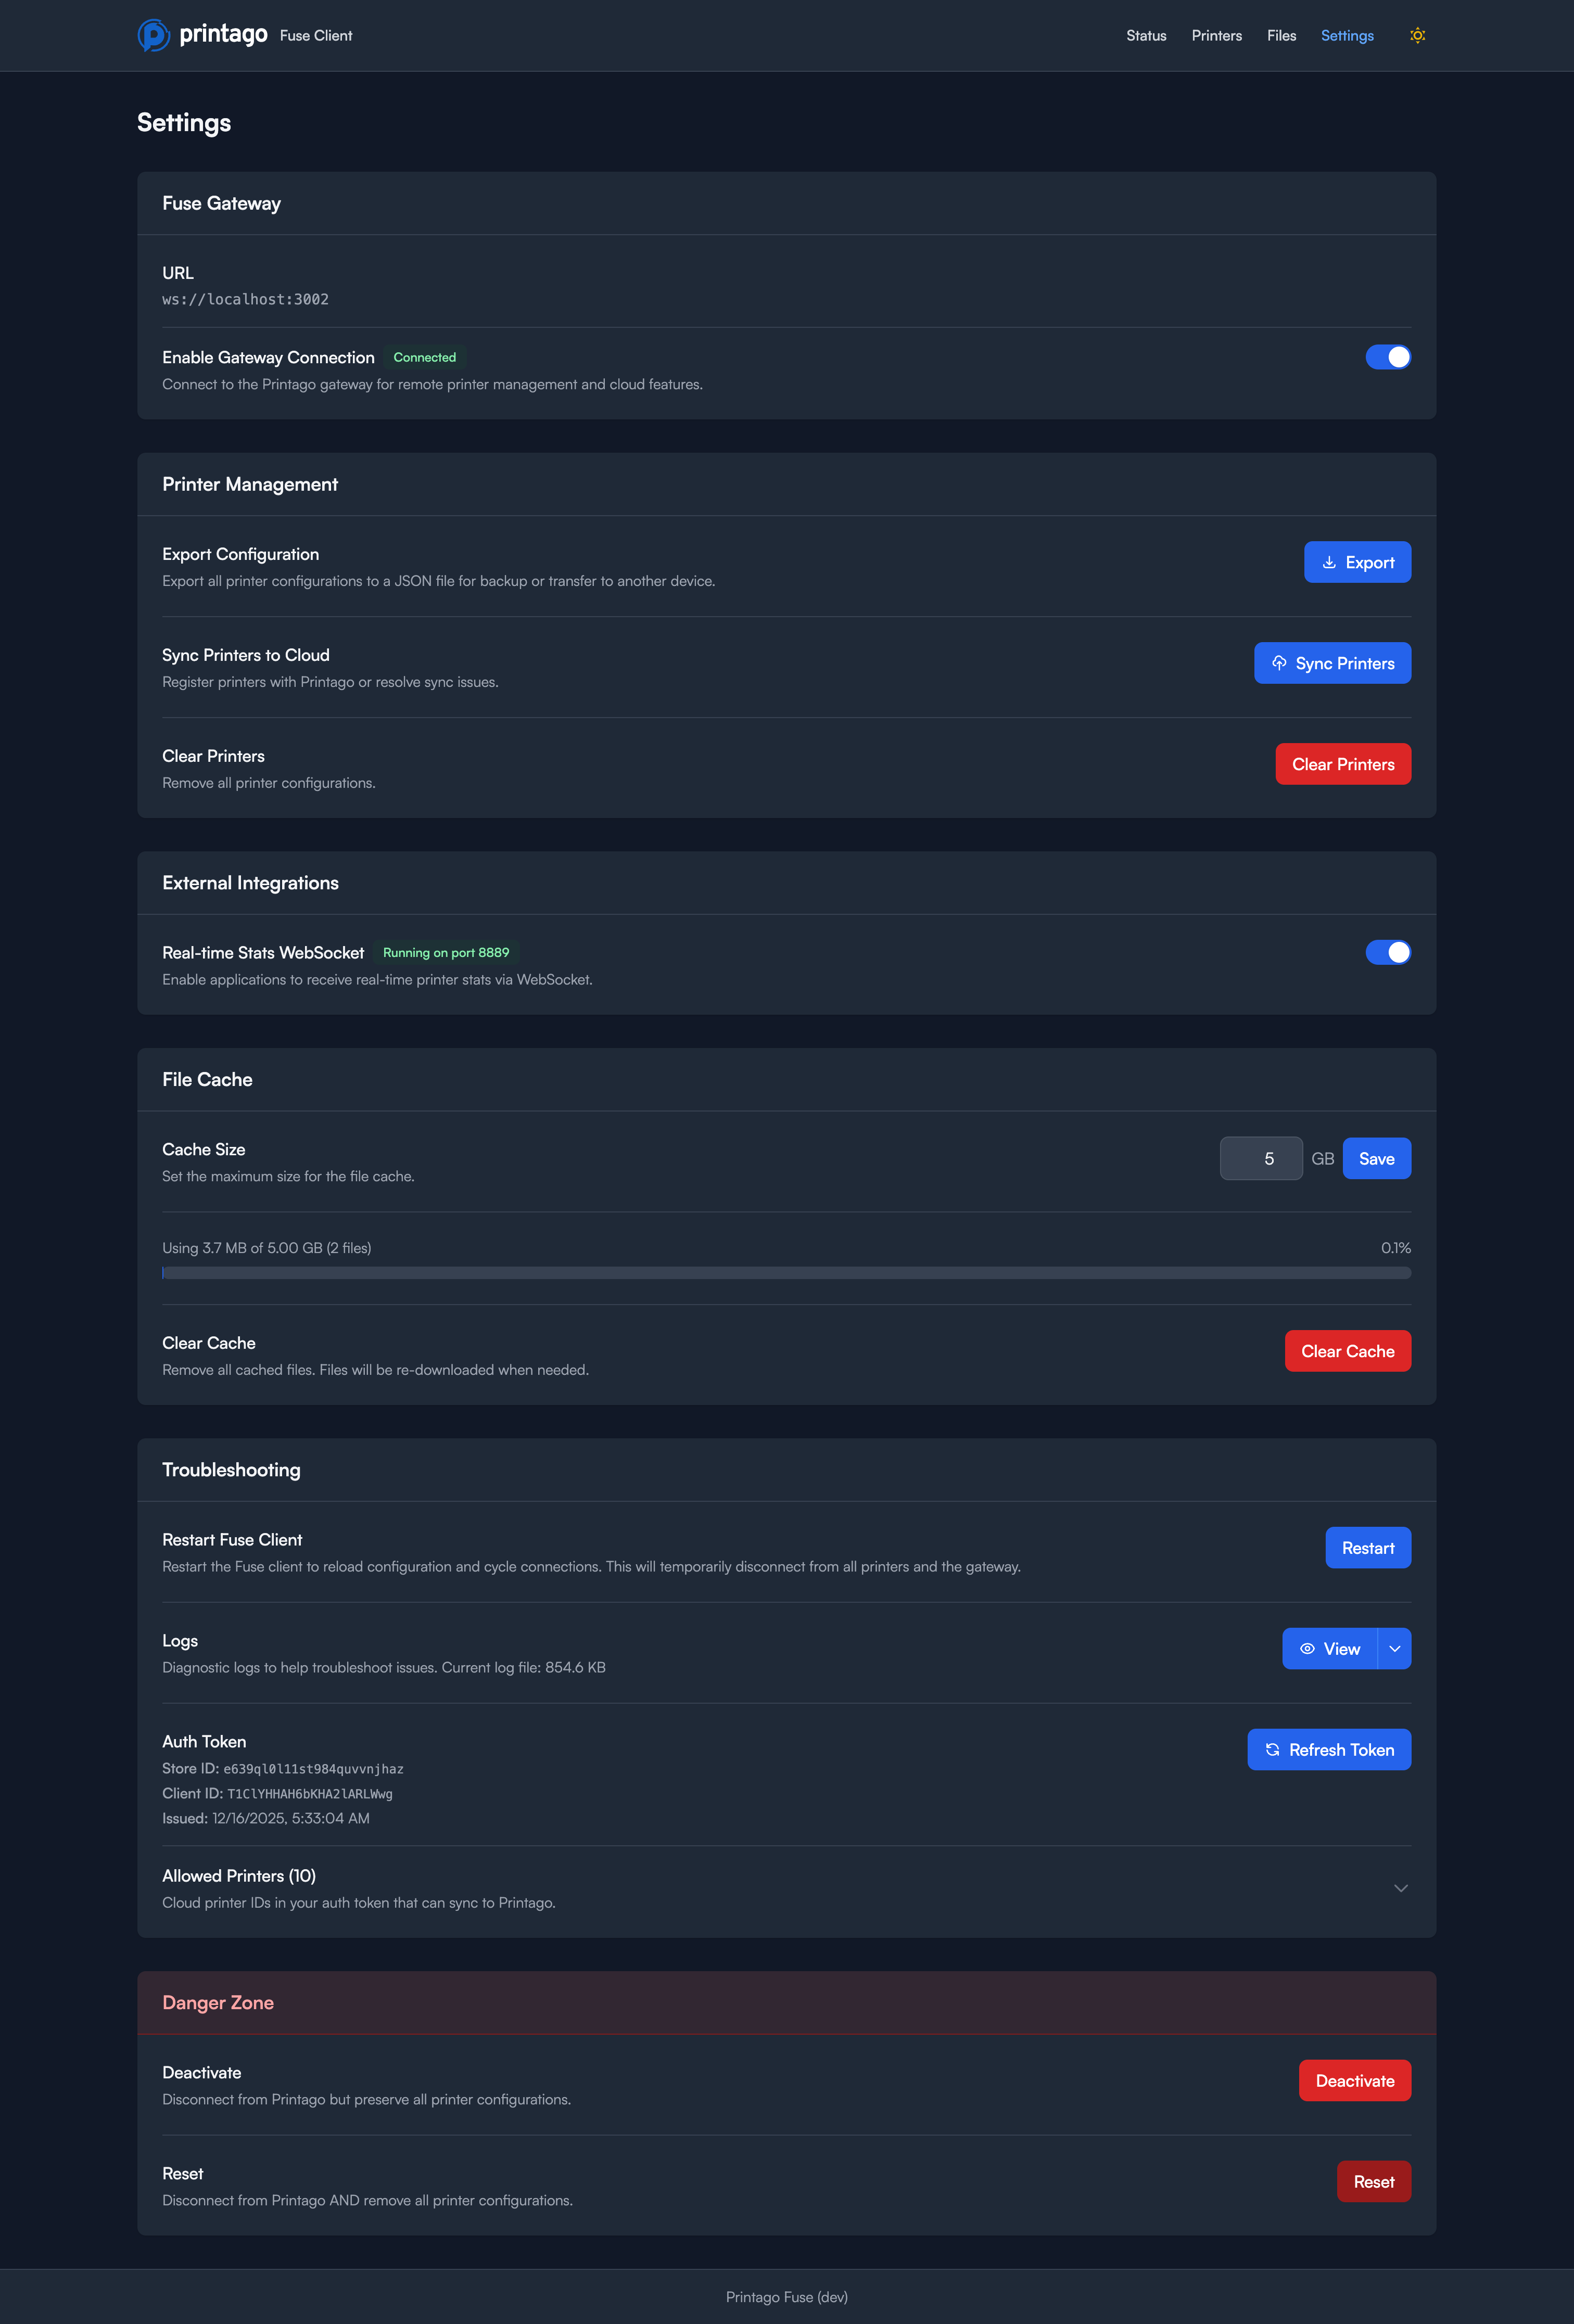
Fuse Gateway
- Fuse Gateway URL: The endpoint for cloud connectivity (default: gateway.printago.io)
- Enable Gateway Connection: Toggle to enable/disable cloud sync with Printago
Printer Management
- Save Configuration: Save the current printer configuration as a named checkpoint, or Export it to a JSON file as a backup. See Configuration Snapshots for details on snapshots and restoring.
- Sync Printers to Cloud: Manually trigger a sync of all printer data to Printago
- Clear Printers: Remove all printer configurations from this Fuse client
External Integrations
- Real-time Stats WebSocket: Enable a WebSocket server on port 8889 for external applications to receive live printer data
File Cache
- Cache Size: Set the maximum cache size in GB (e.g., 10 GB)
- Usage Display: Shows current cache usage
- Clear Cache: Remove all cached files
Troubleshooting
- Restart Fuse Client: Restart the client to reload configuration and cycle connections. Use when troubleshooting connection issues or after configuration changes.
- Logs: View opens the live log viewer; the dropdown beside it offers Download, Upload (send to Printago support), and Clear. See Reading the Fuse Log
- Auth Token: Shows your current authentication token for support purposes
- Allowed Printers: Display the list of printer IDs this client is authorized to manage
Software Updates
When a newer version of Fuse is available, an Update Available banner appears at the top of the Settings page. Desktop apps download the update automatically and offer a Quit and Install Update button; Docker deployments show the commands needed to pull the new image. Updating is safe to do during active prints. See Updating Fuse for full details.
Danger Zone
The following operations are destructive. Use with caution.
Deactivate
- Disconnects this Fuse client from your Printago account
- Preserves all printer configurations locally
- Your printers remain configured but won't sync with Printago
- You'll need to reactivate to sync with Printago again
- Use when temporarily disconnecting Fuse or switching accounts
Reset
- Complete reset: disconnects from Printago AND removes all printer configurations
- Returns Fuse to its initial state
- You'll need to reactivate and reconfigure all printers from scratch
- Use when setting up a new account or troubleshooting severe issues
Troubleshooting
Printers Not Discovered
If auto-scan isn't finding your printers:
- Verify printers are on the same network as your Fuse client
- Confirm LAN Mode and Developer Mode are enabled on the printer
- Check that your firewall allows SSDP traffic (UDP ports 1900, 1990, 2021)
- Try a custom subnet scan with your network's subnet
- As a last resort, add the printer manually if you know its IP address
Connection Issues
If Fuse shows as disconnected from Printago:
- Check your internet connection
- Verify the Fuse client is running (check Status page)
- Try restarting the Fuse client from Settings
- Check that the Gateway URL is correct in Settings
- If issues persist, deactivate and reactivate
Printer Won't Connect
If a configured printer shows as disconnected:
- Verify the printer is powered on and connected to the network
- Check that the IP address hasn't changed (some networks use dynamic IPs)
- Confirm the access code is correct
- Ensure LAN Mode and Developer Mode are enabled
- Check that port 8883 isn't blocked by your firewall
- View the MQTT Communications to diagnose connection issues
- Try removing and re-adding the printer
File Upload Issues
If print jobs are stuck being sent to the printer or fail to upload:
USB storage models (X2D, P2S, H2 series): These printers store files sent over the local network on a USB flash drive. If no drive is inserted, every upload fails, and the Fuse logs show an error like FTP upload failed ... 553 Could not create file. Insert a USB drive (formatted FAT32 or exFAT) and try again. The internal storage on these models cannot receive files over FTPS, so Fuse cannot fall back to it.
MicroSD models (X1, P1, A1 series): The same applies if the microSD card is removed, full, or not formatted correctly.
Upload stuck in a loop (progress climbs, drops back to 0%, and restarts): This is different from the "no storage found" case above; the printer accepts the upload but repeatedly fails to write it. Fuse retries automatically, so the job can sit repeating for many minutes without ever failing outright, and it may not show as cancellable from the printer card. If the Fuse logs show FTP error 451, the printer hit a local error writing to the microSD card (or USB drive); this can be a transient write hiccup, but if it recurs across multiple upload attempts it points to a storage write problem. Try a known-good card or drive: if that resolves it, the original storage was failing and should be replaced. Reformatting or rebooting the printer alone often does not fix a genuinely failing card. If you need to stop the job while you test storage, cancel it from the Print Queue → In-Progress tab in Printago rather than from Fuse. See Cancelling Jobs for details.
General troubleshooting:
- Check the Fuse logs in Settings for detailed error messages
- Ensure the printer has adequate storage space
- Verify network connectivity between Fuse and the printer
- Try restarting the Fuse client if uploads consistently fail
- If the storage itself may be failing (see above), try a different USB drive or microSD card
Camera Not Loading
If the camera feed doesn't appear:
- Verify the printer camera is enabled in printer settings
- Check that port 6000 isn't blocked by your firewall
- Some networks may block RTSP streams; try from a different network
- Restart the printer if the issue persists
If live view works but the camera thumbnails on the Printago dashboard stop updating, the two use different paths: live view is a direct connection to Fuse, while thumbnails are uploaded by Fuse on a timer. Open the Fuse interface and check whether it is asking to be paired again (see Pairing Again After a Credential Failure); a signed-out client keeps serving live view on your LAN but cannot upload.
Reading the Fuse Log
Settings → Troubleshooting → Logs → View opens a live view of everything Fuse is writing. Entries stream in as they happen, so you can leave the page open while you reproduce a problem.
Each row shows the time, the level (ERROR, WARN, INFO, DEBUG), the component
that logged it, and the message. When an entry carries an error, the error
appears on its own red line directly beneath the message, and any other context
the component recorded shows as small key=value chips.
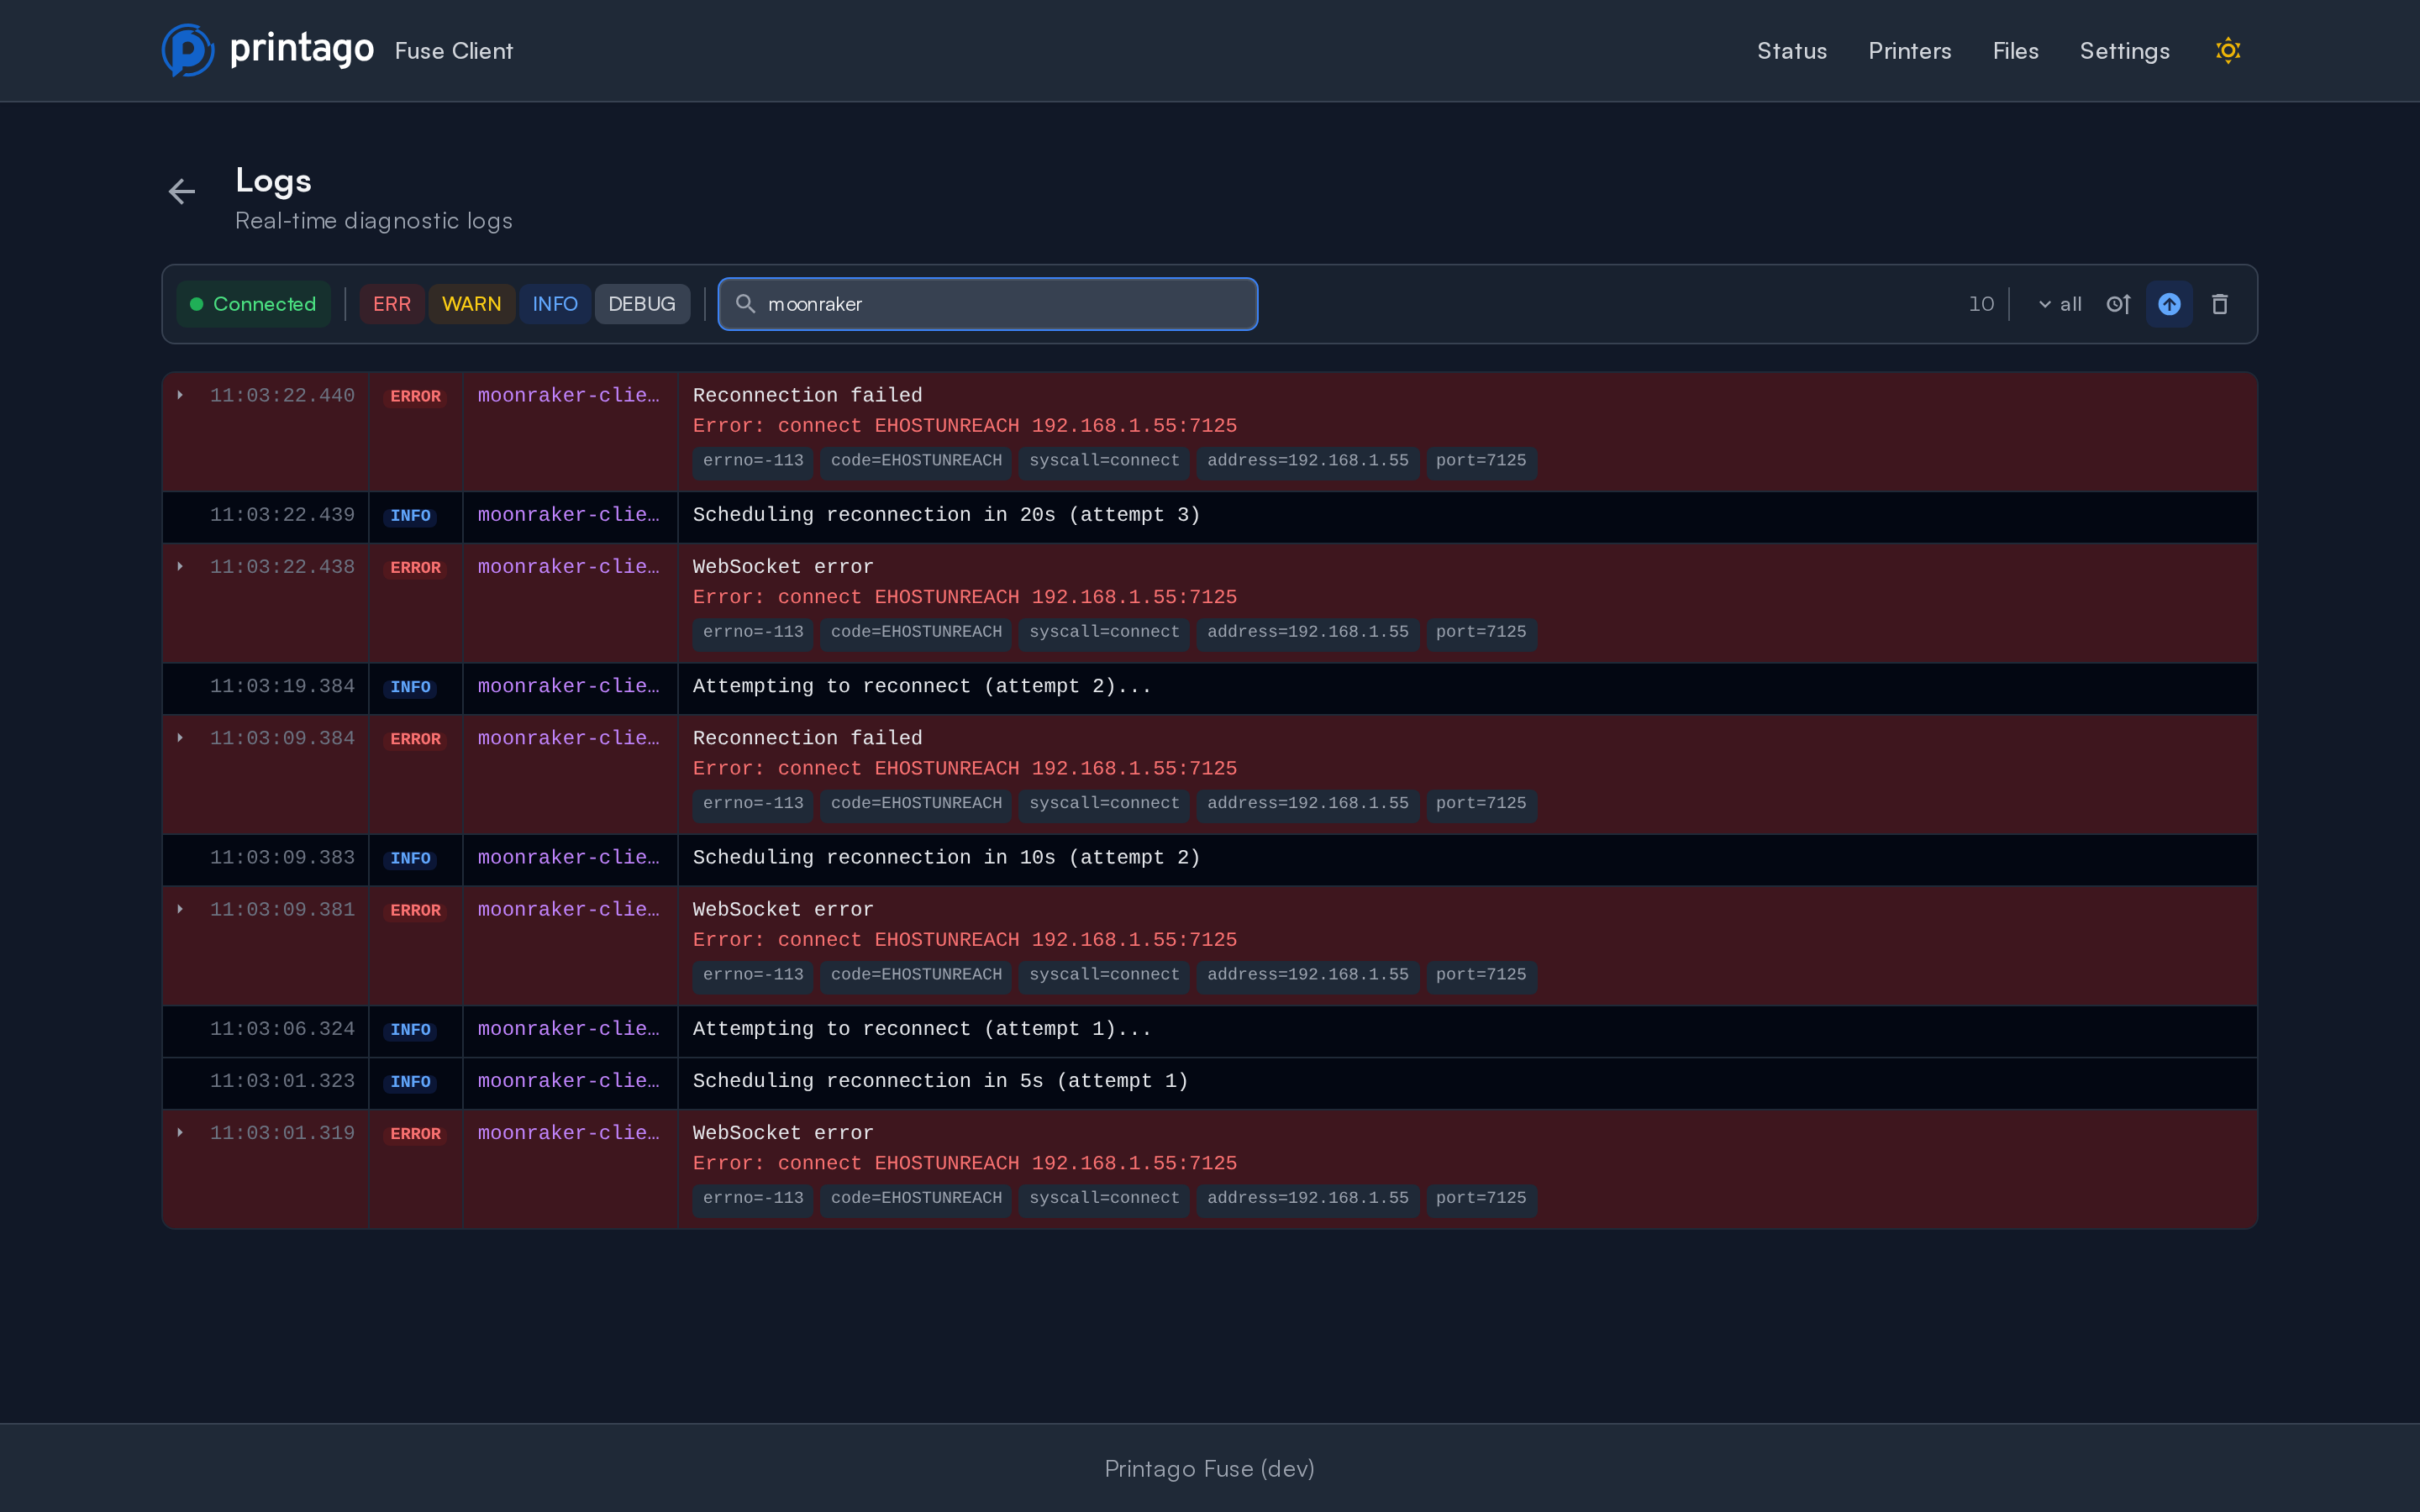
The chips are where the answer usually is. A printer that will not connect, for
example, gives you the exact reason (code=EHOSTUNREACH) and the address Fuse
actually tried (address=192.168.1.55, port=7125), which is often not the
address you expected.
Rows carrying extra detail have a triangle on the left. Click it to expand the row to the full stack trace and the complete payload as JSON. copy in the expanded row copies the whole entry (message, error, stack and payload) as plain text, ready to paste into a support thread. If your browser blocks the copy outright the button says "copy failed" instead of "copied", so you know to select the text by hand.
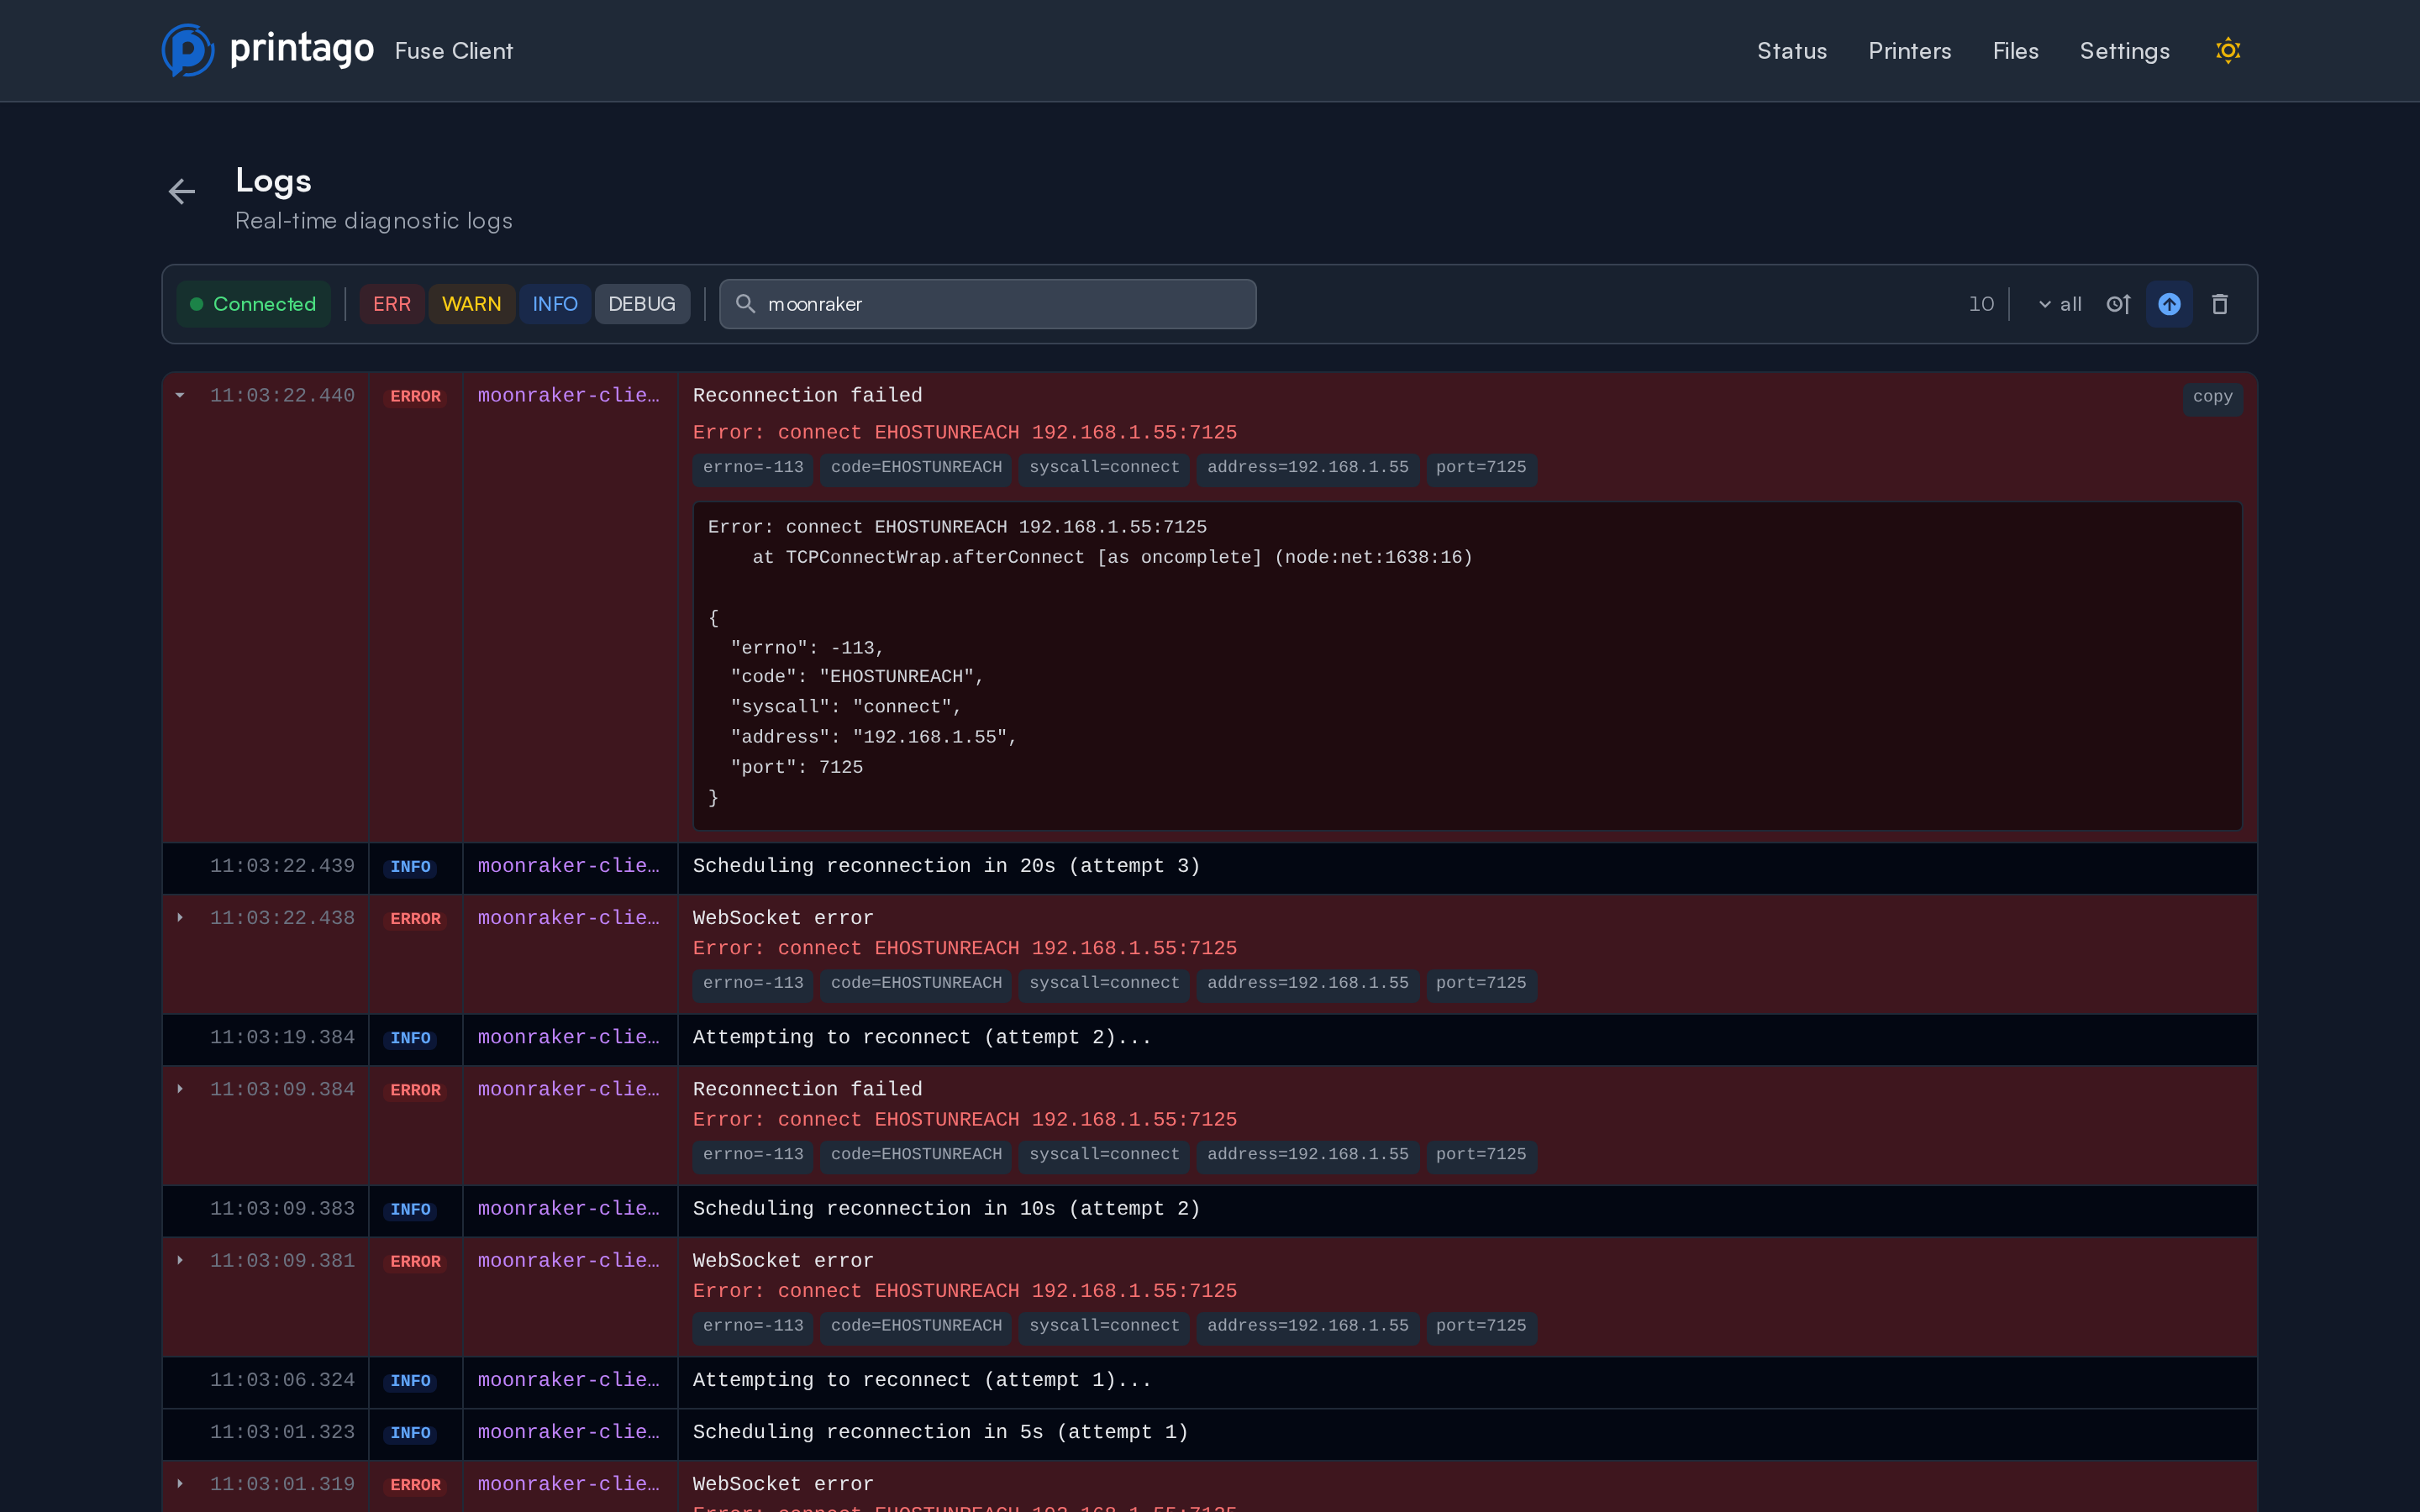
The toolbar controls what you see:
- ERR / WARN / INFO / DEBUG toggle each level on and off
- Search filters on the message, the component and the error text, so
searching for
ECONNREFUSEDor a printer ID finds the rows that mention it even when the text is only in the expanded payload - all expands or collapses every row at once. Rows you have already opened or closed with their own triangle keep that state and are left alone, until you click their triangle again
- The remaining buttons reverse the sort order, pin the view to the newest entries, and clear the on-screen list
Clearing the list only empties the view. It does not delete anything on disk.
The viewer keeps the most recent 1,000 entries, and streams the last 500 lines
of the log file when you open it, so it is not a complete history. For more, use
the dropdown next to View on the Settings page: Download gives you the
current log file (fuse.log), and Upload sends that same file to Printago
support. Both carry the error payloads you see here.
Fuse rotates that file at 5 MB and keeps four older copies beside it
(fuse.log.1 through fuse.log.4). Download and Upload do not include the
rotated copies: they stay on the machine running Fuse, in the same folder as
fuse.log. If the problem you are chasing is older than the current file, copy
those files off yourself and attach them to your support thread.
Clear deletes the log files on disk, including the rotated copies, which is worth doing right before you reproduce a problem so support gets a short log instead of a long one.
If Fuse cannot write its log file at all, which happens on some Windows installs where the install directory is protected, the viewer falls back to an in-memory buffer of the most recent entries and the Settings page says "No log file available yet; in-memory logs only". Download and Upload work from that buffer too, but it is bounded and does not survive a restart.
How Fuse Connects to Your Printers
With a LAN connection, Printago never talks to your printers directly. Fuse holds the printer connections on your own network and keeps a single outbound connection to the Printago gateway, which carries commands down and printer state up.
A few things worth calling out:
- Fuse dials out, you don't open ports. The gateway connection is established by Fuse, so no inbound ports or port forwarding are needed on your network. The ports listed above are for Fuse reaching your printers on the LAN.
- Print files are pulled, not pushed. Printago sends a command containing a temporary download URL; Fuse fetches the file, caches it by content hash (see Files), and uploads it to the printer over FTPS. A file already on the printer or in the cache is reused instead of re-downloaded.
- No Bambu account or cloud tokens involved. Printer connections use each printer's local IP address and access code, so there are no 90-day re-authentications or firmware version requirements.
- If Fuse goes offline, printers keep printing. Only the flow of status updates to Printago pauses; it resumes when Fuse reconnects (see Updating Fuse).
Technical Details
- Control Protocol: MQTT over TLS (port 8883)
- File Transfer: FTP over TLS (port 990)
- Discovery: SSDP (UDP ports 1900, 1990, 2021)
- Camera Stream: RTSP (ports 322, 6000)
- Stats API: WebSocket (port 8889, optional)
- Network: Local network connection required
- Activation: Time-limited codes (15-minute expiration)
- Virtual Printers: Up to 20 per Fuse client
- Supported Models: All current Bambu Lab FDM printers (X1 series, X2D, P1 series, P2S, A1 series, H2 series). Models that store files on a USB drive need one inserted; see File Upload Issues.
Support
For additional help, visit docs.printago.io/fuse or contact Printago support.