QR Workflows
QR Workflows lets you stick QR tags on your printers, on their AMS slots and external spool holders, on your filament shelves and on the spools themselves, and scan them with the Printago app. One scan shows what the tag is for and the action it most likely needs, such as Confirm ready after a print is cleared. Scan two tags together to assign a filament to a slot, to move or swap filament between slots, or to load a spool into a printer, so you can work the farm floor without looking anything up first.
QR Workflows is a free addon, in early access.
What needs which add-on
QR tags come with Filament Inventory, and QR Workflows adds the tools for managing them:
- With Filament Inventory: printing tags and labels for printers, slots, filament colors, spools and blanks, the print page, opening a tag's link, setting up a blank tag, and scanning, in the Printago app's Scan tab or on the web's scan page.
- With QR Workflows as well: the QR tags page, where you see every tag, print them again, and unbind or revoke them in bulk, and the QR Workflows settings that choose what a scan offers.
Each still needs its permission: qr.manage to print and manage tags, qr.scan to scan (see Permissions).
Turning it on
QR Workflows is being turned on store by store during early access, so it isn't listed in the Marketplace yet. Join the waitlist and we'll enable it for your store.
Once it's on, QR Workflows appears in Add-Ons > Marketplace under Farm Management, and the QR tags page appears in the sidebar under Printing.
To switch it off, click the X on its Marketplace card. The QR tags page and the QR Workflows settings disappear; scans keep the settings you last saved. Printing tags and scanning them come with Filament Inventory, so they keep working. Your tags are kept.
Printing printer tags
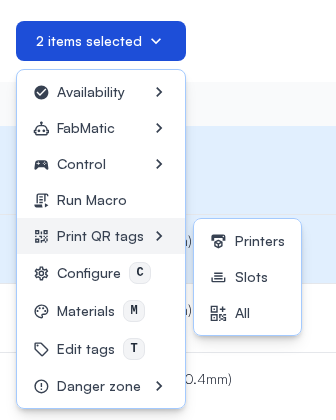
- Open Printers, select the printers you want tags for, and choose Print QR tags > Printers from the actions menu. To print one printer's tag, open the printer and choose Print QR tags > Printer from its ⋮ menu.
- On the Print labels page, pick a label size and what each label shows (see The print page).
- Click Print. In the print dialog, set scale to 100% (or Actual size) and margins to None so the labels line up.
Printing again reuses the tag each printer already has, so a reprinted sticker scans exactly like the old one, and replaces a damaged label.
Where to stick them: somewhere you can reach with a phone while standing at the printer, away from heat and moving parts, such as the front of the frame or the side of the enclosure. Avoid the build plate area and the top of an enclosure that gets hot.
Each tag holds a link. Open it with your phone's camera or scan it in the Printago app to reach the printer's actions.
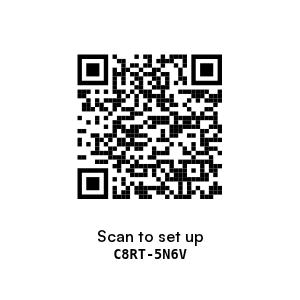
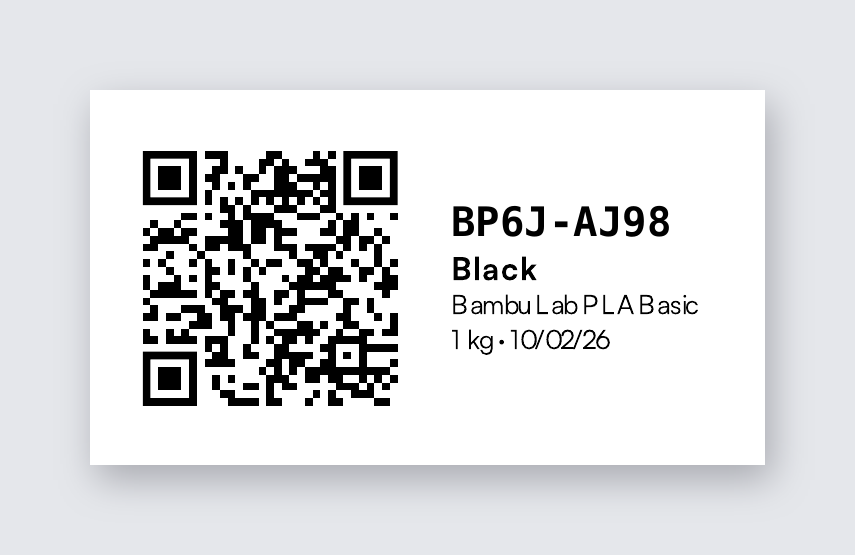
Every new label shows the last eight characters of the tag's ID as a short code, such as C8RT-5N6V, to help you tell labels apart. The code is only for reading: the QR code holds the tag's whole ID, and nothing looks a tag up by its code. A spool's label shows the spool's own label code, which it has from the moment it is created. Labels printed before keep working. Scan the QR code to open the tag.
The print page
Every Print for QR tags opens the same Print labels page: from a printer, from Materials, from a spool, after receiving filament, or from the QR tags page. On the left, choose the label size and what to show. On the right, the labels at the size they will print, grouped by color for filament and spool labels, in the order they print.
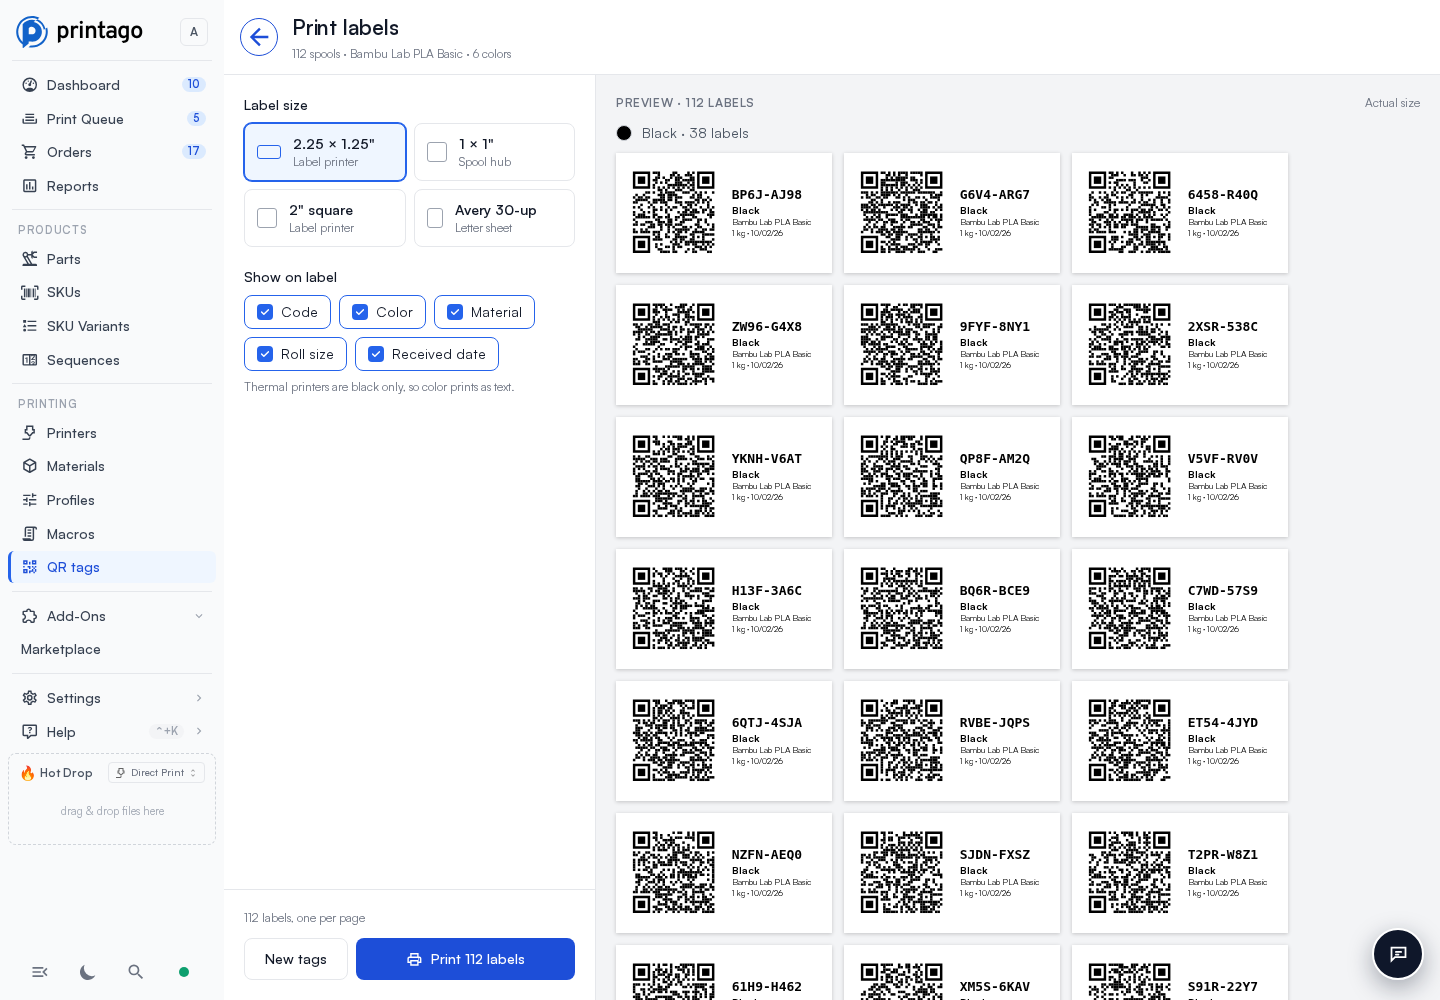
Label size
| Size | Prints on | One label is |
|---|---|---|
| 2.25 × 1.25" | A thermal label printer | The QR on the left, then the code, the color, the material, and the roll size and received date |
| 1 × 1" | Small square labels, for a spool's hub | The QR, the code, and the color and material |
| 2" square (the default) | A label printer | The QR on top, the name or color below |
| Avery 30-up | US Letter sheets of Avery 5160 or 8160 address labels | The QR on the left, the text on the right, 30 to a sheet |
Thermal printers print in black only, so a 2.25 × 1.25" label names its color in text rather than showing a swatch.
Show on label turns each line on or off for every label that has it: Code, Color, Material, Roll size and Received date. Only the fields the labels on the page have are listed, so printer tags offer just Code. A 1 × 1" label has no room for the roll size or received date, so those two are greyed out with the reason while it is chosen. The size and fields you choose are remembered in this browser for next time.
The preview's heading says how many labels you are printing and on how many pages: one page per label for the label sizes, or 30 labels to a Letter sheet for Avery. Print opens your browser's print dialog. Set the paper to the label size, or to Letter for Avery, with scale at 100% and no margins.
Printing slot tags
A slot tag stands for one AMS slot or external spool holder of a printer. Stick it on the AMS below the slot, or next to the spool holder.
- For several printers: open Printers, select them, and choose Print QR tags > Slots from the actions menu. Print QR tags > All prints the printers' own tags and their slot tags together, on one print page.
- For one printer: open the printer and choose Print QR tags > Slots (or All, for its printer tag too) from its ⋮ menu. Slots and All are greyed out for a printer with no slots to tag.
Printago makes one tag for every AMS slot and external spool holder of those printers, and opens the print page.
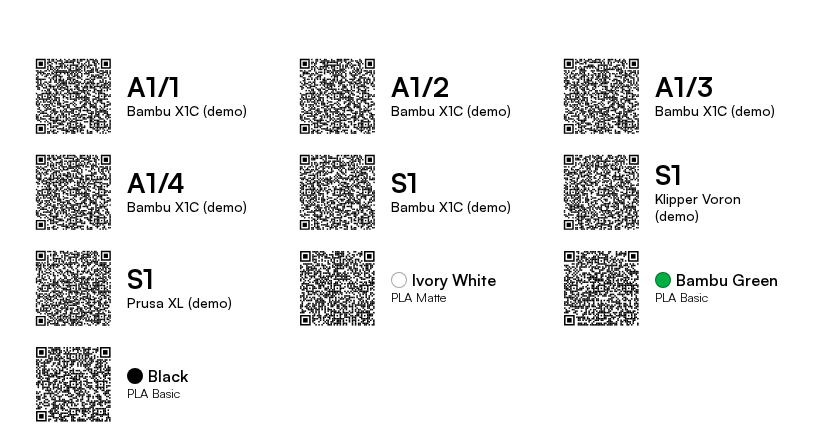
Each label shows the slot the way the app names it, in large type, with the printer's name under it: A1/3 is AMS 1, slot 3, and S1 is the first external spool holder. A slot tag belongs to the slot's position on the printer, so it keeps working when the AMS is unplugged and plugged back in, or when you load a different spool.
Printing filament tags
A filament tag stands for one color of a material, such as Bambu Lab PLA Basic in Black. Stick it on the shelf or bin where you keep that filament.
- Open Materials and click the material.
- Choose Print tag on a color's row, or Print All Tags for every color of the material.
Each label shows the QR code, a swatch of the color, and the color and material names. See Materials for how colors (variants) work.
Printing blank tags
A blank tag isn't for anything yet. Print a sheet of them ahead of time, and set each one up the first time you scan it: stick it on a new spool, or on a printer or slot that doesn't have a tag. You can set it up in the app, or with your phone's camera and Printago on the web (see Setting up a blank tag).
Printing blank tags doesn't add anything to your store, so print as many as you like and throw away the ones you don't use. A blank is added to your QR tags when it's set up.
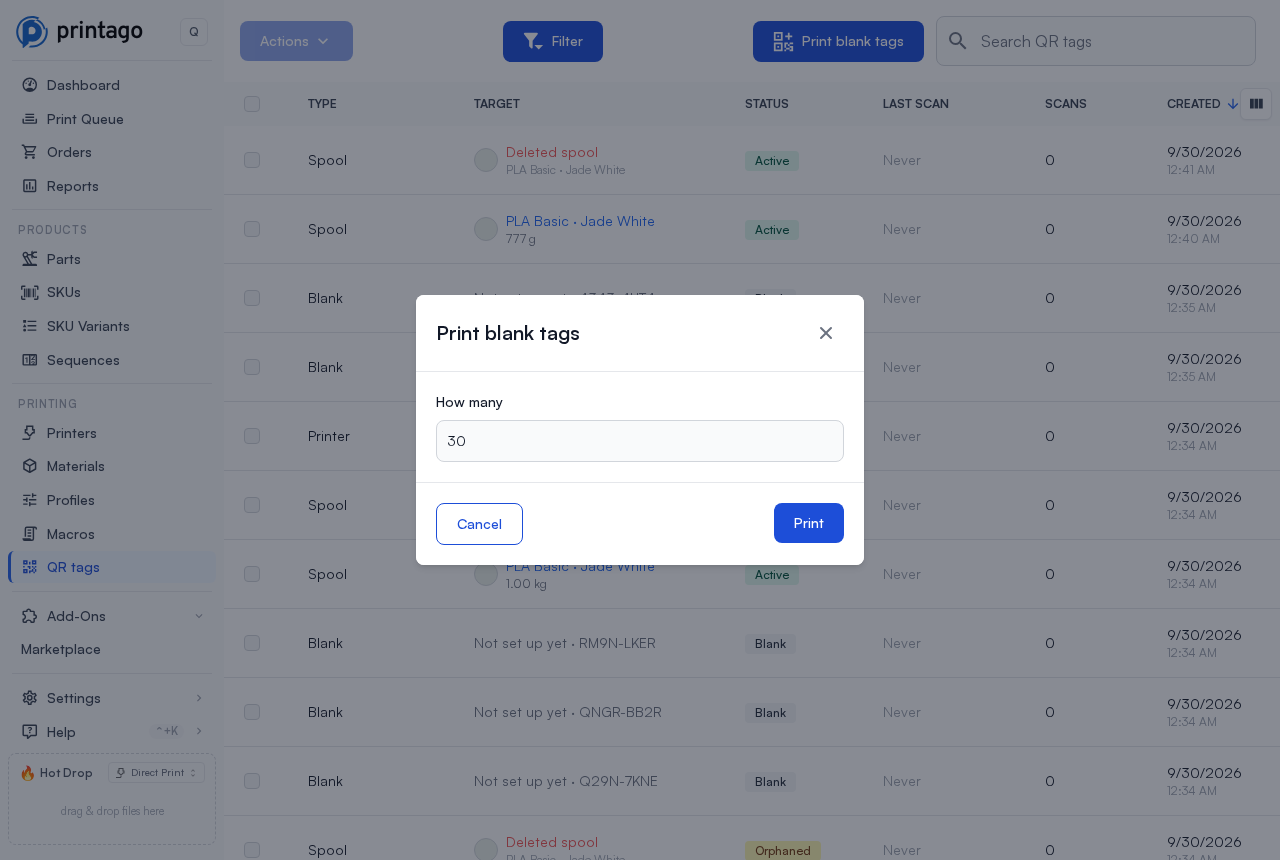
- Open QR tags and click Print blank tags, or open a material and choose Print blank labels from its ⋮ menu.
- Enter how many to print, from 1 to 300 (30 fill one Avery sheet), and click Print.
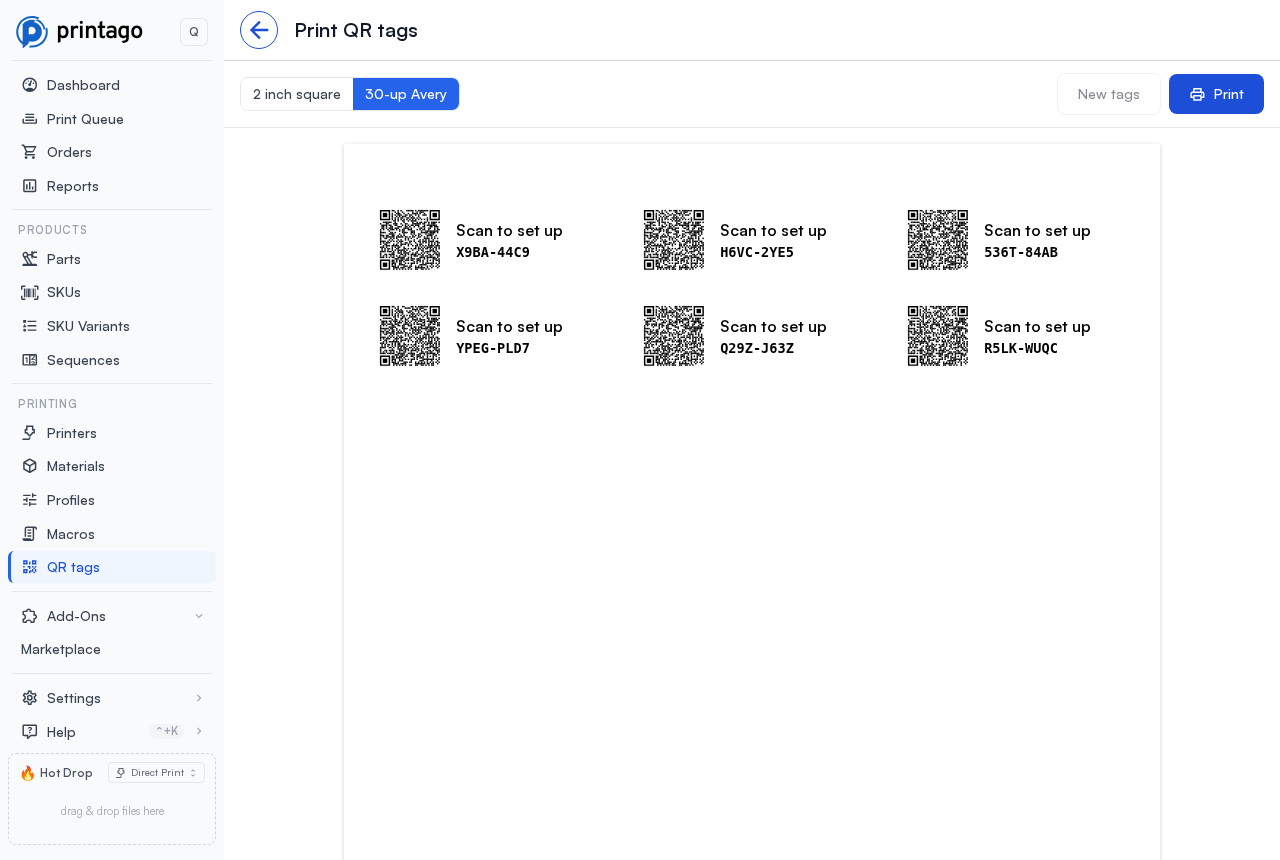
- Printago opens the print page with that many new blanks. Pick a size and print as above.
Each blank label shows its QR code, Scan to set up, and a short code such as C8RT-5N6V, so you can tell two blanks apart. The code stays with the tag after it is set up, and a spool registered with it takes it as its label code.
Managing tags
The QR tags page lists every tag with its type, what it belongs to (a printer, a slot such as A1/3 · Farm P1S 04, a filament color with its swatch, or a spool with its swatch and how much is left), its status, when it was last scanned, and how many times. Blank tags appear here once they're set up. A spool's weight updates as soon as someone changes it in the app. Filter by type or status, select tags to print them again, choose Unbind to reuse them for something else (see Reusing a tag), or choose Revoke to stop them working for good (for example, a sticker that was lost). A revoked tag shows a message when scanned instead of the printer.
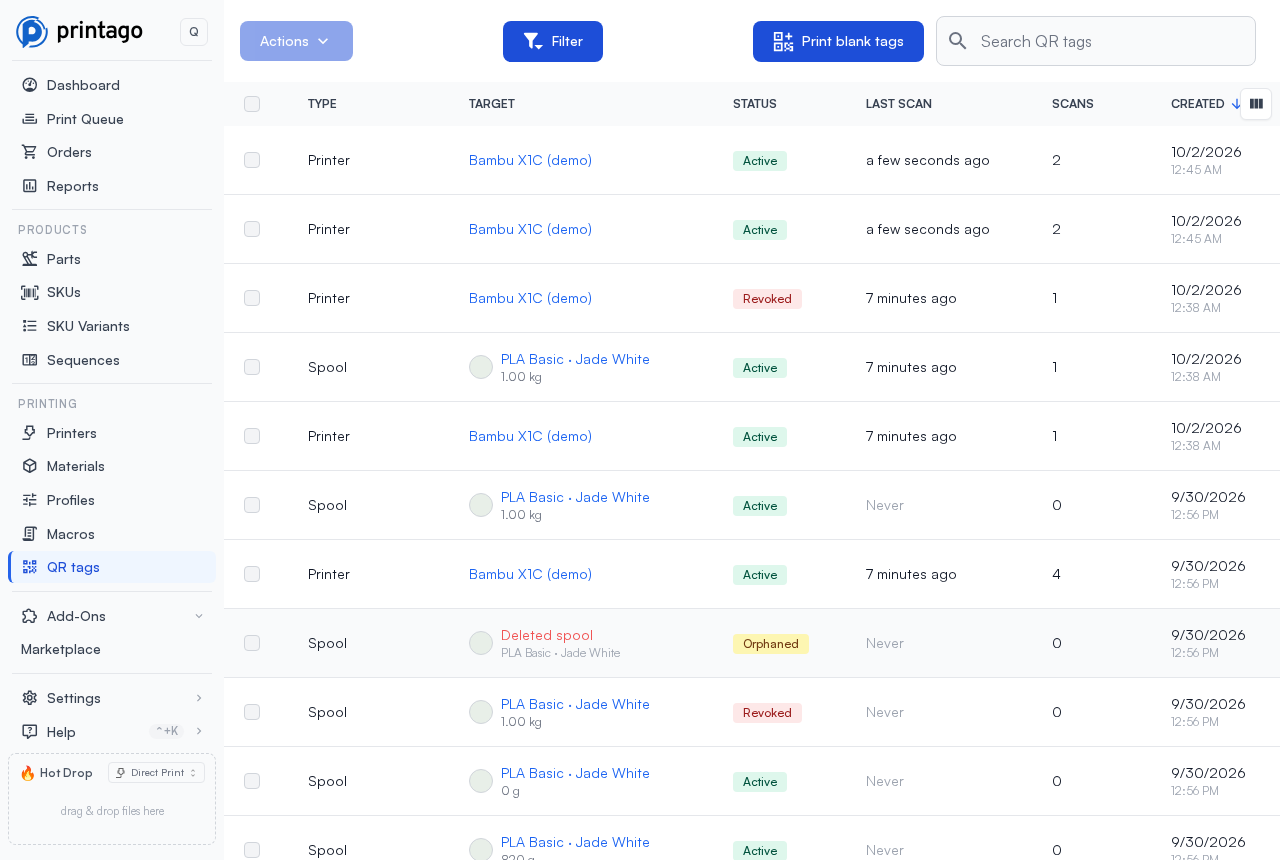
If you delete a printer, its tag and its slot tags show as Orphaned right away, and scanning one says the printer was deleted. If you add the same printer back (for example after re-pairing it, or reinstalling Fuse), its printer and slot tags work again on their own: Printago knows the machine by its device ID (a Bambu printer's serial number, for example), so the tags follow it to the new printer, slots included. A printer that has no device ID in Printago can't be matched this way; unbind its tags and set them up again instead. The same goes for a filament tag when you delete the color from the material, and for a spool tag when you delete the spool. An orphaned tag can still be reused: scanning it offers Unbind tag.
Reusing a tag
A tag that is stuck on the wrong thing, or whose printer, slot, filament or spool moved or was deleted, doesn't need a new sticker. Unbind it, and it becomes a blank tag again with the same code. The next time you scan it, set it up for whatever it is on now, the same way as any blank tag.
- In the app, scan the tag and choose Unbind tag under More actions. For a tag whose target was deleted, Unbind tag is right under the message. The app asks first, then shows the tag as a blank: scan what it's for next to set it up.
- On the web, scan the tag on the scan page and choose Unbind tag, or select tags on the QR tags page and choose Unbind from the selection menu. Opening the link of a tag whose target was deleted also offers Unbind tag, then the blank tag setup.
For example, if you move an AMS with slot tags on it to another printer, unbind each slot tag and scan it with the slot it now belongs to. Unbinding never changes the printer, filament or spool the tag was for, and a revoked tag can't be unbound. Unbinding needs qr.manage, and you can switch Unbind tag off for each tag type in Settings.
Printing spool labels
With spool tracking, every spool can have its own label: stick it on the side of the spool or on its hub, and a phone's camera opens the spool's page. A spool label is a QR tag for that spool.
Print them from wherever the spools are:
- After receiving filament tracked as spools, or converting bulk into spools: the dialog lists the new spools by color and offers Print N labels. Choose Skip to print them later.
- The Spools tab of a material: tick the spools you want, or the box in the header for every spool listed, and click Print N labels. With nothing ticked, Print labels prints every spool listed (narrow the list to a color first to print just that color).
- A spool's row menu on the Spools tab, or Print label on the spool's own page, for one spool.
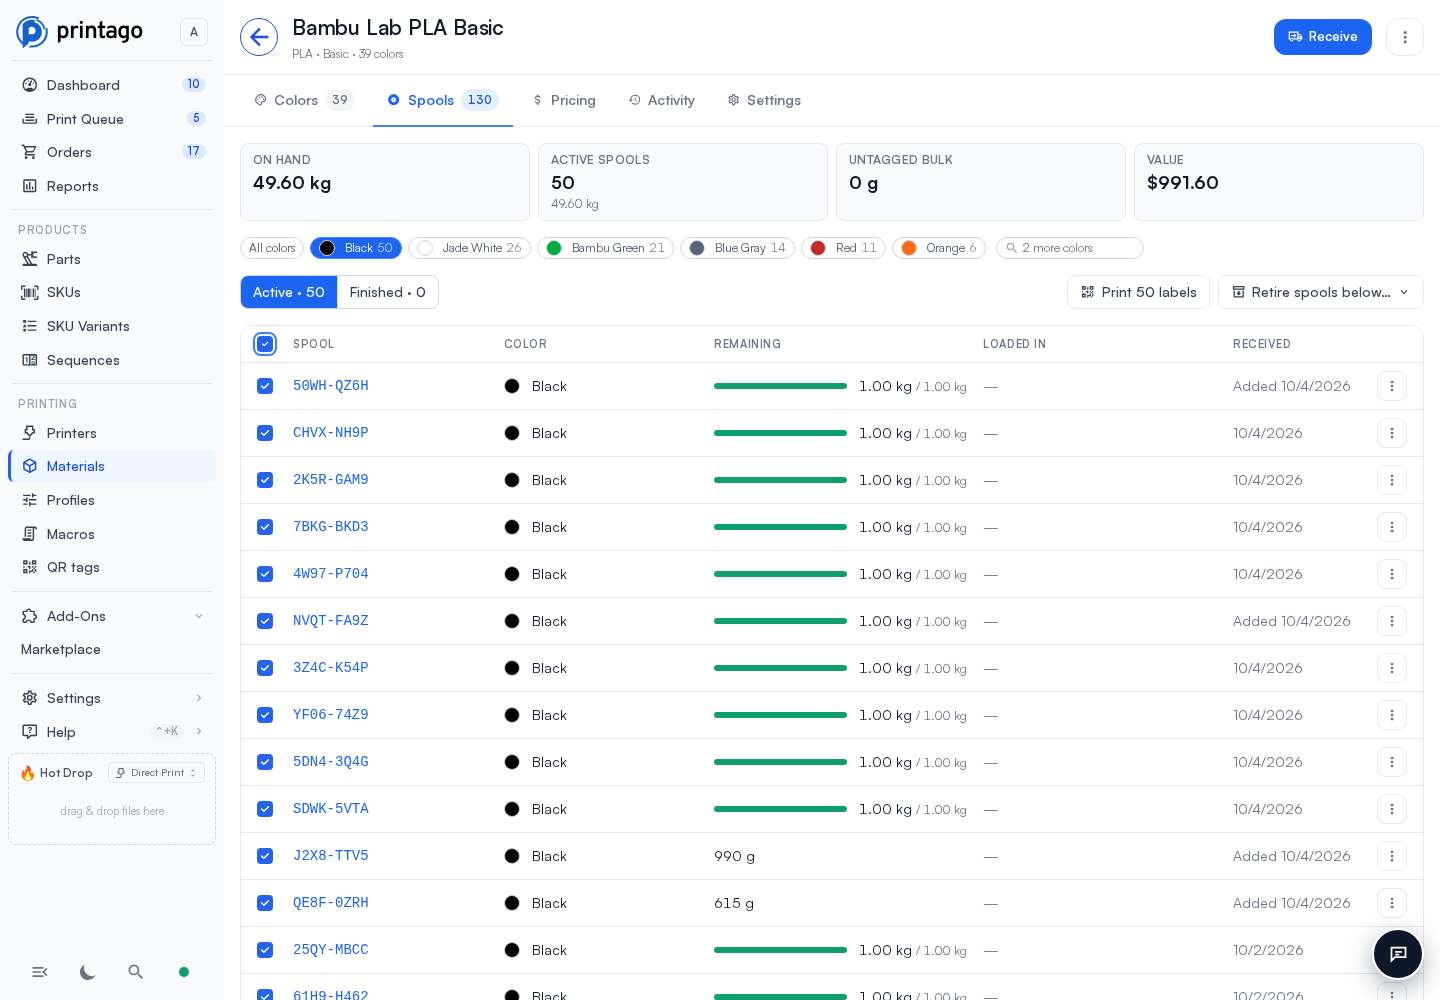
Labels print grouped by color, so you can stick each color's labels on that color's spools. Each spool label shows its code, its color, the material, its roll size, and the day it was received (or added, for a spool converted from bulk or registered by a scan). A spool that came in on a delivery prints the day the delivery was received. If that day can't be read, the label leaves the date off rather than print the wrong one, and the page says so.
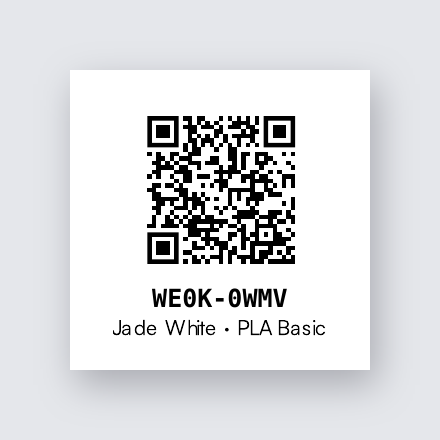
A spool's label shows its label code, which the spool has from the moment it is received, converted or registered, so the code on the Spools tab and the code on the label always match. Printing a spool's label again reuses its tag, so old and new labels scan the same.
Printing spool labels needs Filament Inventory, spool tracking and qr.manage. Without them there are no Print labels buttons, and everything else on the material page works as before.
Scanning in the app
Open the Scan tab in the Printago app and point the camera at a tag. See Using the Mobile App for the camera permission and the messages the app can show.
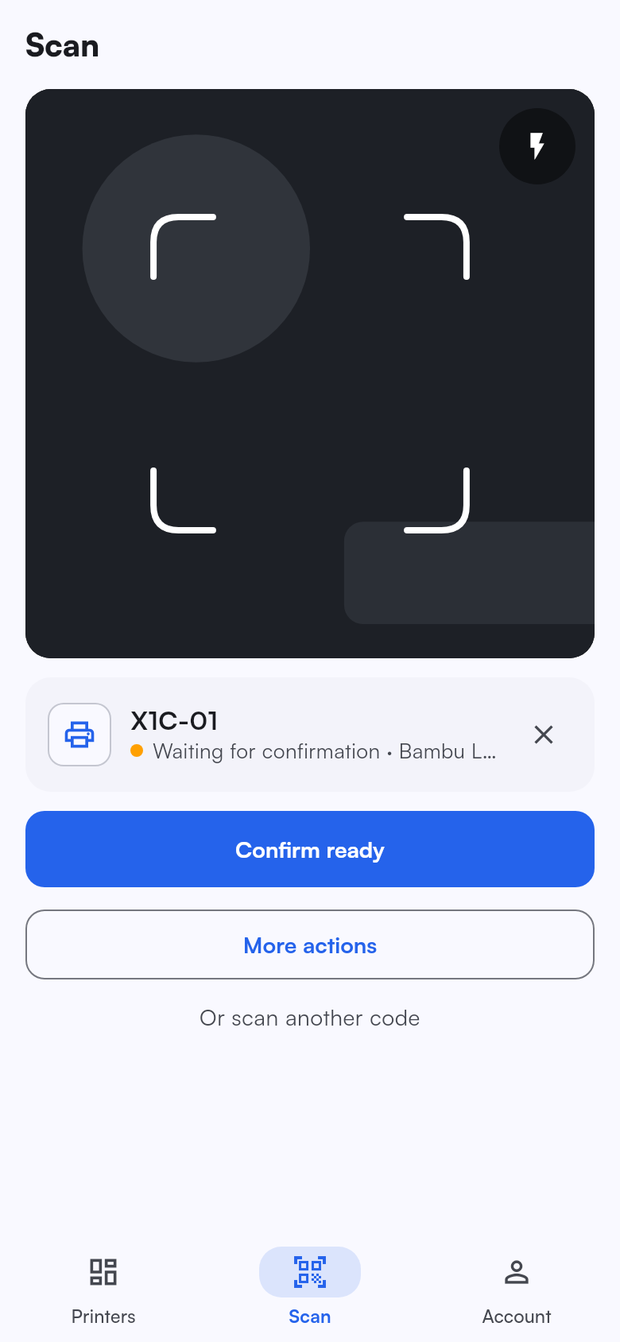
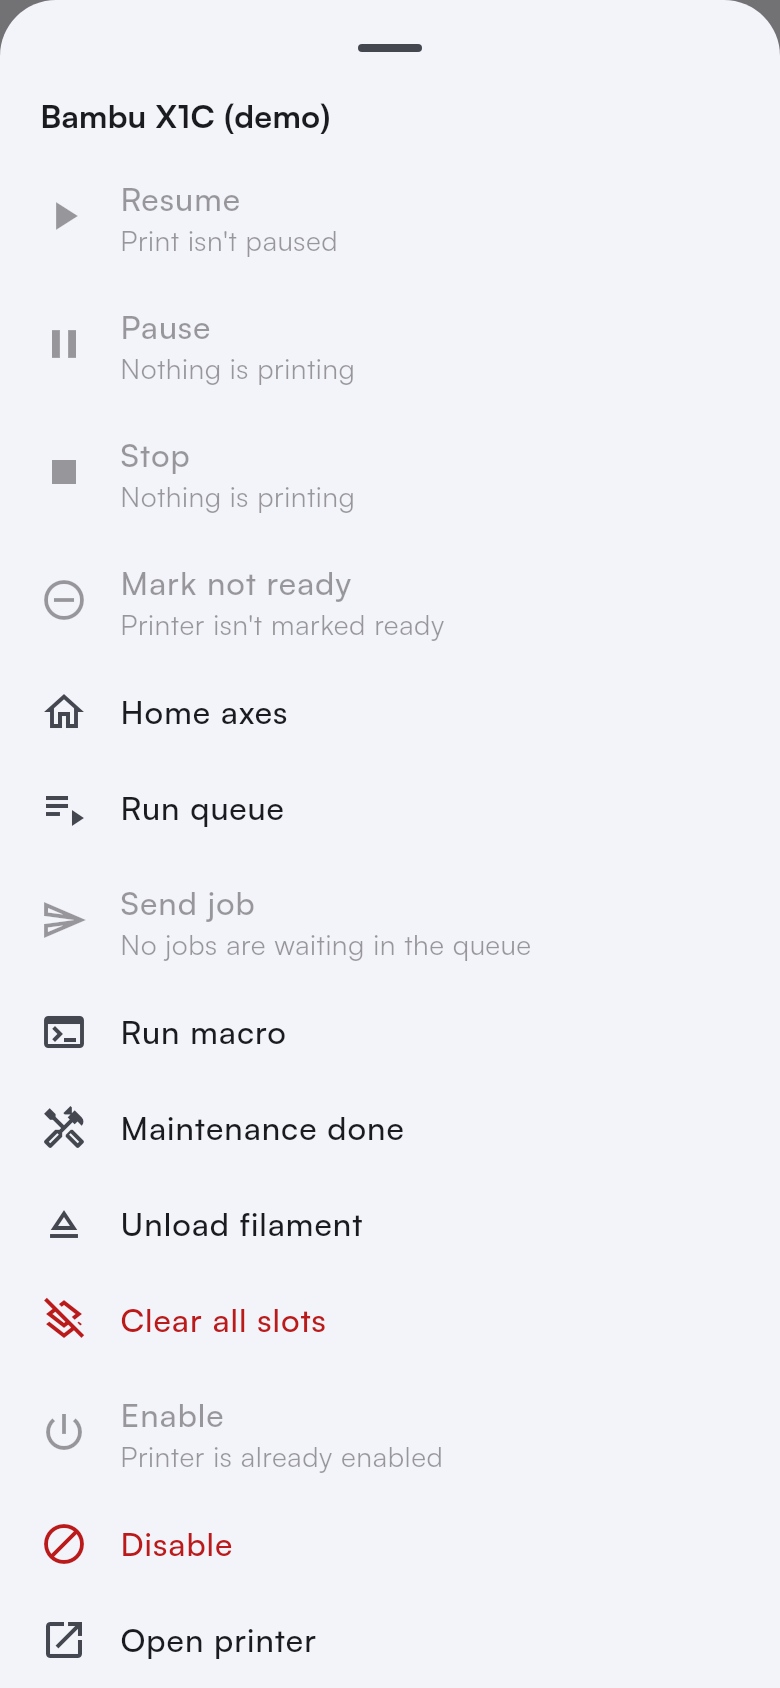
After a scan, the app shows the printer with its live status and one large button for the action it most likely needs:
- Confirm ready when the printer is waiting for you to confirm it is clear.
- Resume when the print is paused.
- Open printer otherwise.
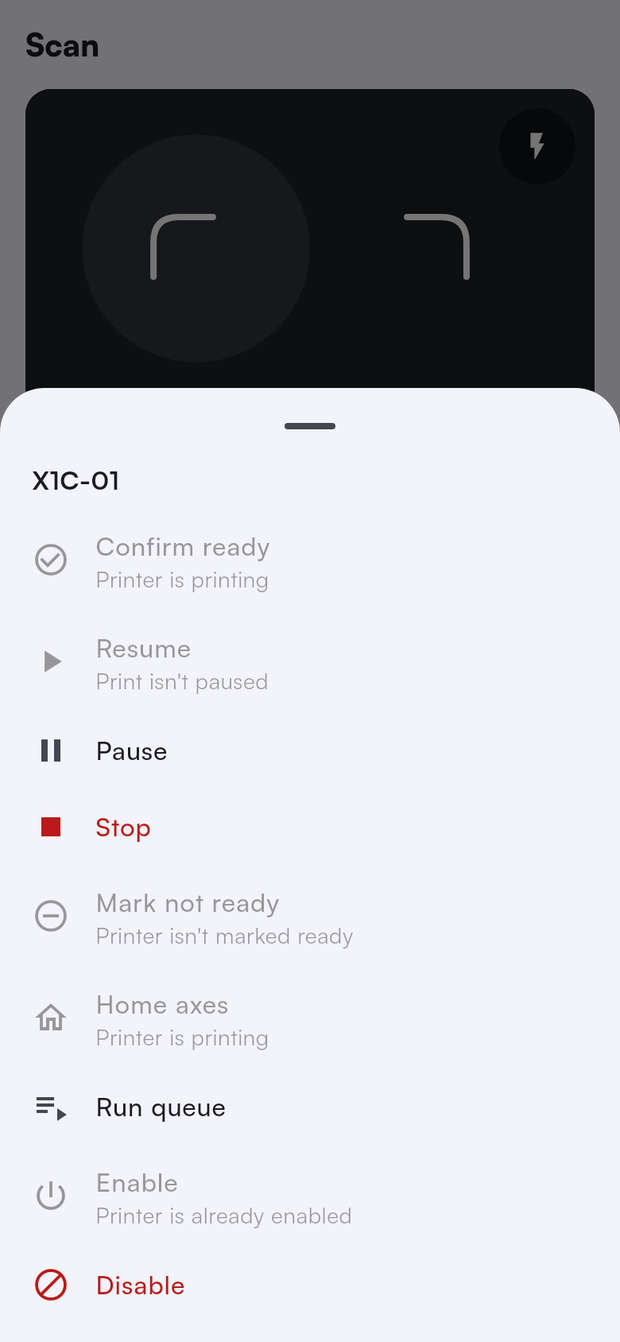
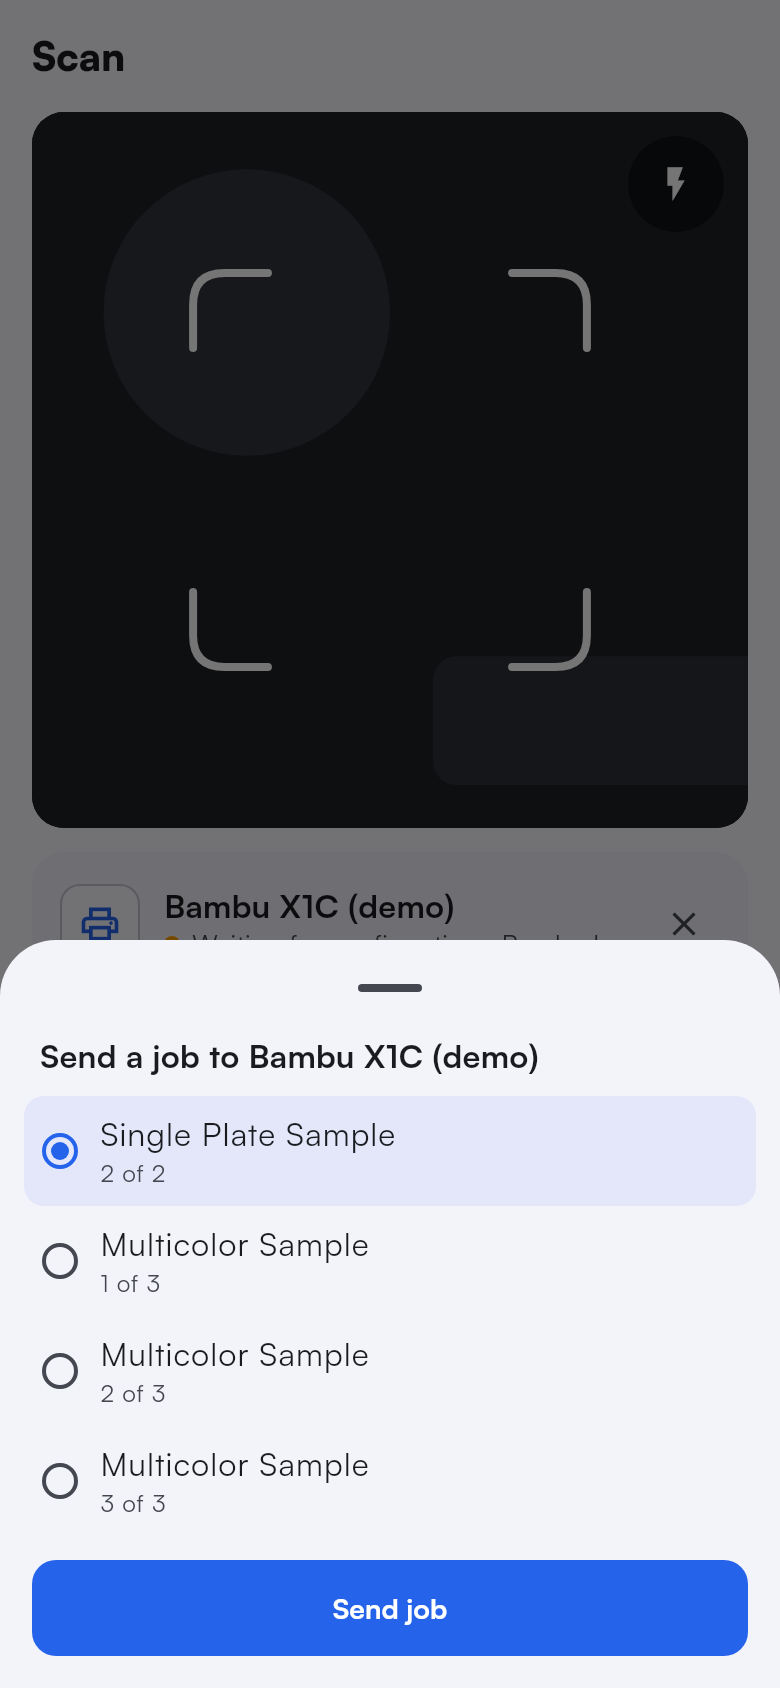
Everything else is under More actions. Actions that can't run right now are greyed out with the reason, for example Printer is offline, Printer is printing, or You don't have permission. If Printago can't read a printer's status at the moment, the card reads Status unavailable and the actions that need it are greyed out until you scan again. An action that needs a choice, such as which job to send, opens a list with the most likely choice already picked.
Scanning on the web
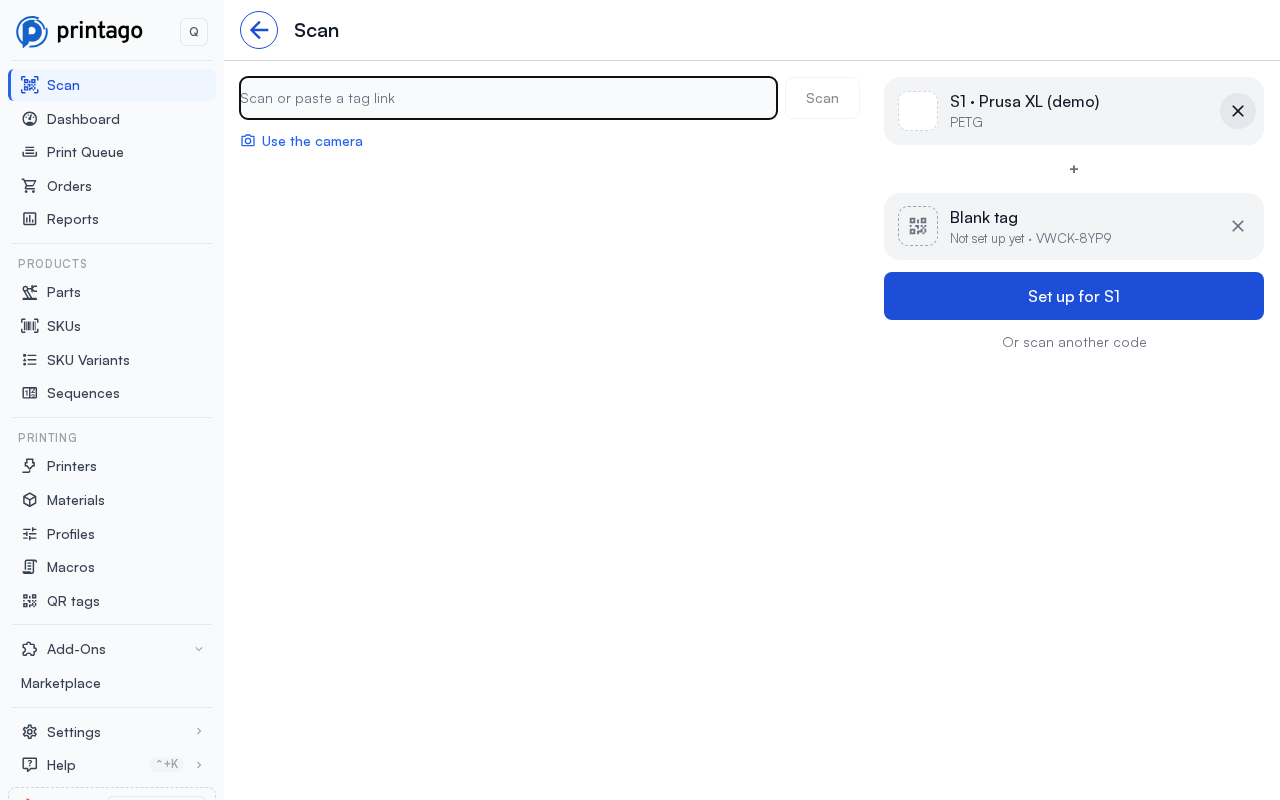
You can scan in any browser too, with no app: on a computer at a packing or spool station, a tablet by the farm, or a phone.
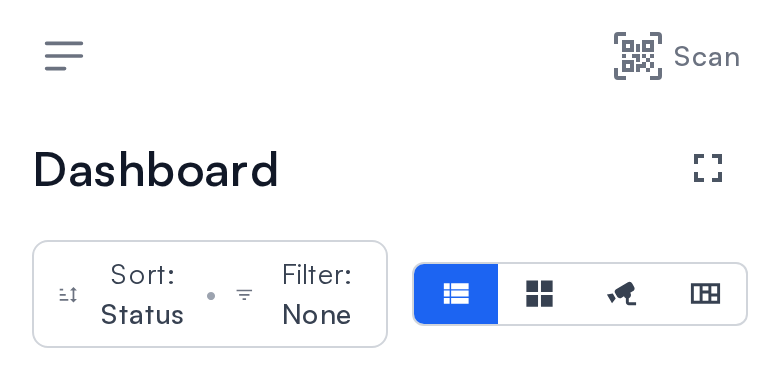
- Open the scan page with Scan, at the top right of every page on a phone, and at the top of the sidebar menu on a larger screen.
- Scan with a USB or Bluetooth barcode scanner. The scan page is ready for one as soon as it opens: the scanner types the tag's link into the box and presses Enter. You can also paste a tag's link, or type its code (such as PTG-…).
- Or use the camera. Choose Use the camera (it starts on its own on phones and tablets) and hold the tag in front of it. The camera keeps reading, so you can scan one tag after another.
The scan page works like the app: it shows what you scanned with the most likely action as the main button and every other action below it, with the reason any of them can't run right now. Scan a second tag that goes with the first, such as a filament and then a slot, or a blank tag and then the printer it's for, and the two show together with what they can do together. Actions that need a choice, such as which slot or how many grams, ask for it first, and destructive ones ask you to confirm. Clear a tag with its X.
Opening a tag's link with a phone's camera opens the scan page with that tag already scanned, ready for its actions, for anyone who can scan. A blank tag's link still opens its setup page, and someone without scan permission still goes straight to the printer, filament or spool.
Printer actions
| Action | What it does | Needs |
|---|---|---|
| Confirm ready | Marks the printer clear so it can take the next job in the queue. | printer.ready |
| Mark not ready | Holds the printer so the queue skips it. | printer.ready |
| Pause | Pauses the current print. | printer.control |
| Resume | Resumes a paused print. | printer.control |
| Stop | Stops the current print. The app asks you to confirm first. | printer.control |
| Home axes | Homes the printer's axes. Not available on Prusa printers. | printer.control |
| Run queue | Matches waiting jobs to ready printers across the whole store. | queue.manage |
| Send job | Lists the next jobs waiting in the queue and sends the one you pick straight to this printer, with the same checks as Send to on the queue page. | queue.manage |
| Run macro | Lists the GCODE macros made for this printer's model and runs the one you pick. | macro.run |
| Maintenance done | Lists the printer's maintenance tasks, the most overdue first, and marks the one you pick done. Shown only with the Maintenance Tracker addon. | maintenance.complete |
| Unload filament | Unloads the filament from the toolhead. Available on printers that can unload by command, such as Bambu Lab printers. | printer.control |
| Clear all slots | Forgets the filament assigned to every slot of the printer. The app asks you to confirm first. | printer.edit |
| Enable | Enables the printer so it takes jobs again. | printer.control |
| Disable | Disables the printer so it takes no new jobs. The app asks you to confirm first. | printer.control |
| Open printer | Opens the printer in the app. | printer.view |
Scanning a slot
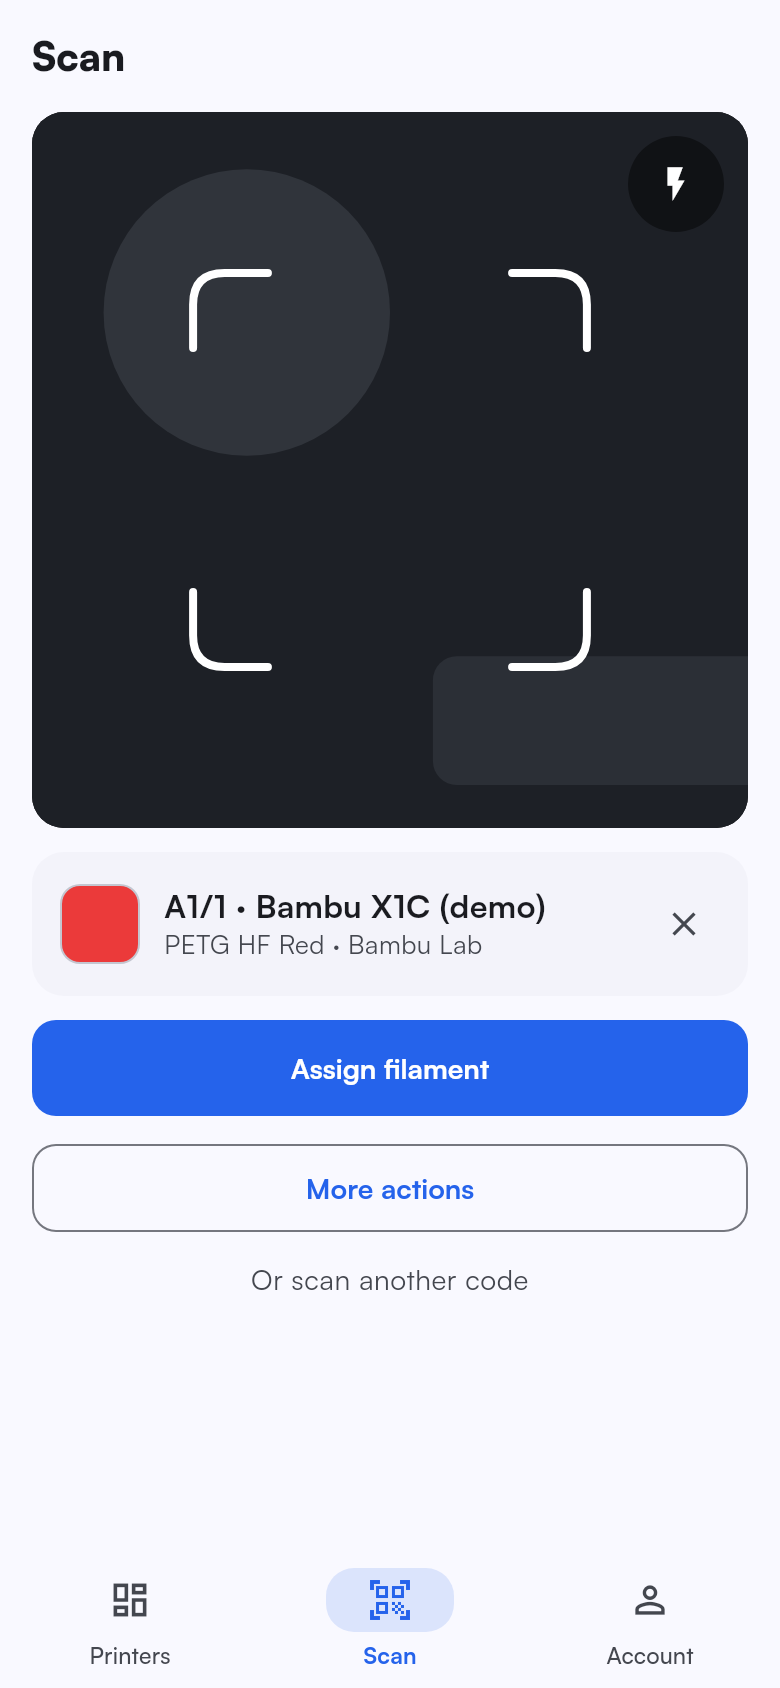
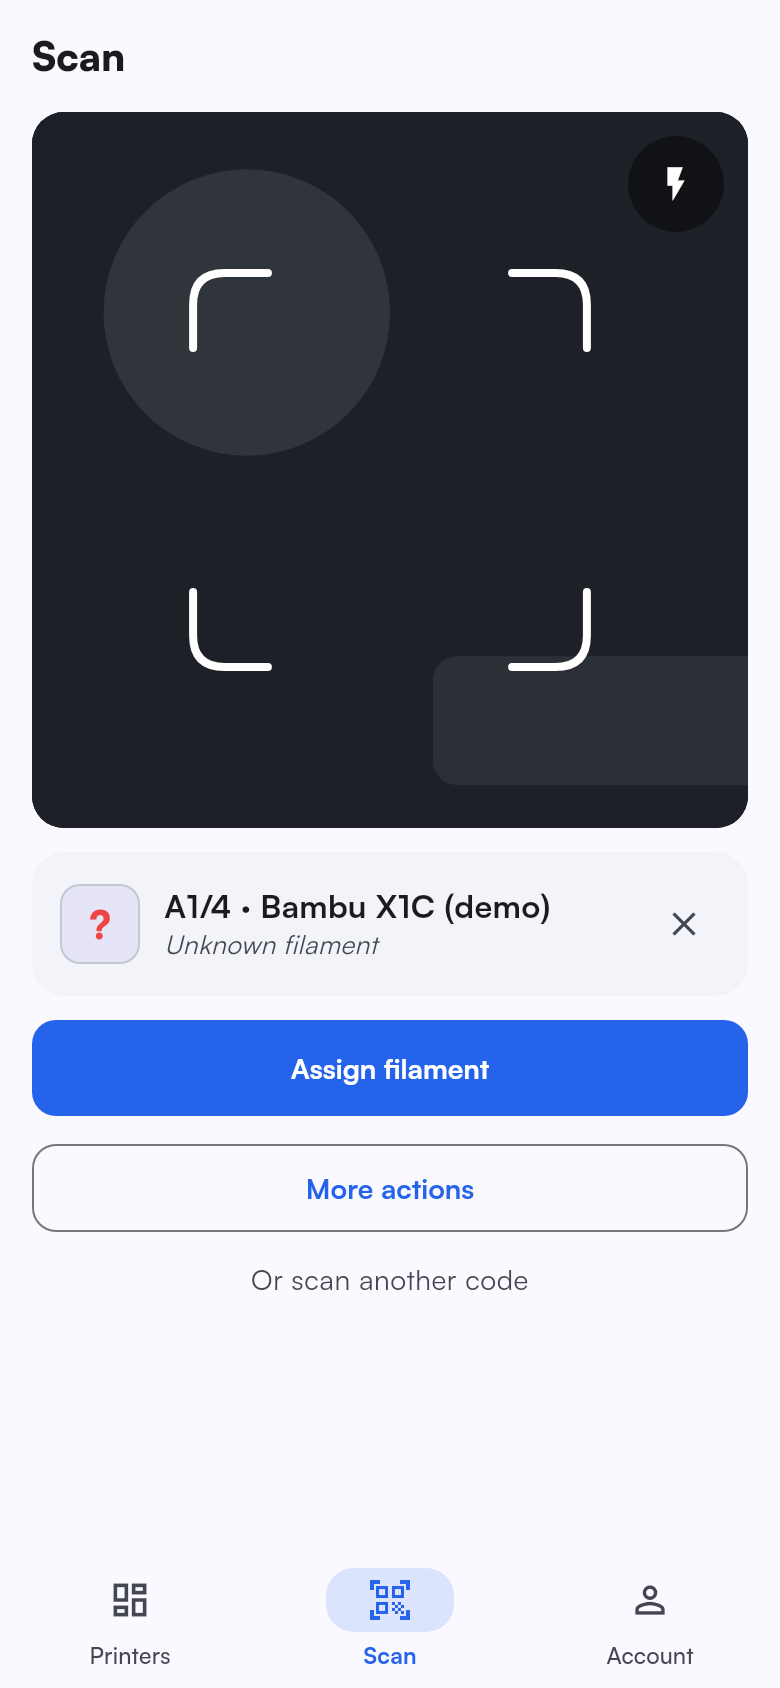
A slot tag shows the slot, its printer, and what is assigned to it: a filament, Empty, or Unknown filament when the printer sees a spool that nothing is assigned to. The main button is Assign filament, which opens your filament list so you can pick what is in the slot.
| Action | What it does | Needs |
|---|---|---|
| Assign filament | Assigns a filament from your materials to the slot. | printer.edit |
| Load filament | Loads the slot's filament into the toolhead, heated for that filament. Available when the printer is idle, the slot has filament assigned and the printer sees the spool, on printers that can load by command. | printer.control |
| Clear slot | Forgets the filament assigned to the slot. | printer.edit |
| Refresh RFID | Asks the printer to read the spool's RFID tag again. Available for AMS slots on printers that read RFID tags. | printer.control |
| Open printer | Opens the slot's printer in the app. | printer.view |
Scanning two tags together
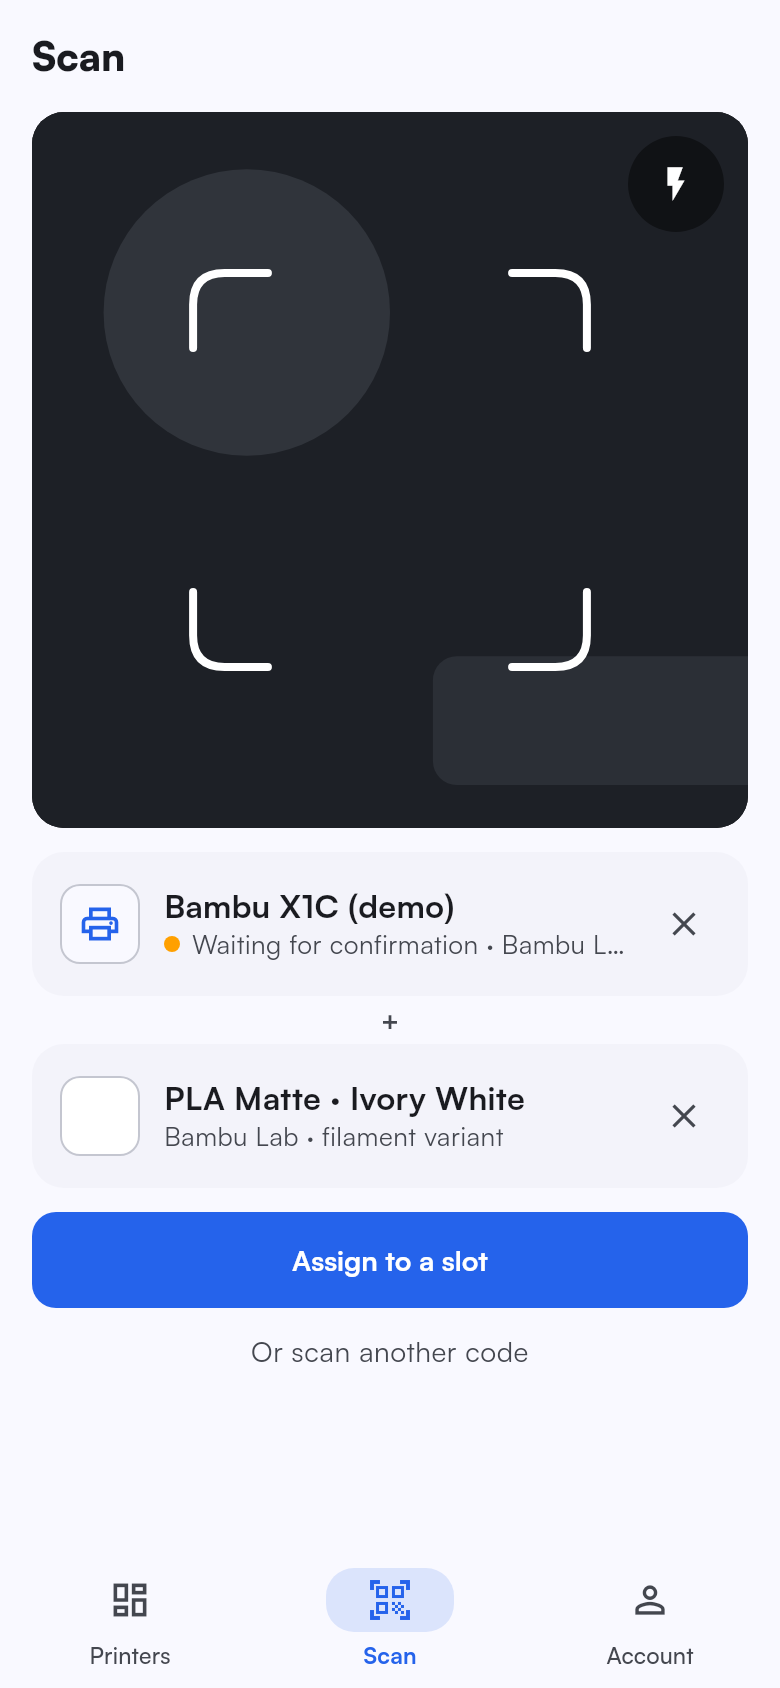
Scan one tag, then the other. You can also hold both in view at once. The two tags show one above the other, and the main button says what will happen.
| You scan | The main button | What happens |
|---|---|---|
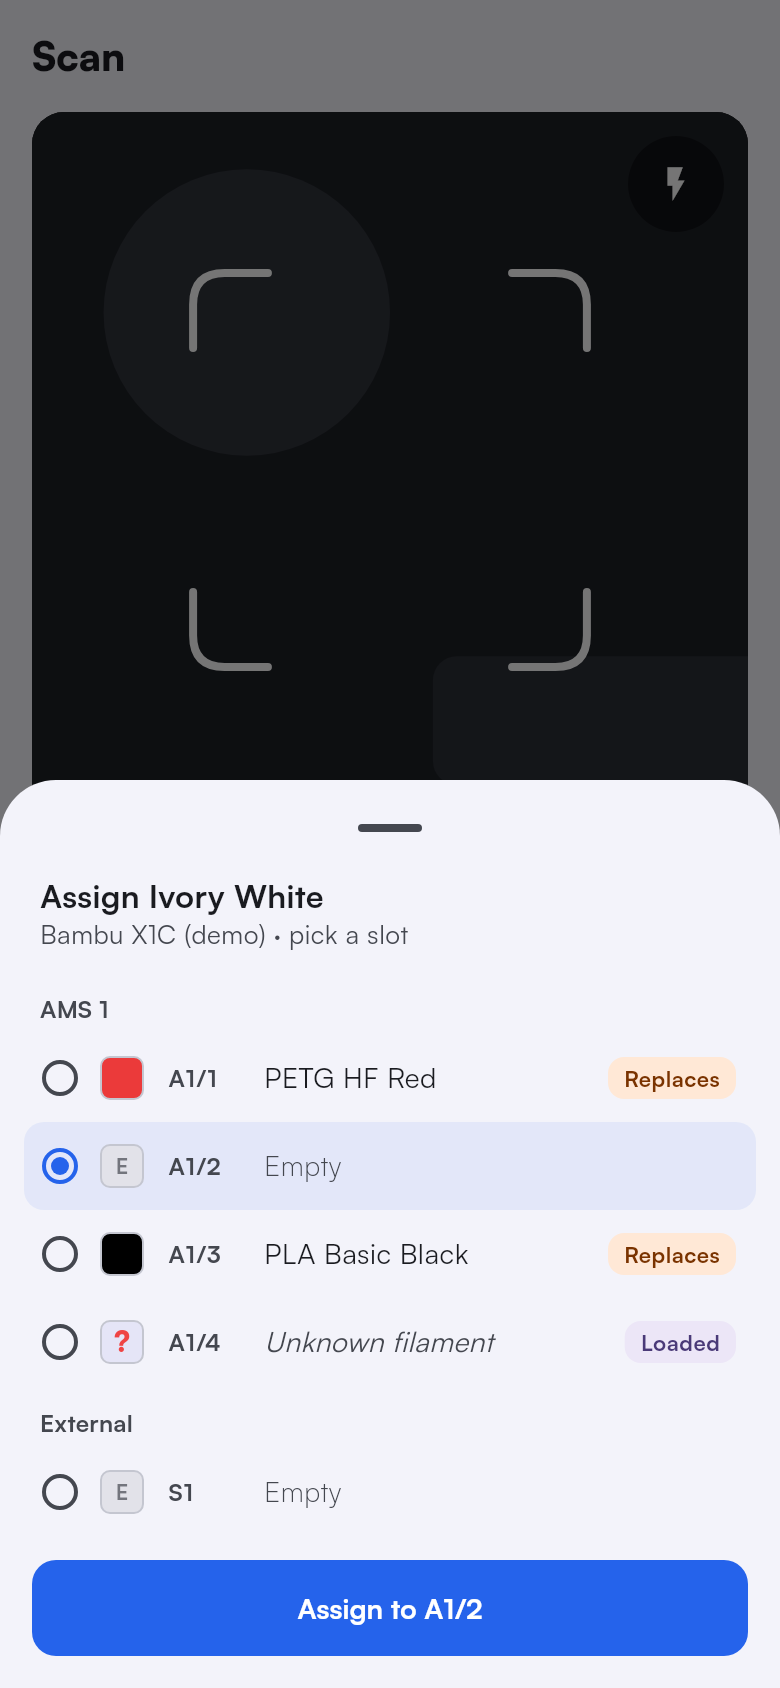
| A filament and a printer | Assign to a slot | Opens the printer's slots, grouped by AMS unit, with the first empty slot picked. Slots that already hold filament say Replaces, and a spool the printer sees but nothing is assigned to says Loaded. Tap Assign to to confirm. |
| A filament and a slot | Assign to A1/3 | Assigns the filament to that slot. |
| A filament on its own | Assign to a printer | Pick the printer, then the slot. |
| Two slots, one with filament | Move PLA Basic Red to A2/1 | Assigns the filament to the empty slot and clears the other one. |
| Two slots, both with filament | Swap A1/3 and S1 | Exchanges the two slots' filament. The app asks you to confirm first. |
Moving and swapping work between two printers too. Both slots change together: if anything goes wrong, neither slot changes. Assigning, moving and swapping need printer.edit.
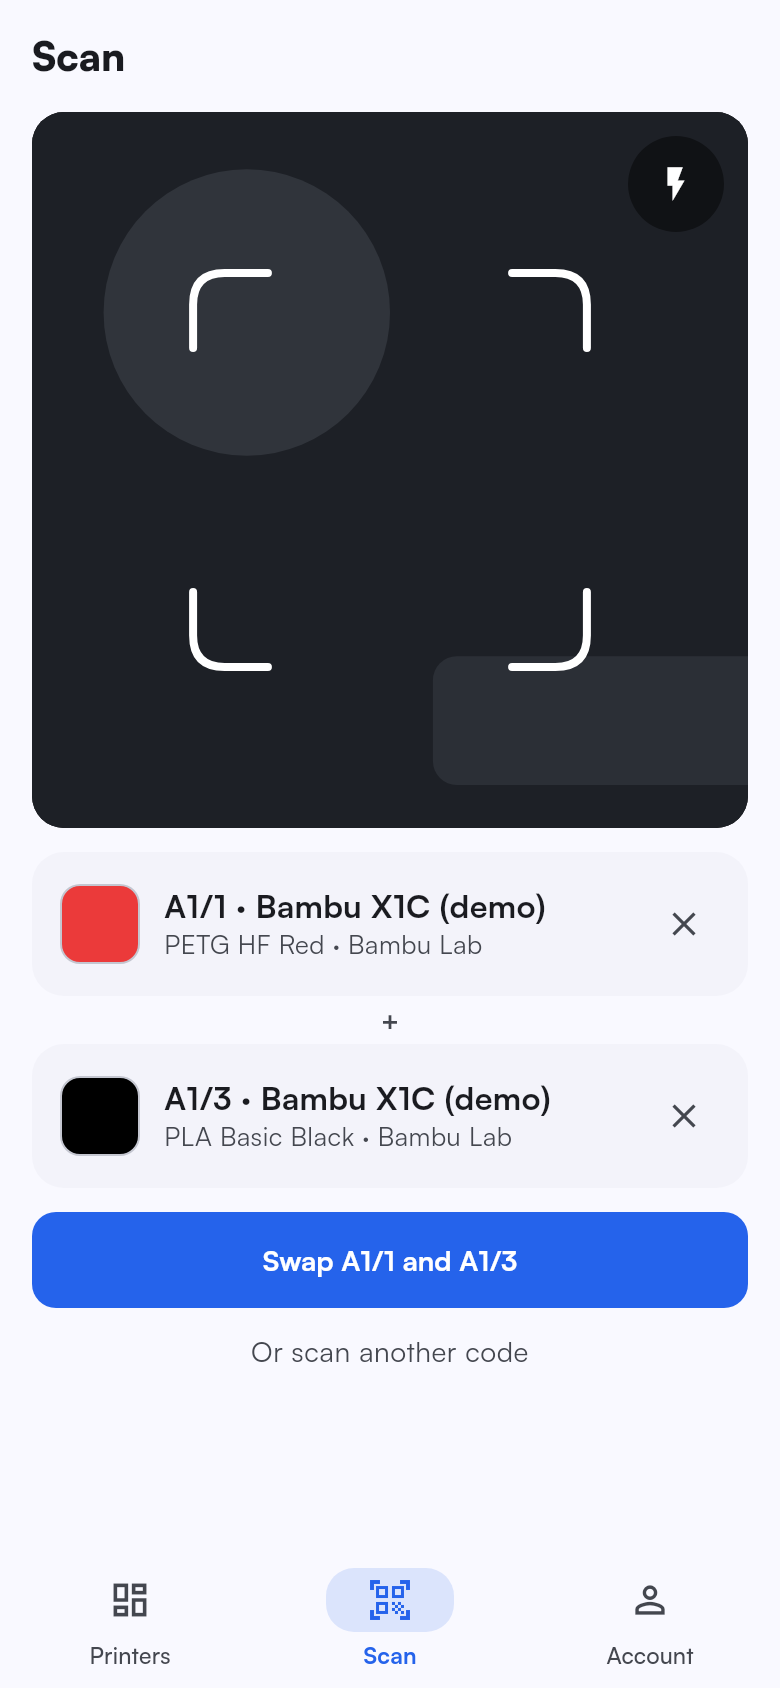
Some tags have nothing to do together. The app shows one message instead:
| You scan | The app says |
|---|---|
| Two printers | Two printers scanned. Scan one printer at a time. |
| Two filaments | Two filaments scanned. Scan a filament with a printer or a slot to assign it. |
| A printer and one of its own slots | That slot is on this printer. Scan the slot on its own to see what it can do. |
| A printer and a slot on another printer | Scan a slot on its own, or with another slot to move filament between them. |
| Two slots with nothing assigned | Both slots are empty. Assign filament to one of them first. |
| Two spools | Two spools scanned. Scan a spool with a printer or a slot to load it. |
| A spool and a filament | A spool and a filament have nothing to do together. To register a new spool, scan the filament with a blank tag. |
| Two blank tags | Two blank tags scanned. Scan a blank tag with the printer, slot, filament or spool it's for. |
When you scan two tags one after the other and they have nothing to do together, the second tag simply replaces the first. Two spools, two blank tags, and a spool with a filament show their message instead.
When audit logging is on, every action is recorded with Mobile scan as its source and the person who scanned.
If your phone loses its connection while an action is being sent, the app tries again for you. The printer only ever receives the action once.
Setting up a blank tag
Scan a blank tag together with what it is for. The app shows the blank as Blank tag, Not set up yet with its code, and the main button says what it becomes:
| You scan a blank with | The main button | What happens |
|---|---|---|
| A filament | Register spool | Registers a new spool of that filament, with its weight, and sets the blank up as the spool's tag. See Registering a spool. Set up as a filament tag is under More actions, for a shelf tag instead. |
| A printer | Set up for Farm P1S 04 | The blank becomes that printer's tag. |
| A slot | Set up for A1/3 | The blank becomes that slot's tag. |
| A spool | Set up for this spool | The blank becomes another tag for the spool, for example one for the box and one for the spool. A spool with no label printed yet takes the blank's code, so the spool matches the sticker. |
A blank tag scanned on its own shows Scan what this tag is for.
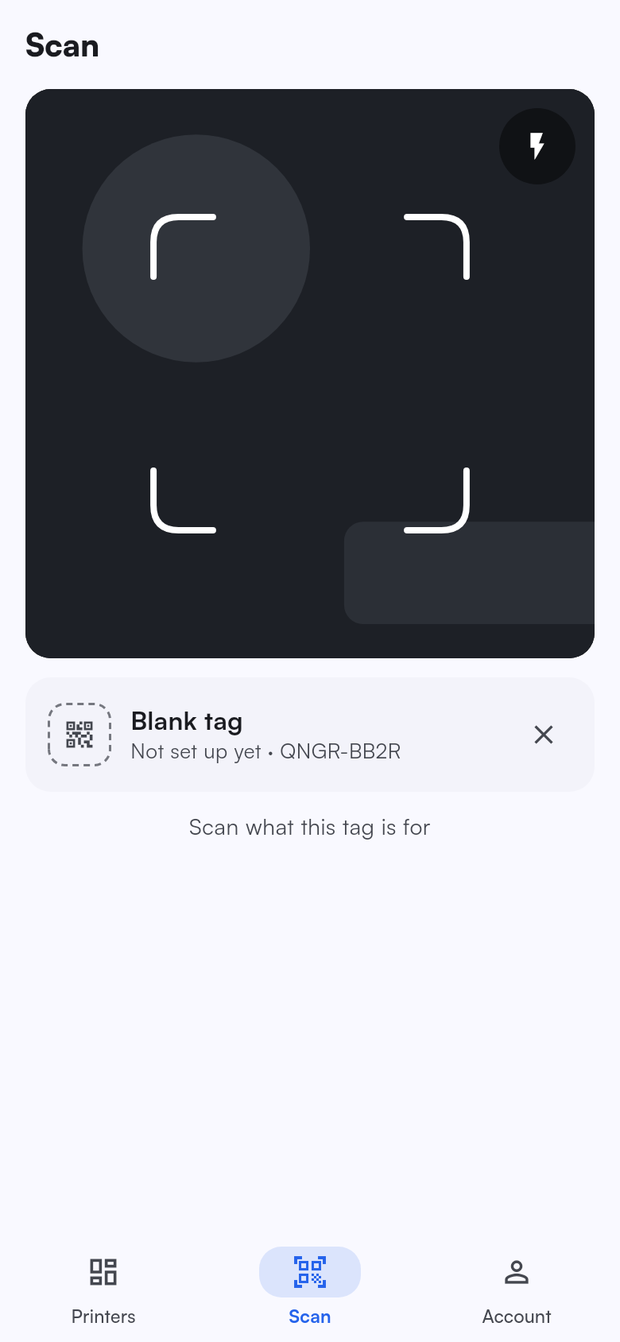
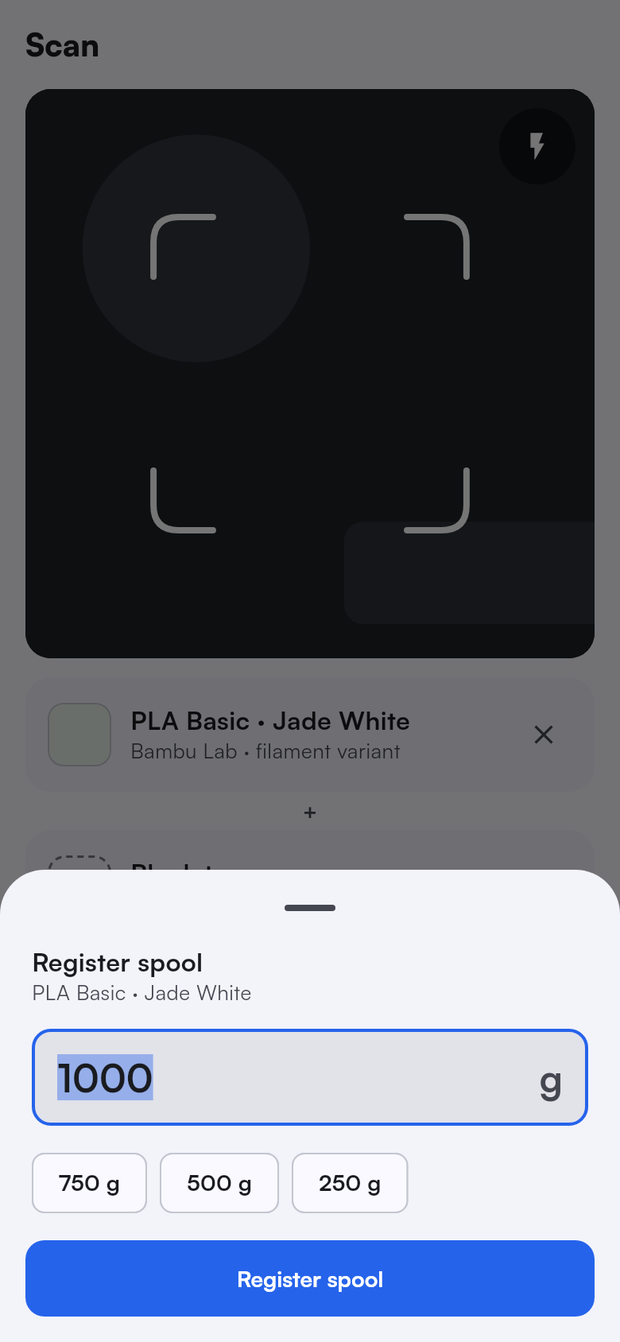
Once it is set up, scanning it works exactly like any other tag for that printer, slot, filament or spool.
If two people scan the same blank at the same moment, the first one sets it up and the other sees "This tag was set up a moment ago. Scan it again to see what it's for." Nothing is created twice. Setting up a blank tag needs qr.manage.
With your phone's camera
A blank tag's QR code is a link, so any phone can set it up. Point the camera at the tag and open the link:
-
With the Printago app installed, the link opens the app's Scan tab with the blank already scanned. Scan what it's for to finish.
-
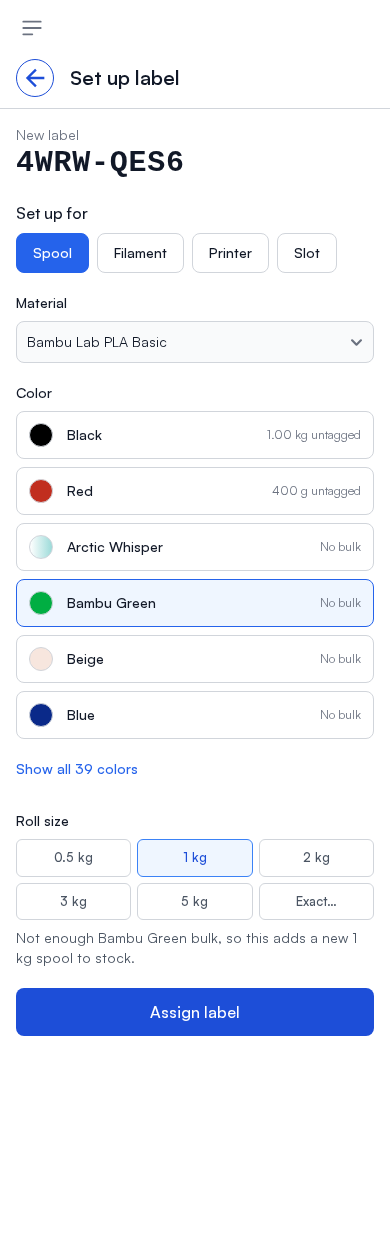
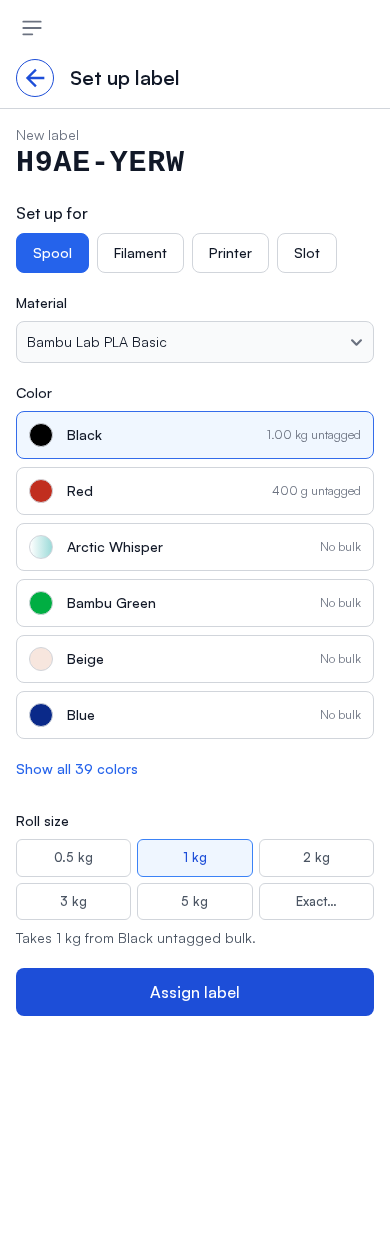
Without the app, it opens the tag's page on Printago on the web, laid out for a phone (sign in if asked, and the page comes back to the tag). It shows the label's code and opens on Spool:
- Pick the Material.
- Pick the Color. Each color shows its untagged bulk, such as 1.38 kg untagged or No bulk.
- Pick the Roll size.
- Tap Assign label. Printago makes the spool, records it in the color's activity, sets the label up as the spool's tag, and opens the spool's page.
Above Assign label the page says where the spool comes from: Takes 1 kg from Black untagged bulk when the color's bulk covers the roll, or Not enough Black bulk, so this adds a new 1 kg spool to stock when it doesn't. A spool never takes part of a roll from bulk. Choose Filament, Printer or Slot under Set up for to set the label up for one of those instead.
Once a blank is set up, its link opens the scan page with the tag already scanned. For someone who can't scan, it opens what it's for instead: the printer's page for a printer or slot tag, the filament's page for a filament tag, or the spool's own page for a spool tag (the spool's material page without spool tracking). A revoked or unknown tag says so instead.
Spools that arrive with a code
Some spools come with a QR code printed on them whose link carries what the spool is: M for the material (such as PLA), C for its color as a hex value, and G for its weight in grams (see the link format). When you set one up as a spool, Printago fills those in for you:
- The material and color, when exactly one of your colors matches both. When none or several match, you pick.
- The roll size, from
G, on the web and in the app's weight sheet.
What the label says only fills in the form. It never changes one of your materials or colors.
Spools
A spool tag stands for one physical spool of filament, so Printago can tell you how much is left on it and which slot it is in. See Spools for how spools fit with your materials.
Registering a spool
- Stick a blank tag on the new spool.
- Scan the filament's tag (on its shelf or bin), then the blank. Either order works.
- The weight sheet opens by itself, with the keypad up and the store's new spool weight filled in (1000 g unless you change it). Type what the spool holds, or tap 750 g, 500 g or 250 g, and tap Register spool.
The app shows the new spool. Registering needs material.instance.create and qr.manage.
A filament tag scanned on its own also has Register spool under More actions, for a spool you don't label.
With spool tracking, a registered spool's weight comes out of that filament's bulk stock when bulk holds all of it, and the app says "taken from bulk stock". Otherwise the spool is added as new stock, and the app says "added as new stock". Either way the filament's activity records it.
Scanning a spool
A spool shows its filament, how much is left and where it is: "PLA Basic · Jade White", "820 g · in A1/3 Farm P1S 04". The main button is Update grams.
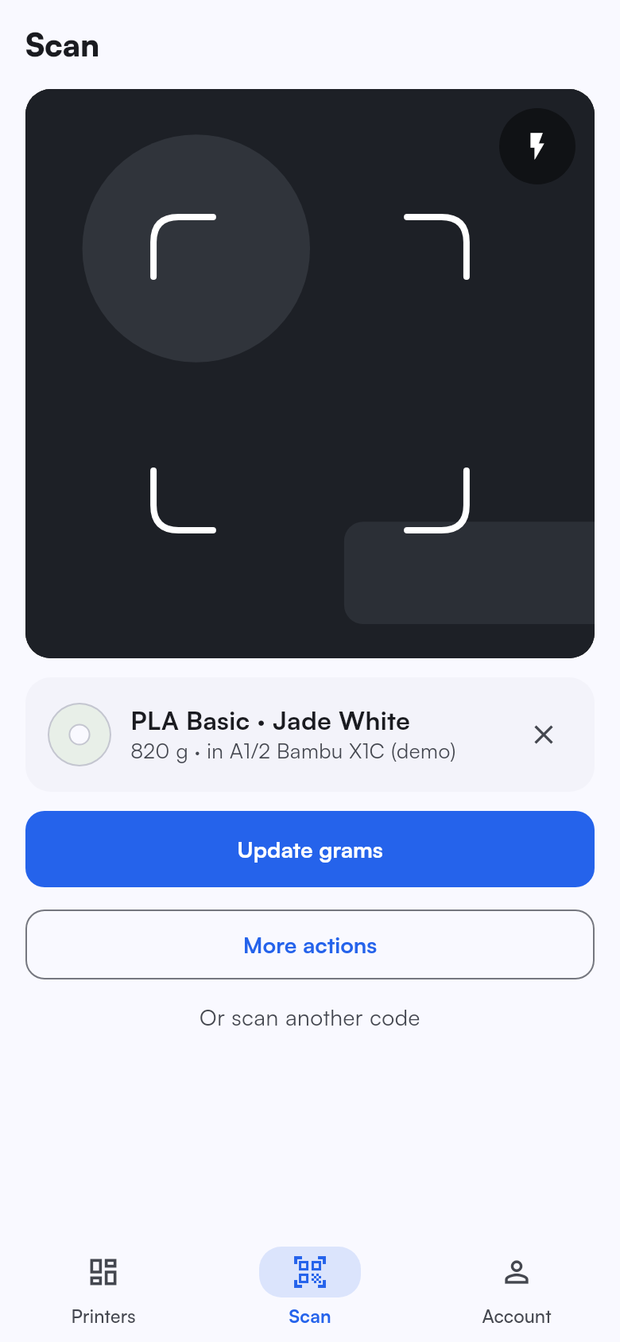
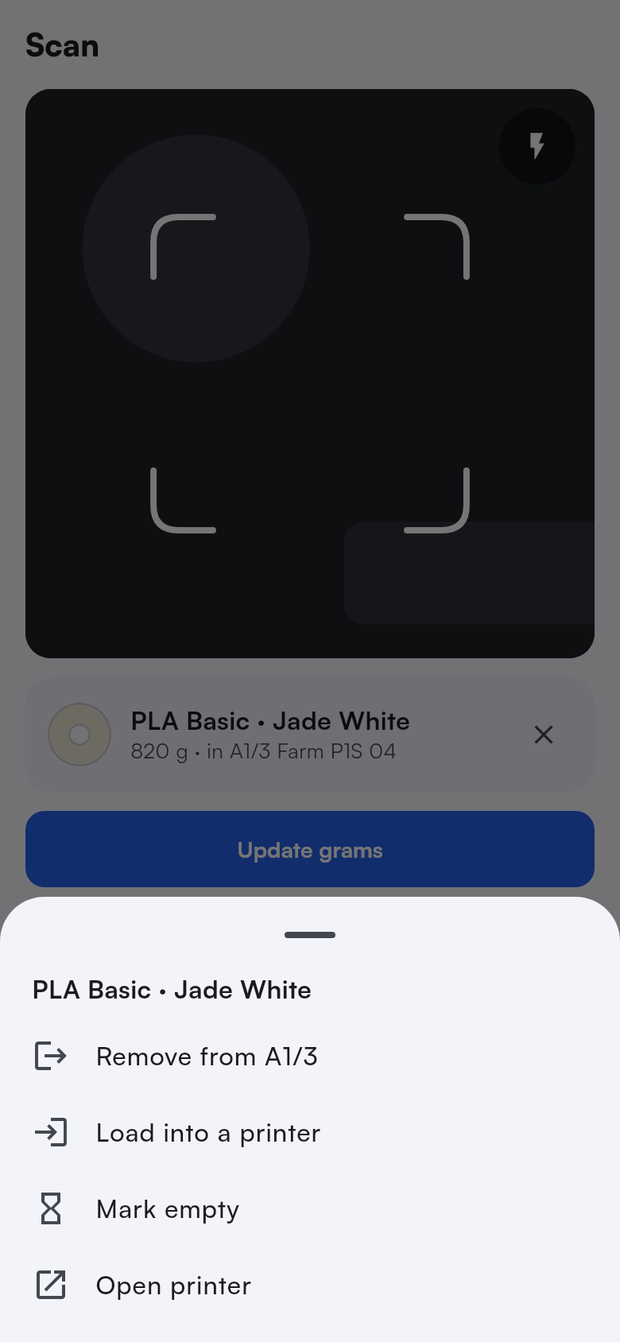
| Action | What it does | Needs |
|---|---|---|
| Update grams | Opens the weight sheet with the spool's weight filled in. Type what is left after weighing it. The filament's activity records the change. | material.instance.edit |
| Remove from A1/3 | Takes the spool out of its slot. The slot keeps the filament's color, the same as Unlink roll on the web. Shown while the spool is in a slot. | printer.edit |
| Load into a printer | Pick a printer, then a slot. | printer.edit |
| Mark empty | Finishes the spool as used up, the same as Mark used up on the web: what was left is written off, and the spool comes out of its slot while the slot keeps the spool's filament assigned. The app asks you to confirm first. | material.instance.edit, and printer.edit when it is in a slot |
| Open printer | Opens the printer the spool is in. | printer.view |
An empty spool can still be weighed again, but it can't be loaded. A finished spool (used up, or archived on the web) shows as Used up or Archived and offers nothing until it is restored on the web.
Loading and moving spools
| You scan | The main button | What happens |
|---|---|---|
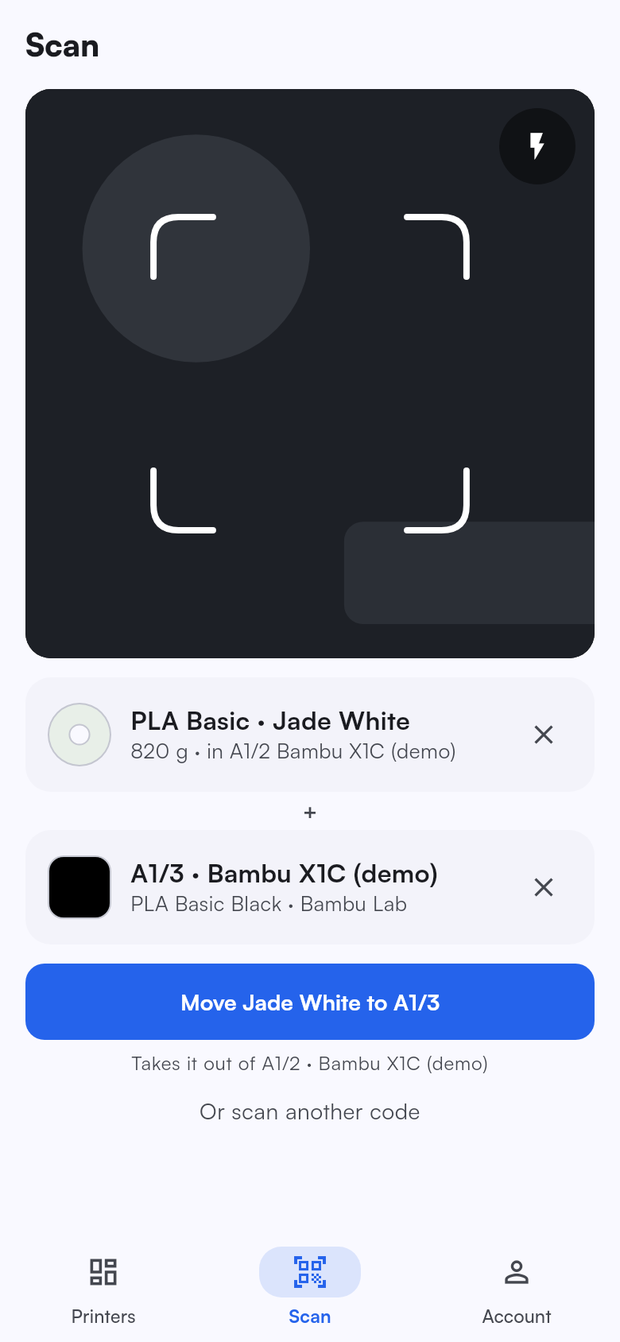
| A spool and a slot | Load into A2/1 | Loads the spool into that slot, without asking which. |
| A spool that is in another slot, and a slot | Move Jade White to A2/1 | The line under the button names the slot it leaves: "Takes it out of A1/3 · Farm P1S 04". The spool is loaded into the new slot and the old slot is cleared in the same step. |
| A spool and the slot it is already in | "Jade White is already in A2/1 on Farm P1S 04." Nothing changes. | |
| A spool and a printer with one slot | Load into S1 | Loads it straight away. |
| A spool and a printer with several slots | Load into a slot | Opens the printer's slots, grouped by AMS unit, with Replaces and Loaded marks and the spool's own slot marked Here. Which slot is picked is up to the Pre-selected slot setting. |
A spool is in one slot at a time: loading it anywhere takes it out of the slot it was in, unless you switched off moving spools between slots. Loading sends the filament to the printer, the same as assigning a filament.
When the printer later reports the filament in that slot, the spool stays loaded as long as the printer reports the same filament. If it reports a different filament, the spool is taken out of the slot and the slot shows what the printer reports.
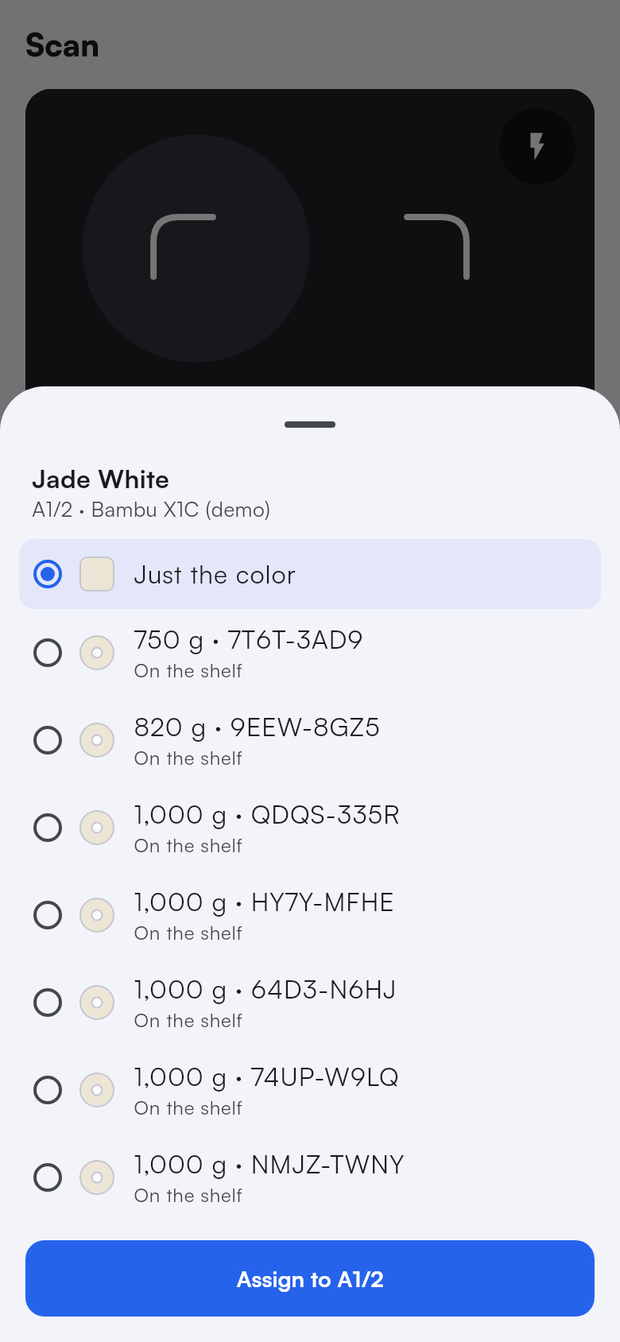
Assign filament on a slot also lists spools: after you pick a filament, if you have spools of it, the app asks which one is in the slot, or Just the color. A spool already in that slot isn't listed.
Settings
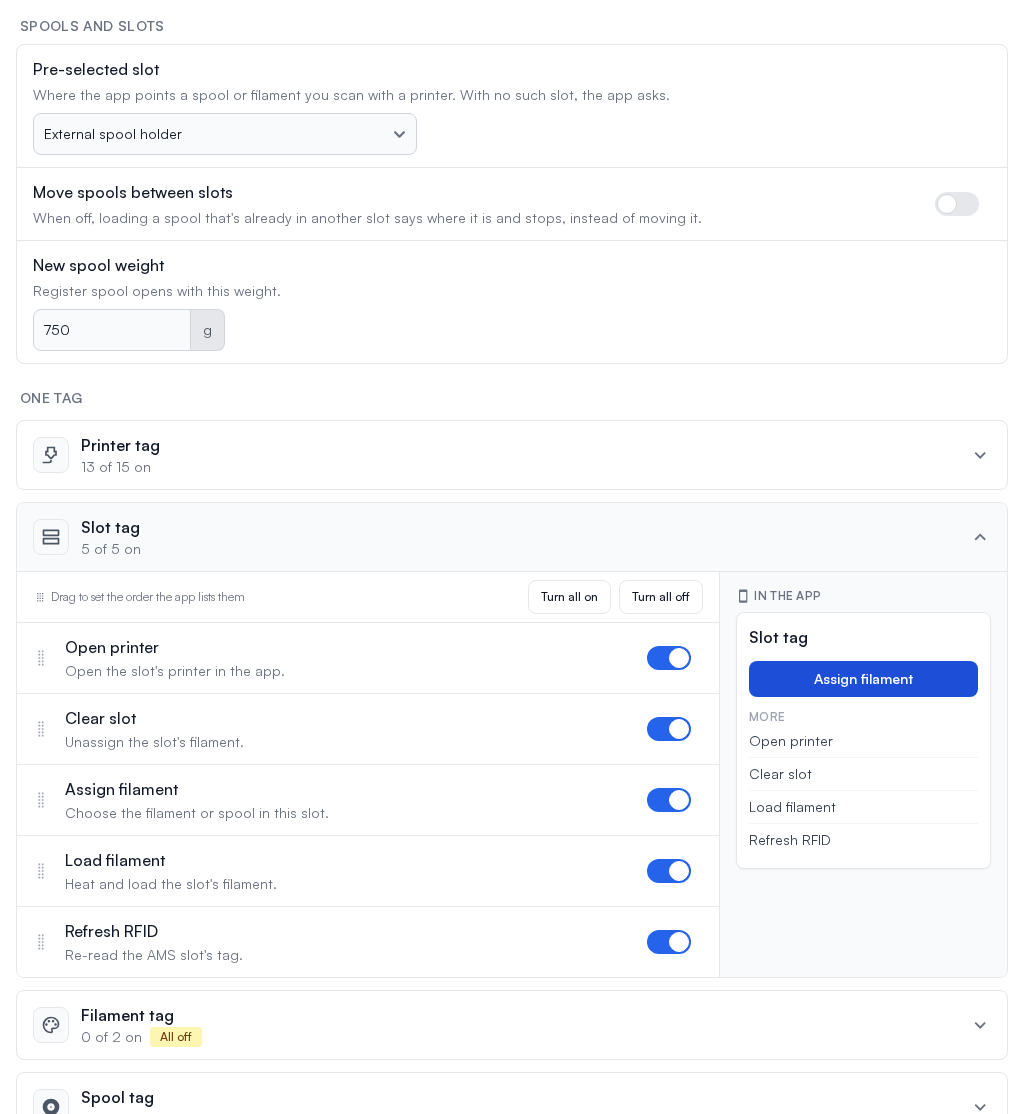
Owners and admins choose which actions a scan offers and what the app starts with, in Settings > General tab > QR workflows. The row only shows once the add-on is on. Changing these settings needs settings.edit. Click Save to apply them: the next scan in the app uses them, and anyone else with the page open sees the change without reloading.
Spools and slots
- Pre-selected slot is the slot the app picks when you scan a spool or a filament with a printer, or a spool or filament on its own and pick a printer. Always ask picks nothing, so you choose every time. External spool holder picks the printer's external holder. First empty slot (the default) picks the first slot with nothing assigned and no spool in it. For a spool, it first picks a slot where the printer sees a spool that nothing is assigned to, since that is most likely the one you just put in. When no slot fits, for example every slot is taken, the app asks. You can always pick another slot in the sheet.
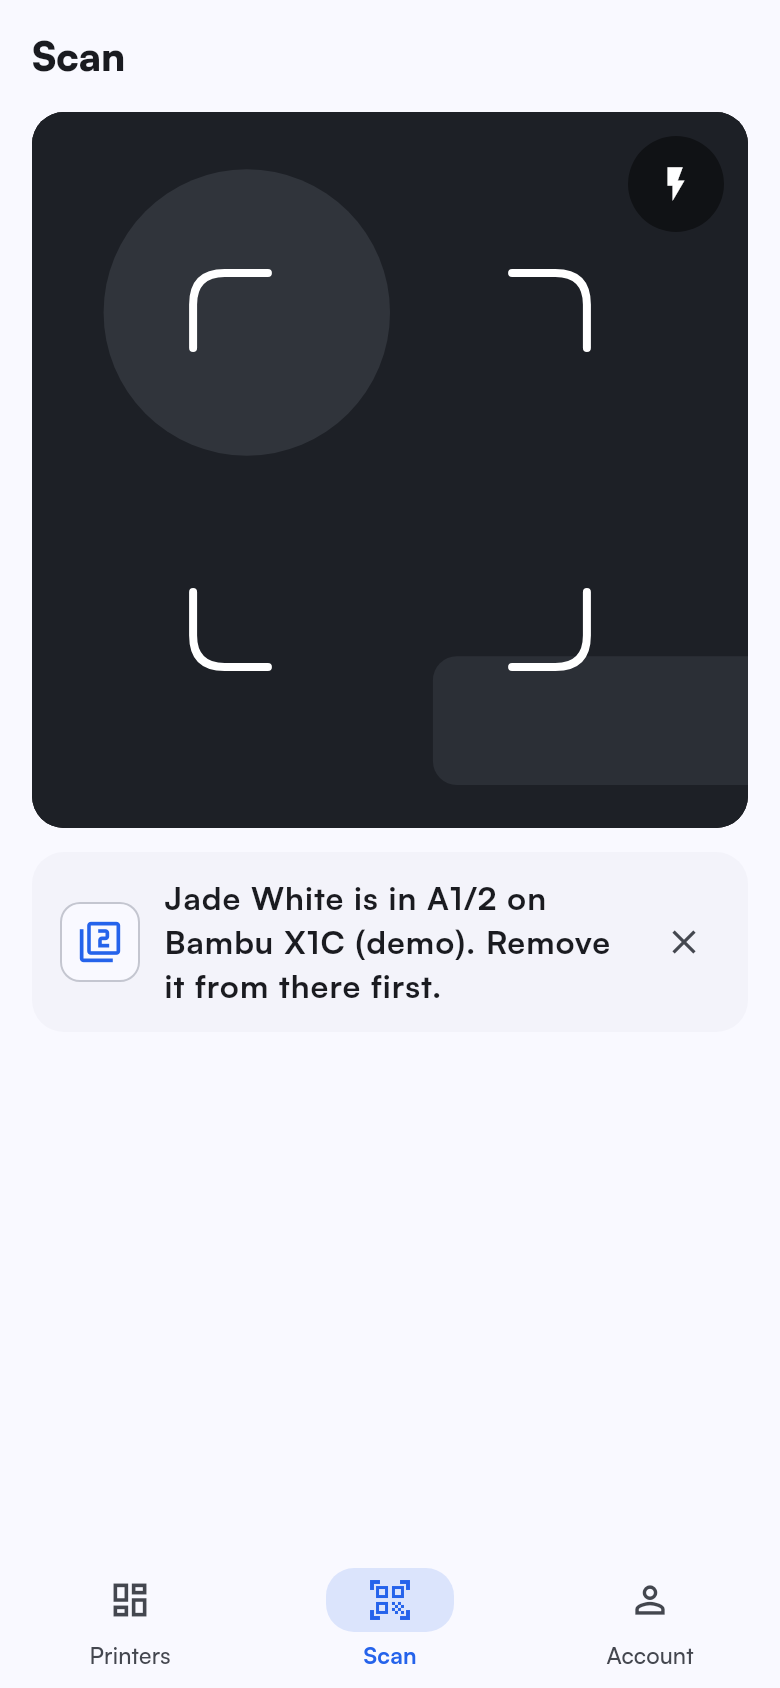
- Move spools between slots is on by default. Turn it off so a spool already in a slot is never moved by a scan: scanning it with another slot or printer says where it is, "Jade White is in A1/2 on Farm P1S 04. Remove it from there first.", and loads nothing. Assign filament on a slot then only lists spools that aren't in another slot. Take the spool out first with Remove from A1/2.
- New spool weight is the weight Register spool opens with, from 1 to 50,000 g.
Actions
Each tag and each pair of tags has a card listing its actions, with how many are on and, for Blank + Filament, which one is the main button. Open a card to:
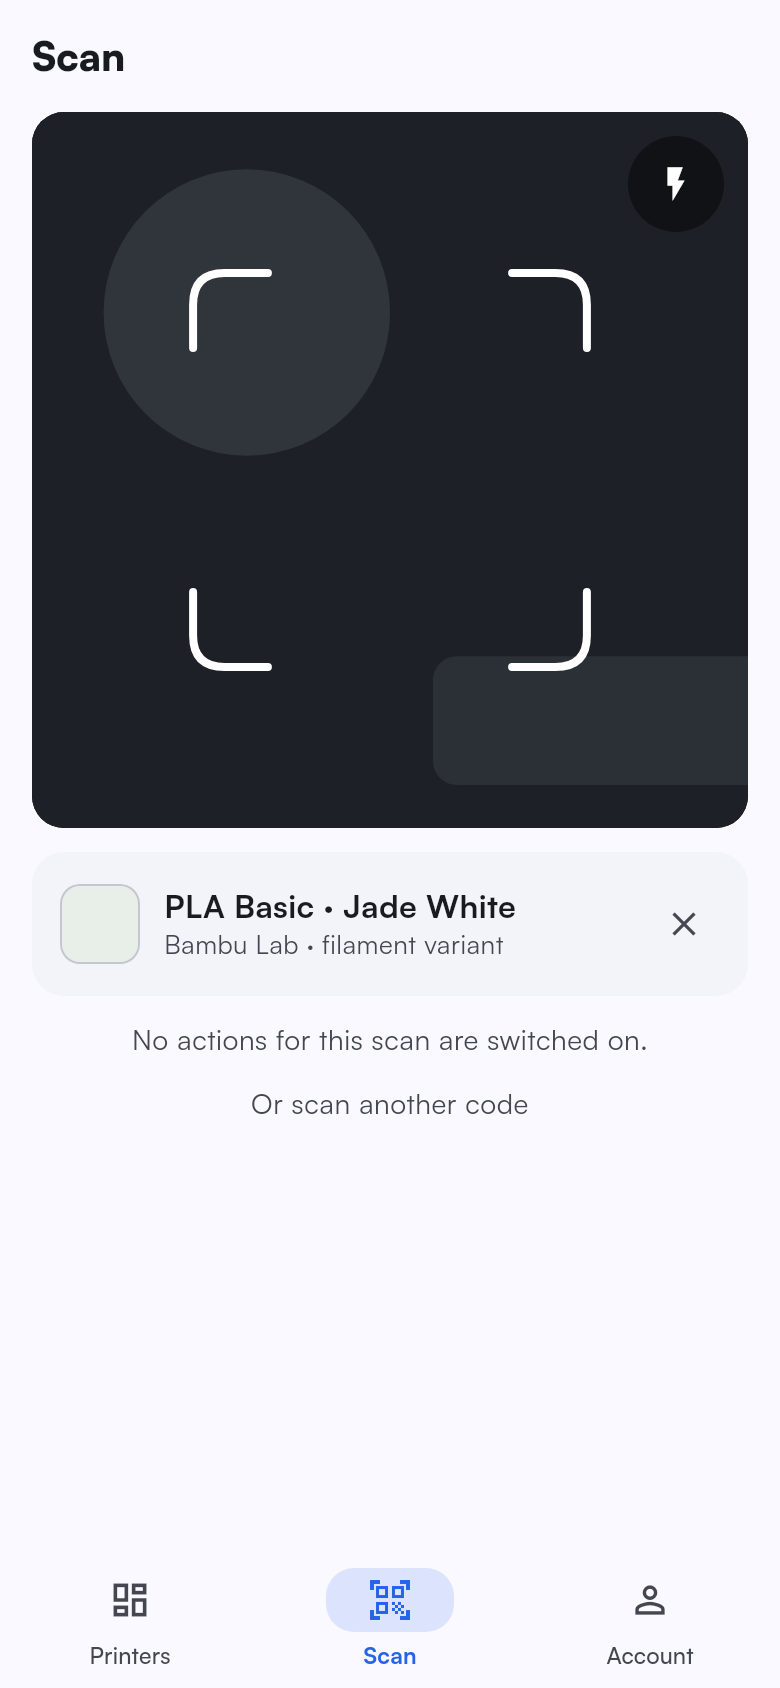
- Switch actions off. A switched-off action is gone from the app on the next scan, including as the main button, and Printago refuses it even if someone taps it on a scan from before you saved. Turn all off leaves the scan with nothing to offer, and the app says "No actions for this scan are switched on." A blank tag's page on the web offers the same actions, and leaves out Printer, Slot, Filament or Spool when every action of that pair is off.
- Set the order the app lists them in under More actions by dragging each row by its handle. With a keyboard, focus the handle, press Enter, move it with the arrow keys and press Enter again. The order never changes the main button.
- Pick the main button for Blank + Filament with Make main. Every other pair offers one action at a time, so it has no choice to make: Slot + Slot shows Move when one slot holds filament and Swap when both do. The printer tag's main button follows the printer, as described in Scanning in the app.
Stop, Clear all slots and Disable are marked Destructive. They are never the main button, and the app asks before running them.
Next to the list, In the app shows the main button and the More actions list as they will look after you save, for example for an idle printer, or for Slot + Slot when one slot holds filament. It can't know a printer's live state, so a real scan can grey out actions that can't run right now. On a phone the page shows only the lists.
Permissions
| Permission | What it allows |
|---|---|
qr.scan | Scanning tags in the app. Each action also needs its own permission, listed above. |
qr.manage | Viewing, printing, unbinding and revoking tags, including slot, filament, spool and blank tags, and setting up blank tags in the app or on the web. |
Admins and Operators have both. Students have qr.scan. See Roles & Permissions.